Pass › Pass Admin Guide
Enabling the Kiosk Module
Kiosk location availability
No. You cannot limit which destination locations are available on an individual Kiosk. All eligible kiosk destinations are shown. Limit Location Availability restricts destinations for selected students—not for a Kiosk or departure location.
If you are searching for how to limit locations on a kiosk, configure kiosk destinations, or restrict kiosk locations, per-Kiosk destination restrictions are not supported.
Enabling the Kiosk module will allow students to create passes from a single device in situations where they might not have access to their own device.
Who can create a Kiosk (admins vs. teachers/staff)
An admin cannot set up a Kiosk for another adult, and an admin does not manage another adult's active Kiosks. A Kiosk belongs to the adult who creates it.
- A Kiosk is created by the adult who will use it, from their own Pass account (Kiosk → + Kiosk). While creating it, that adult selects either Me (their own name) or a location they are associated with. There is no option to select a different adult, so a Kiosk cannot be created on someone else's behalf.
- Each adult's active Kiosks appear on their own Dashboard Kiosk tile, and the session is managed from that adult's Kiosk screen — the three dots there Send the code, Regenerate a new code, or End the Kiosk.
- An admin's control over Kiosks is school-wide, not per adult: toggling the module On/Off, the student passcode and input-method settings, the Default Domain, and Disable the ability to direct launch a kiosk (see #1-#6 below).
- To review Kiosk activity as an admin, use Summary Reports and view by Pass Type Kiosk Pass (KSK). That reports on the passes students created at Kiosks; it does not list other adults' Kiosk sessions.
If a teacher needs a Kiosk, the teacher sets it up themselves — see Pass Teacher/Staff Guide → Kiosk → Setting up a Kiosk.
To activate the Kiosk functionality in your school, slide the Kiosk toggle to the right, and your Kiosk options will be displayed.
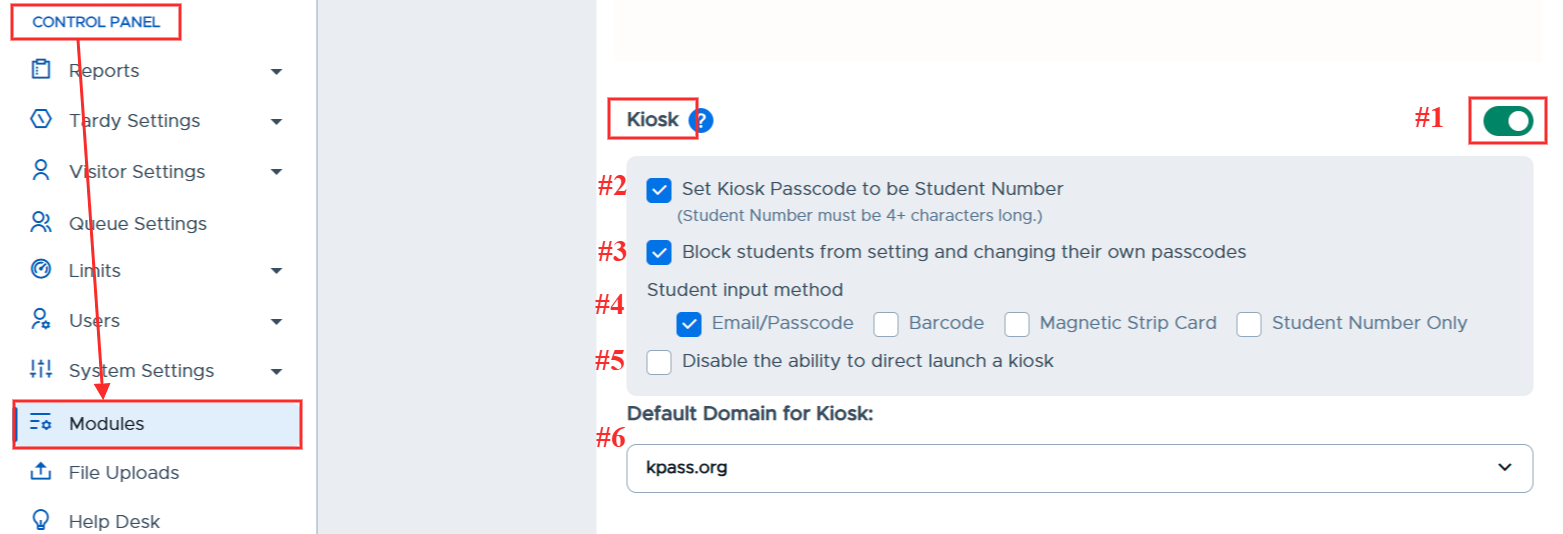
#1 Toggle Kiosk Mode “On” or “Off”.
#2 Set Kiosk Passcode to be Student Number - Automatically assigns the Student ID Number in Pass as the student’s passcode.
If this box is not selected, you will need to manually assign Kiosk Passcodes on the Main Users page.
#3 Block students from setting and changing their own passcodes - Prevents students from accessing and editing their own passcode.
#4 Student Input Methods - Check the box to choose your default kiosk input method. All options will be available to students when creating passes using a kiosk.
- Email/Passcode - Students will enter the first part of their email address and their assigned Kiosk Passcode.
- Barcode - Students will scan a barcode or QR code using the device or external camera. The barcode/QR code must include the Student Number that appears in Pass.
- Magnetic Strip Card - Students will swipe their ID cards using an external Magnetic Strip Reader. The magnetic strip must include the Student Number that appears in Pass.
- Student Number Only - Students will type in their Student Number, as it appears in Pass.
#5 Disable the ability to direct launch a kiosk - Removes the “Launch” button from the adults’ Kiosk screens. Adults will need to use the following URL: https://pass.securly.com/kiosk/login and then enter the Code from the Kiosk page (i.e.- p42rgh2v) to launch the Kiosk. Please see the Pass Teacher/Staff Guide →Kiosk for additional details.
#6 Default Domain for Kiosk - If you have multiple email domains, choose the student domain as your default for Kiosks.
There are four ways of managing Student Passcode:
- Student Passcode Management via Student Profile Settings
- CSV File Import of Student Passcodes
- Barcode or Magnetic Strip Scanning
- Student ID Number as Kiosk Passcode