Pass › Pass Admin Guide
Capturing Tardy Infractions
Schools have several options for inputting Late to School (LTS) and Late to Class (LTC) instances into the Pass system.
Option #1 - CSV Upload
Option #2 - Teacher Pass (TCH)
Option #3 - Kiosk
Option #4 - Student Late Pass (SLP)
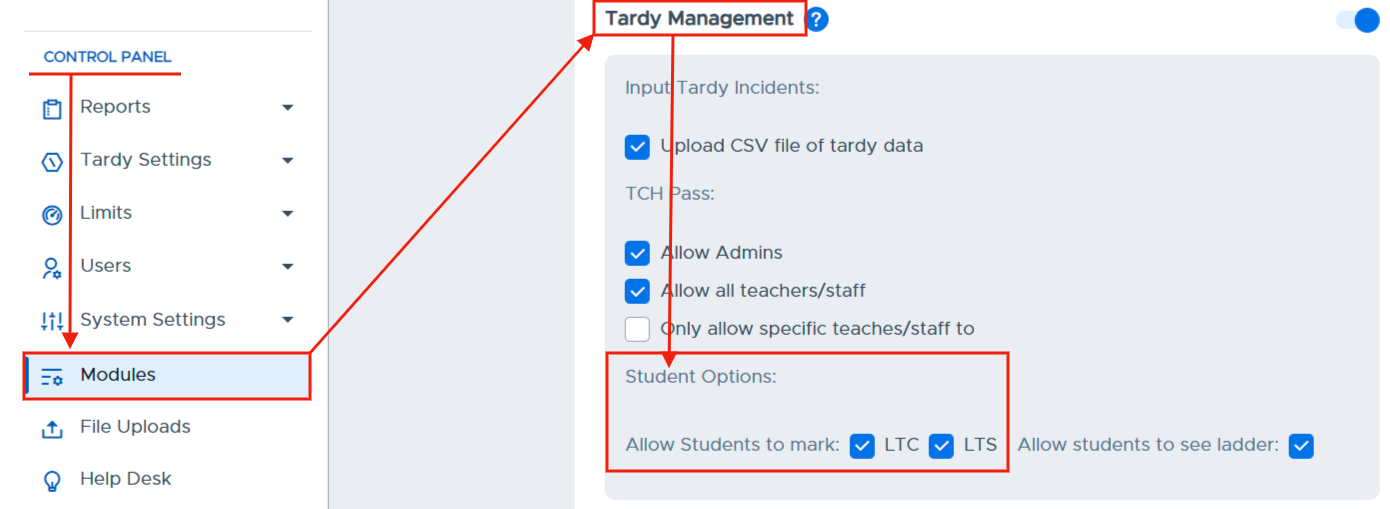
In the Control Panel, click on Modules. Make sure Tardy Management is toggled to the “On” position. You will have several options to input Late to School (LTS) and/or Late to Class (LTC) infractions into Pass. You can choose one or a combination of the following options.
Option #1 - CSV Upload
For LTC or LTS infractions, schools can upload that information via a CSV file directly into Pass. (Sample LTC/LTS files can be found in the system.)
Option #2 - Teacher Pass
The school can allow the Teacher Pass (TCH) to have two checkboxes that allow an Admin to designate the TCH pass as a LTS or LTC pass.
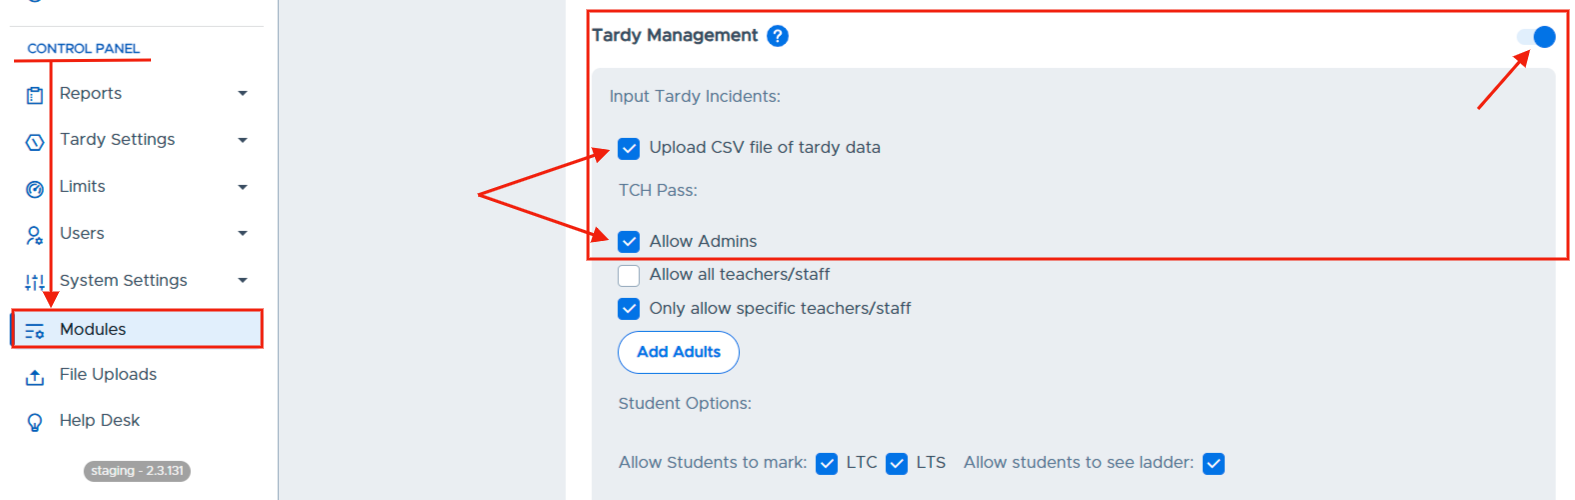
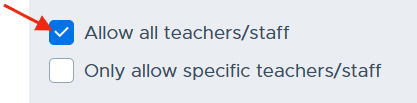
The school can further decide to (1) allow All Adults to see the LTS or LTC buttons on a TCH pass and to access Tardy Reports and Tardy Detentions & Appointment List, OR (2) allow only specific teachers/staff (in addition to Admins) to see the LTS or LTC buttons on a TCH pass and to access Tardy Reports and Tardy Detention & Appointment List.
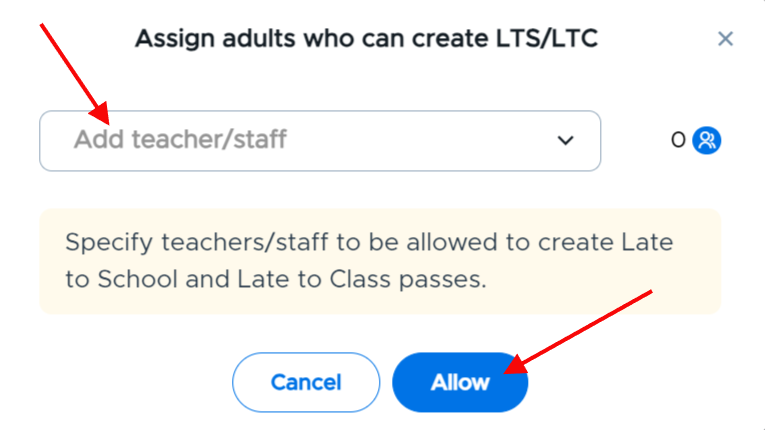
If the second option is chosen, click the Add Adults button, click + Assign button in the top right corner, type or select the names of those adults from the dropdown menu, and then click Allow. You can also click Tardy Settings, click Tardy Adults, click the + Assign button, type or select the names of those adults, and then click Allow.
Option #3 - Kiosk
Admins can allow students to mark passes created on a Kiosk as LTC and/or LTS. Check the LTC and/or the LTS boxes as shown on the screenshot below.
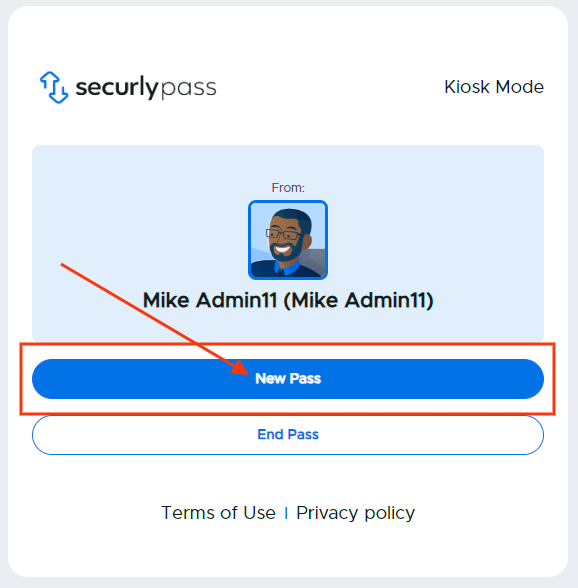
For a student to create an LTC/LTS pass on a Kiosk, the student will click on New Pass.
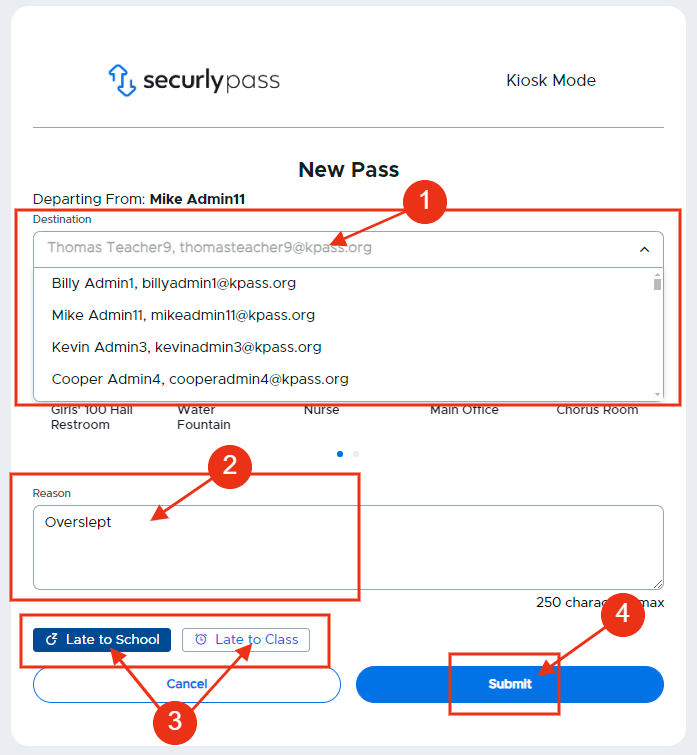
The student will then have to select the Destination (Teacher’s name) from the dropdown menu or favorites, add the reason for the tardy, click the appropriate LTS/LTC option, and then click Submit.
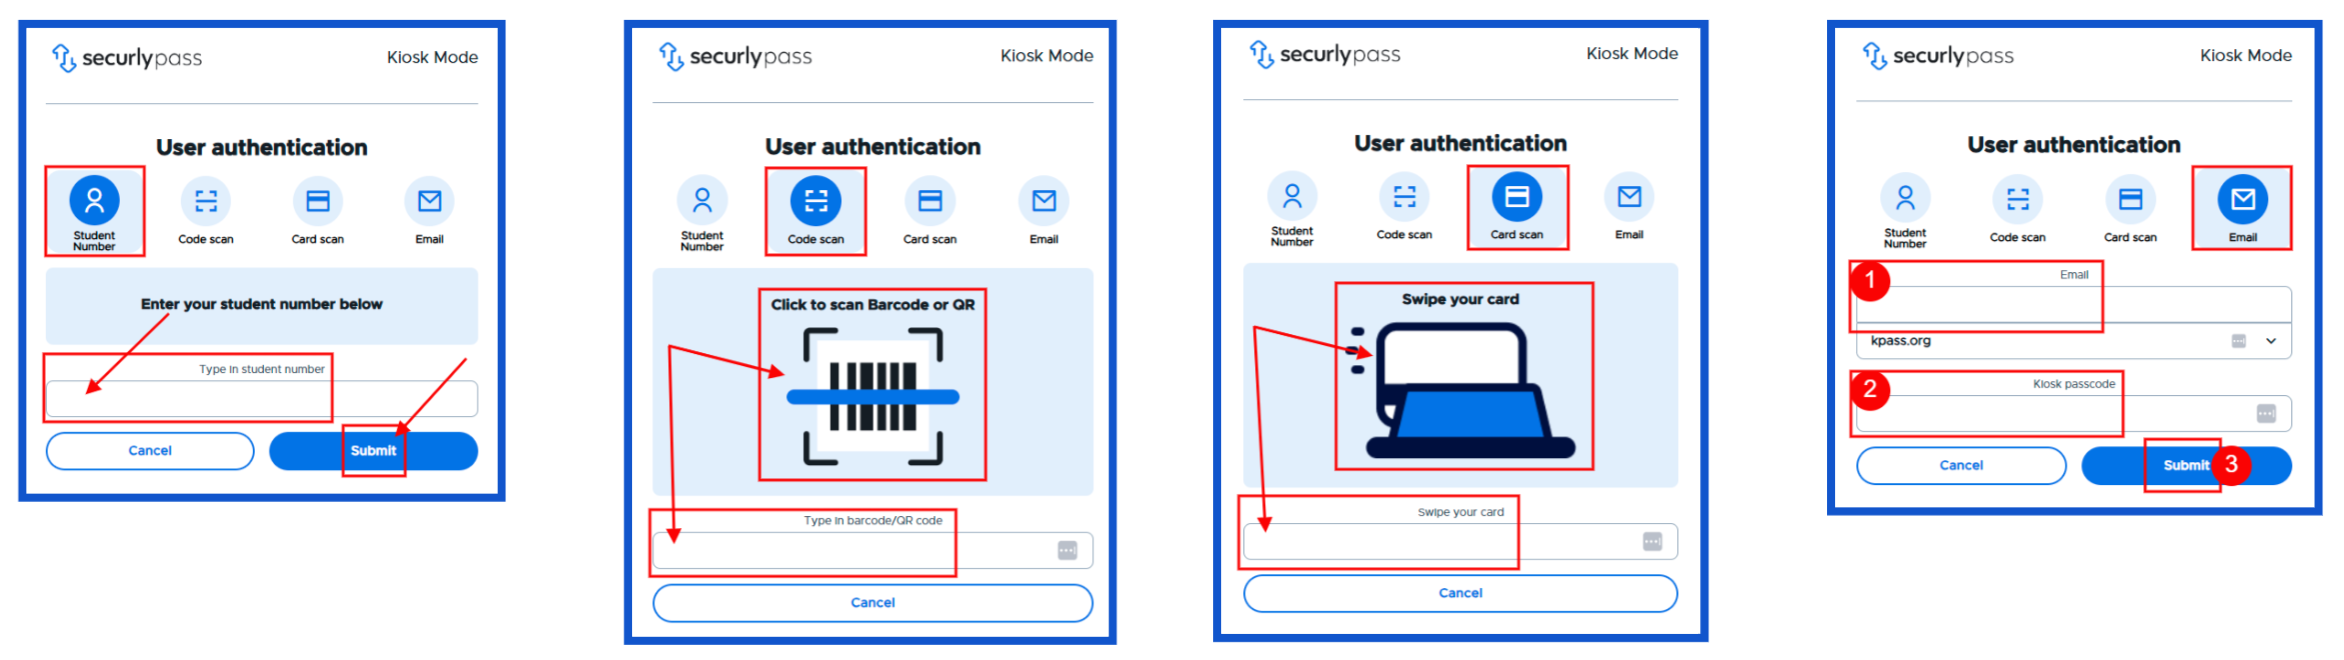
On the next screen, the student will add the corresponding User Authentication information (enter email and passcode, swipe their card, or scan their Barcode/QR code).
Additional info:While students can also enter their passcode in the "Swipe your card" field or "Type in barcode/QR code" field, it is not the intended functionality for these authentication methods.
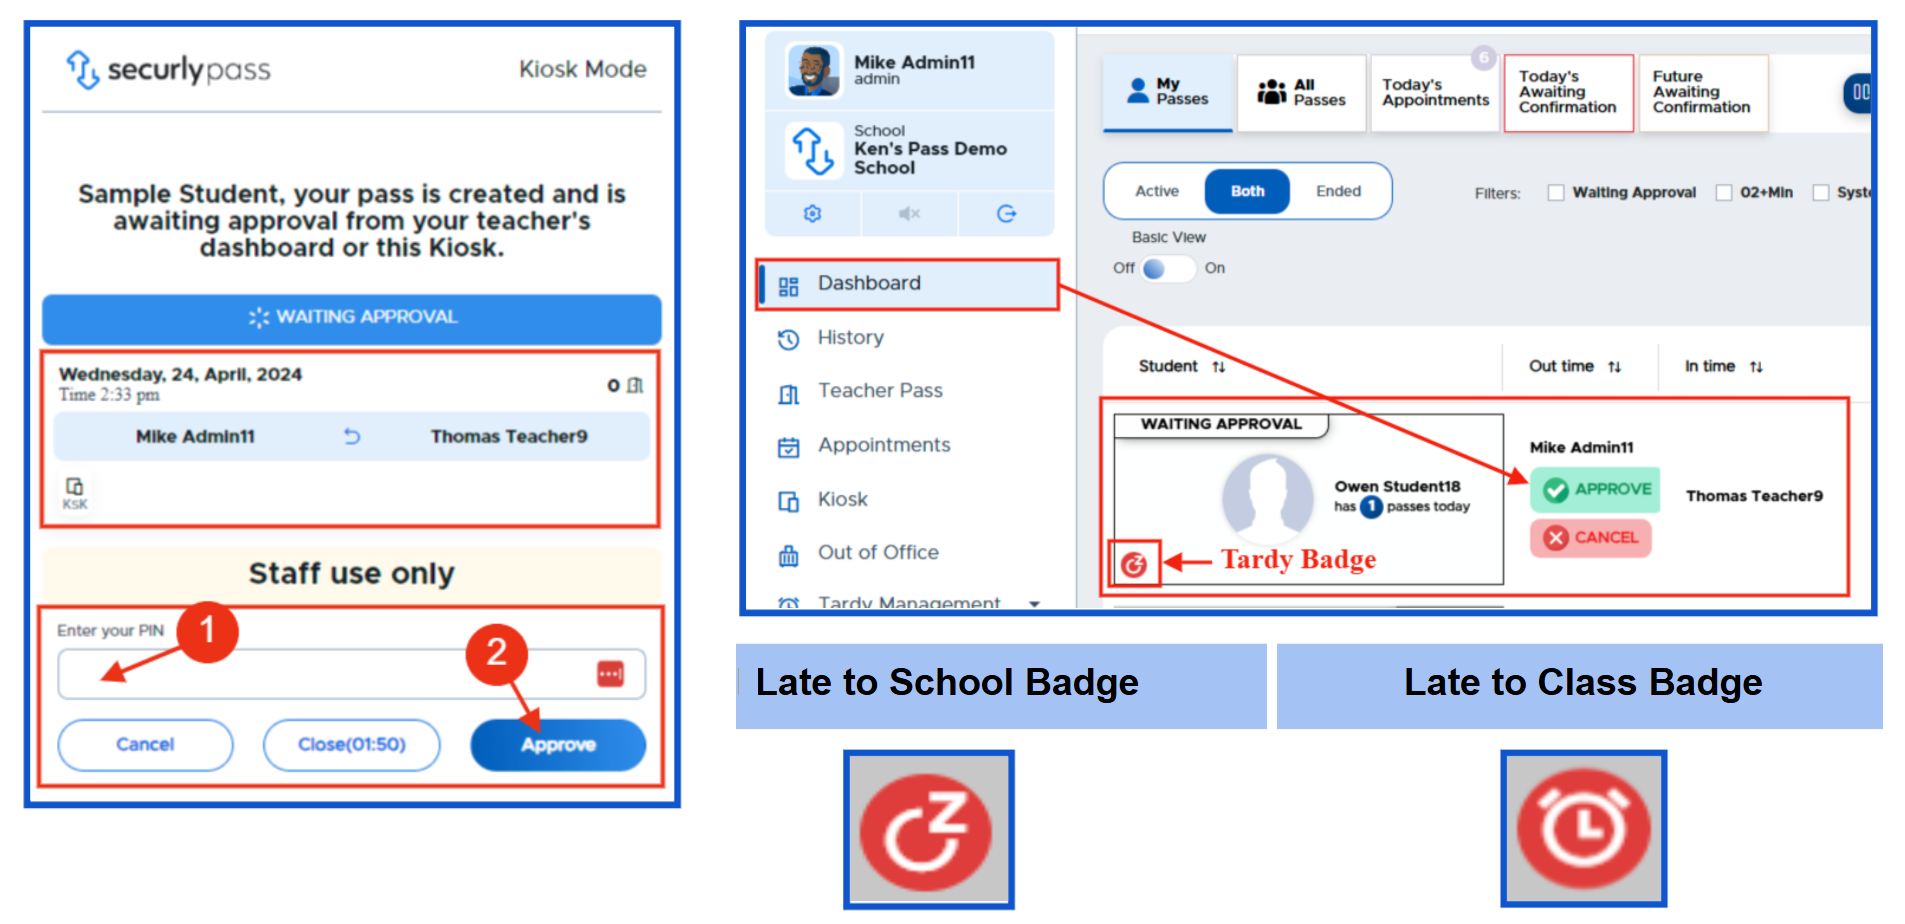
The adult will then enter their PIN and click Approve OR Approve the pass from their Dashboard. A LTS badge or LTC badge will appear to the left of the student’s name, indicating that this is a tardy pass.
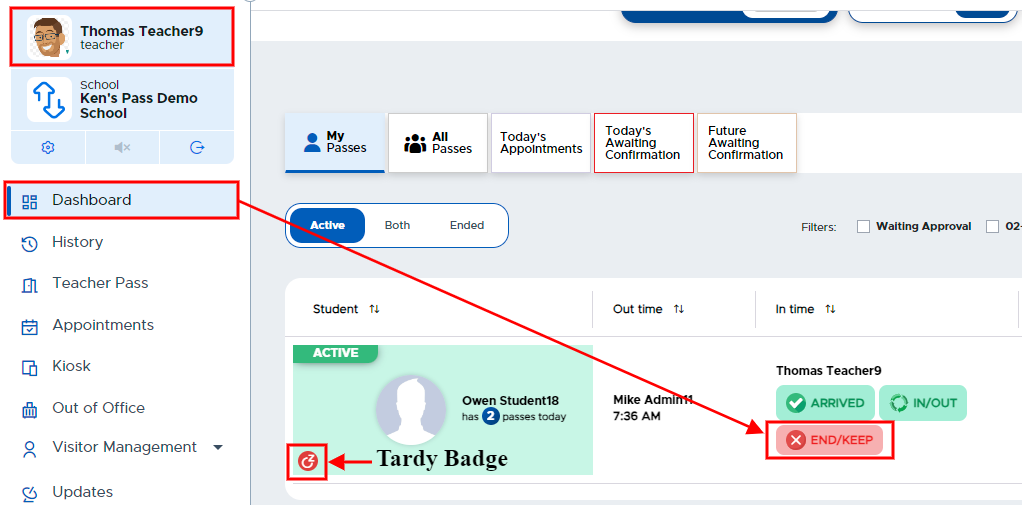
When the student arrives to class, that adult will END/KEEP the student’s pass, and that student’s tardy infraction will be recorded in the Pass system.
Remember:
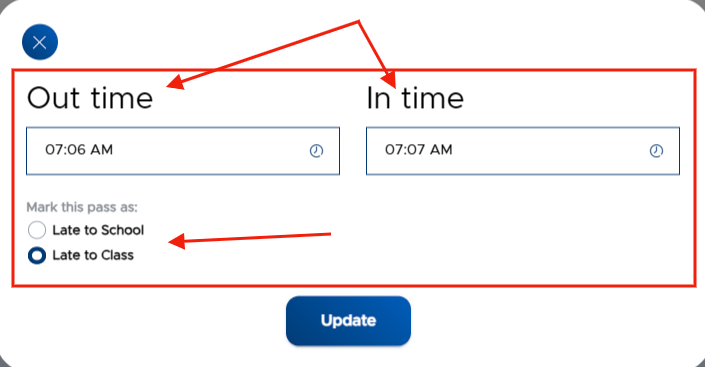
Any adult who interacts with that pass can edit it to remove the LTC/LTS or switch it if they are allowed access in Modules as well.
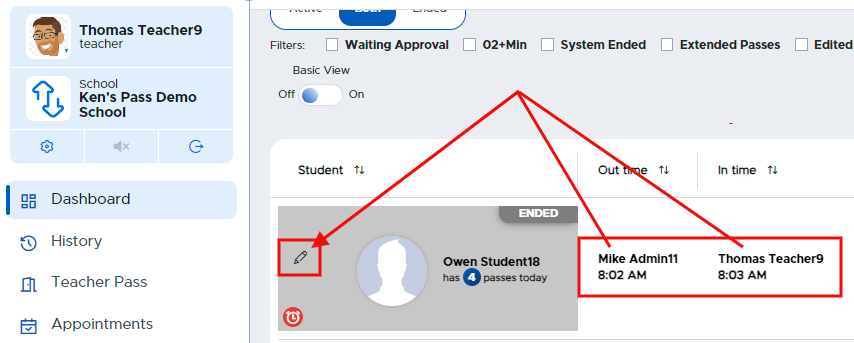
Any adult who has access to Tardy Management will have the ability to filter passes on both the Dashboard and History tabs.
Dashboard Filtering Options

History Filtering Options

Option #4 - Student Late Pass (SLP)
Admins can allow students to mark passes as LTC or LTS from the student’s device. Under the Tardy Management Module on the Modules page, check the LTC and/or the LTS boxes as shown in the screenshot below.
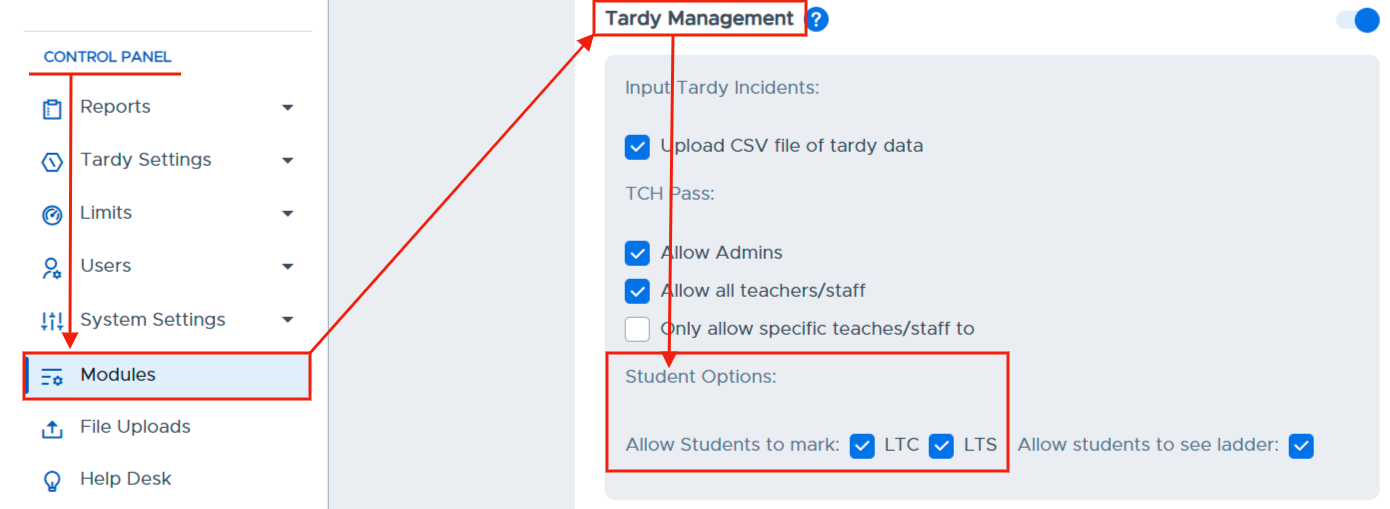
Student perspective
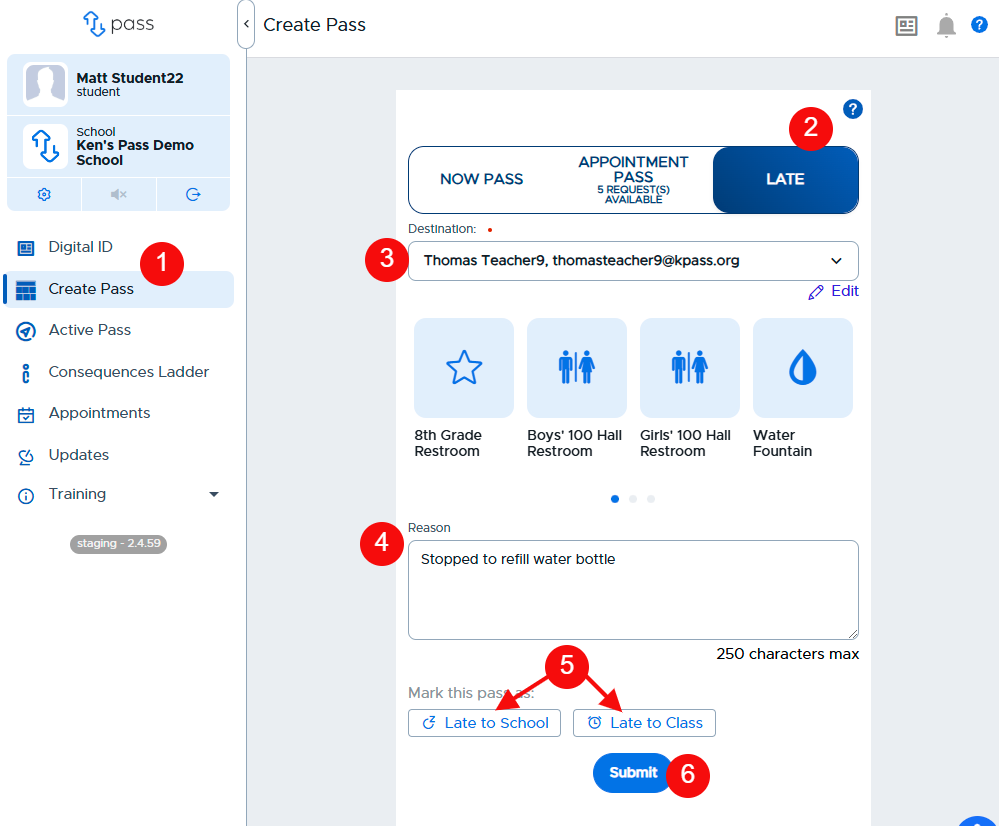
- From the student’s Dashboard, the student will click Create Pass.
- On the Create Pass screen, the student will click Late.
- Choose the teacher/location, typically the adult for which the student is late.
- Add a Reason
- Click Late to School or Late to Class (5).
- Click Submit.
- The student’s Late pass will automatically be approved and simultaneously ended by the system.
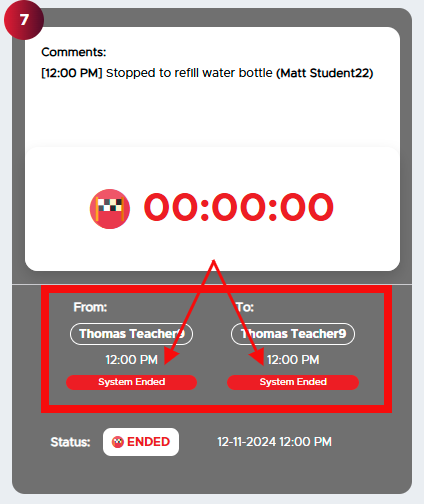
Adult perspective
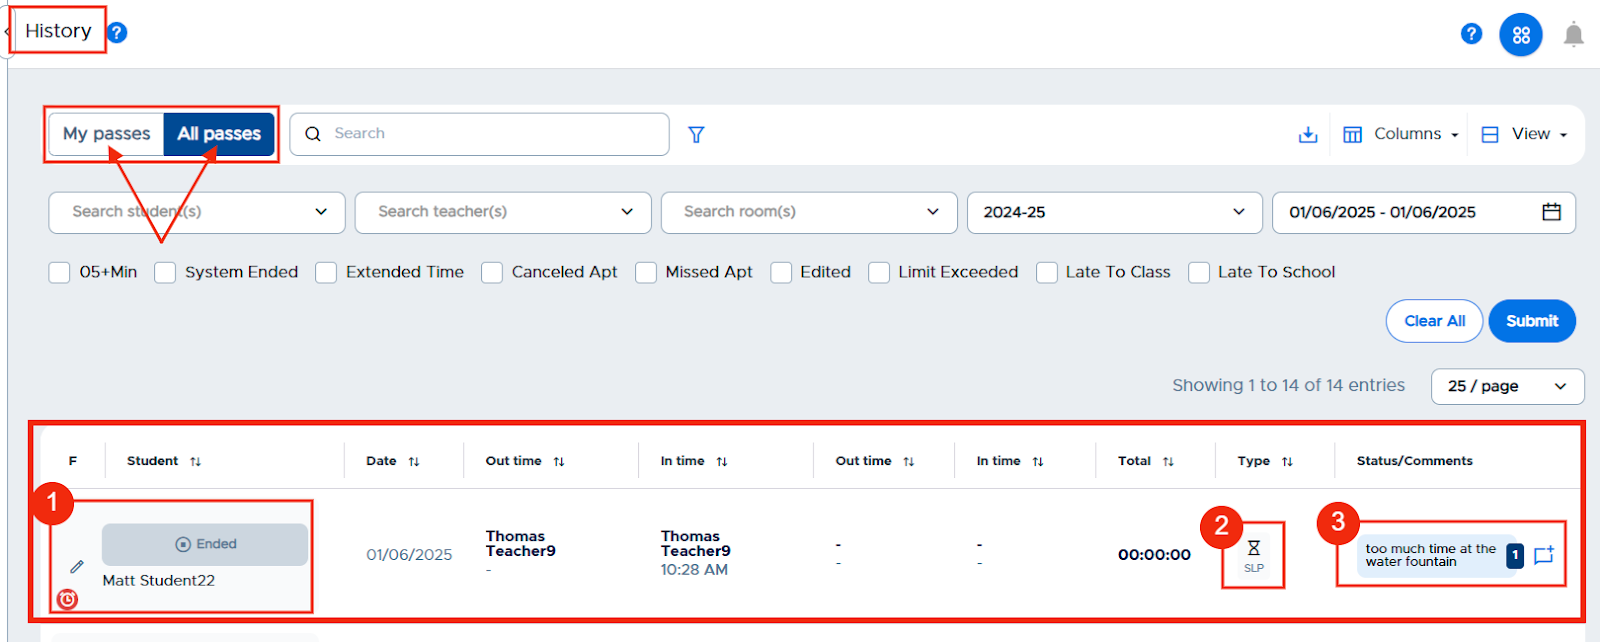
For adults, the Student Late Pass (SLP) will appear on both the Dashboard under the Both and Ended pass tabs and on the History page.
- Dashboard - Late icon under the student’s name (1) and SLP under the Pass Type column (2), along with the comment (3) as to why the student is late
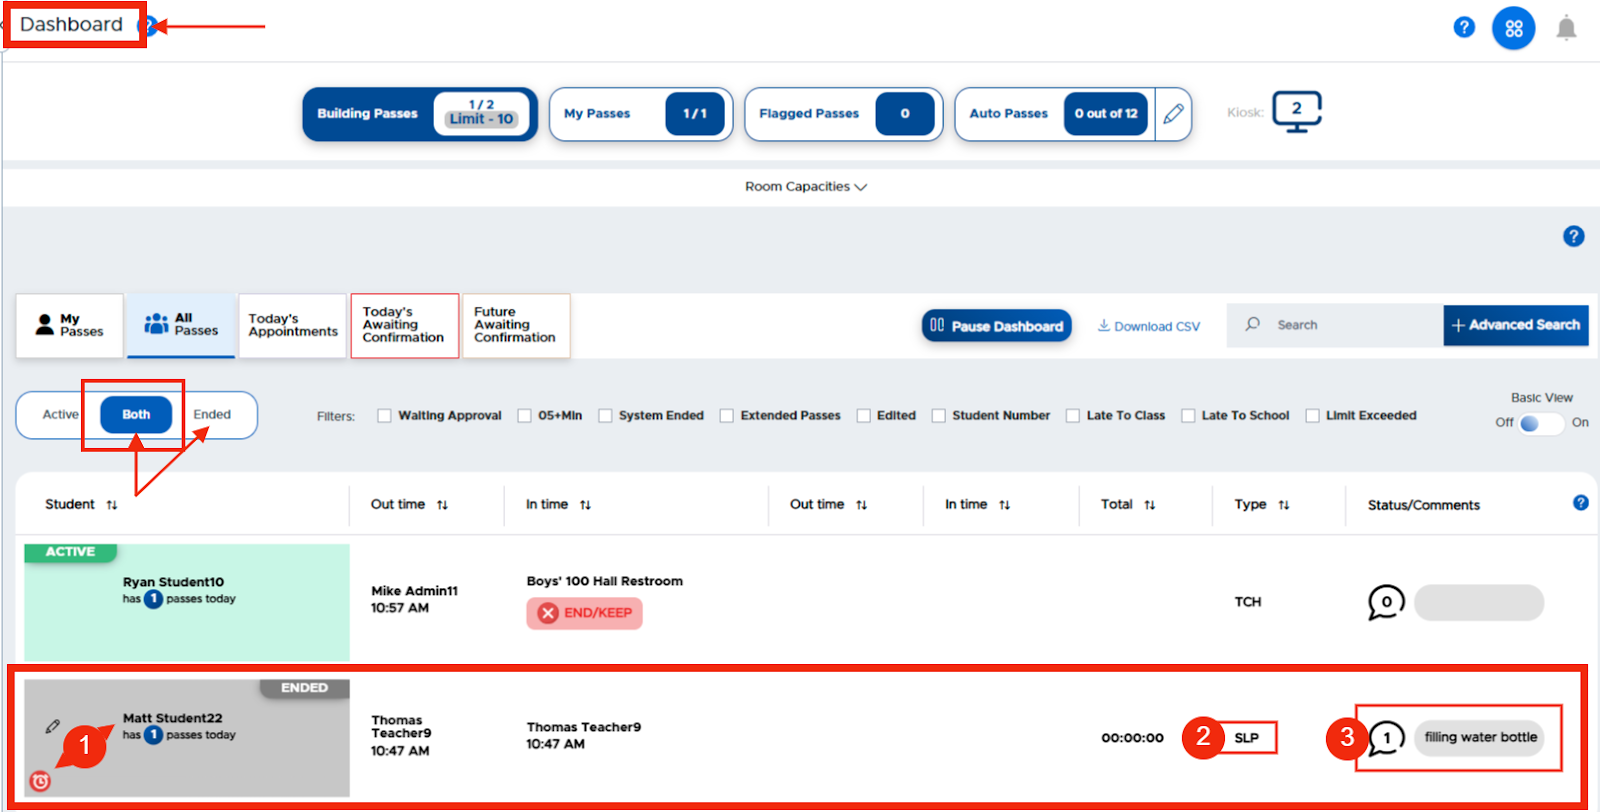
- History - Late icon under the student’s name (1) and SLP under the Pass Type column (2), along with the comment (3) associated with the pass.
Additional notes
-
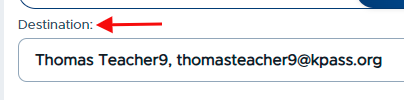
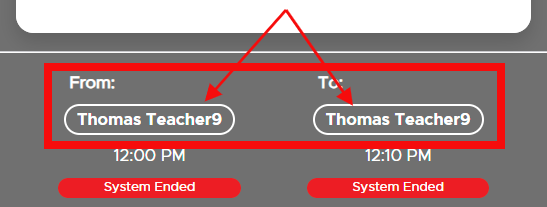
The student will select only the destination (adult or locations), but the SLP will present the same adult/location name for the starting and ending point “from/to”.
-
The SLP will not count toward any limits or pass blocks.
-
Adults will NOT need to approve the SLP. It will automatically be started and stopped.
-
Students will not be able to create an SLP to an adult who is Out of Office (OOO).
-
The SLP will be visible in Today’s history (admin and student), Pass History, and Dashboard, but not in the Summary report or Meet-up report.
-
Only the adults associated with the pass and admin will be able to edit the LTC or LTS designation within the same day. In that case, the pass will remain an SLP.
-
Detentions that are earned as a result of tardies will be assigned overnight.
-
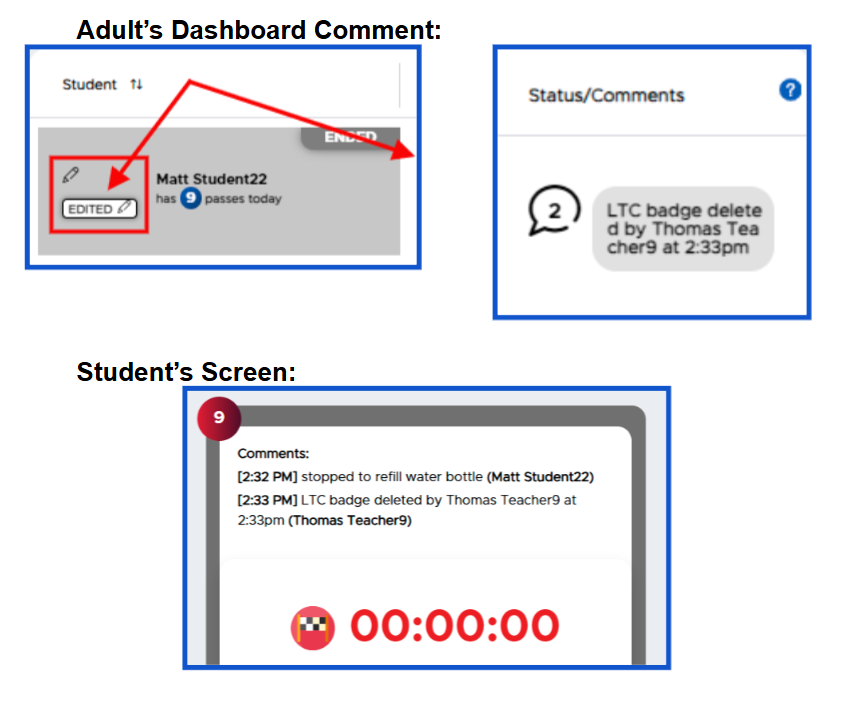
If the LTC/LTS designation is removed, added, or edited, the SLP will remain as an ended pass on the Dashboard and in History. The adult who removes the badge will have an automatic comment generated that says “LTS/LTC removed/added/edited by (user’s name) at 0:00am/pm”.
-
The last option on the Modules page is for admins to decide if they want to allow students to see the consequence ladder on their device. If they do wish for this to be seen, they need to check the box “Yes”.