Visitor Admin Guide
Visitor Admin Guide
Visitor Admin Guide
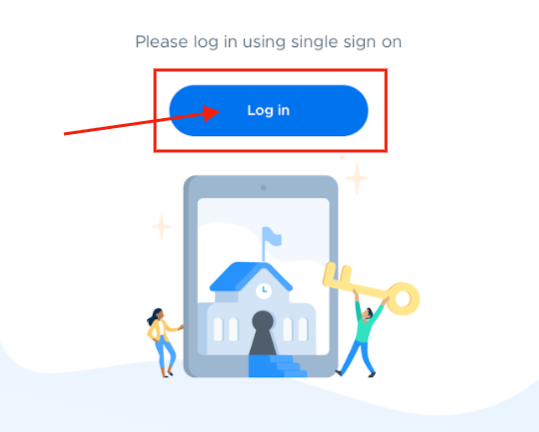
Visitor - a Visitor Management System (VMS) designed for schools to help admins streamline guest check-in, validate visitor identities, and keep the school campus safe - is a module in Securly Pass, which is a web-based application; therefore, Pass (and Visitor) runs on any device with internet access. Schools can also download the Visitor self check-in app (iOS or Android) that can only be run on iPads or tablets.
Front Desk Users - Visitor Adults
Visitor Guardian/Student Matrix
Customized List of Destinations
Dymo Printer: Visitor Self-serve Badge Printing
Setup and Management of Kiosks
Technical Compatibility Guidelines
Selecting Kiosk Mounts / Stands
Setting up Printers in Visitor
Setting up Printers in the Visitor iPad app
Using Visitor for Check-ins / Check-outs
Updating an existing visitor’s photo
Print Badge from Check-in Screen
Print Badge (Mac using Safari browser)
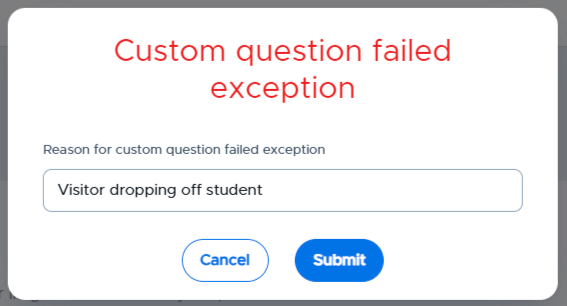
Creating Exceptions for a Denied Guest
Custom Question Screening Exception
Using Kiosk for Visitor Check-ins / Check-outs
Important Note: While using Chrome or Safari (supported browsers) for Pass Visitor, you will be prompted to “Allow updates”. Please allow and then refresh your browser.
Admin Management
Modules
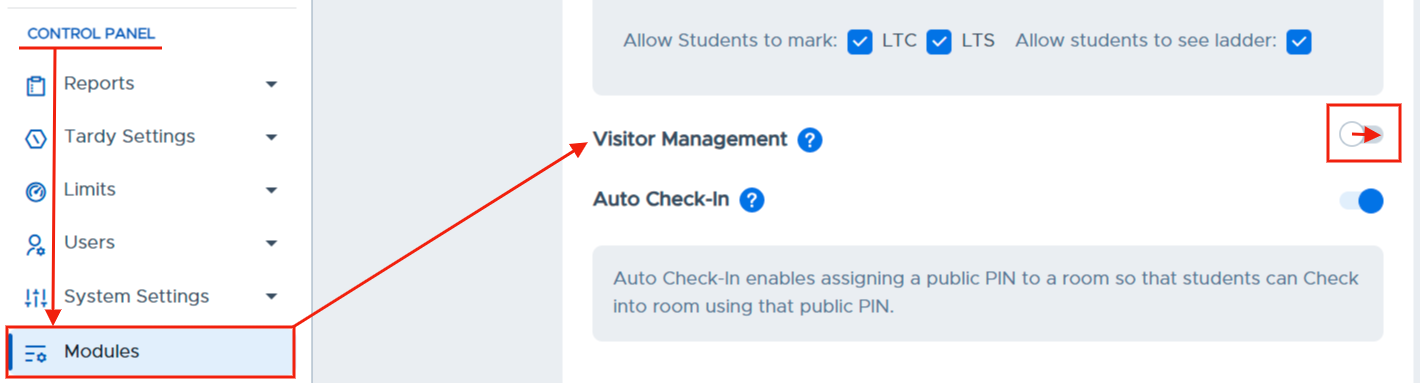
Once in your Pass system, you will need to make sure that your Visitor Module is activated. To do so, under the Control Panel, click Modules. On that page, scroll down to Visitor Module and slide the toggle to the right.
Front Desk Users - Visitor Adults
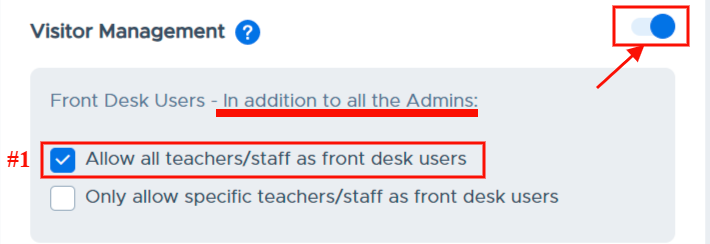
When activated, all admin users will have access to Visitor Management. You also have two options as to which teachers and staff will have access to Visitor Management.
Option #1 - Allow all teachers/staff as front desk users. (All adults in your school will have access to Visitor Management and can check in visitors.)
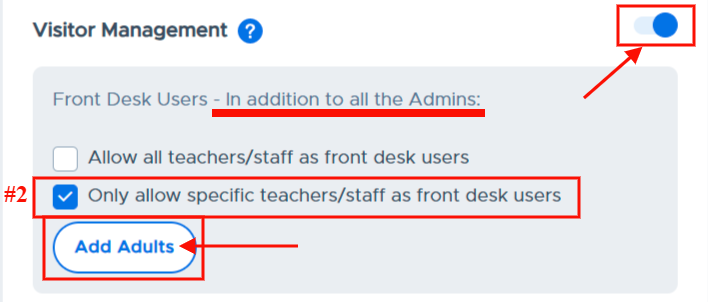
Option #2 - Only allow specific teachers/staff as front desk users. (Only THESE adults - in addition to your admin - will have access to Visitor Management and can check in visitors.)
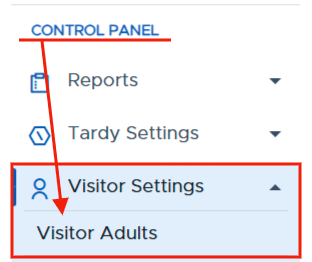
If you choose this option, click Add Adults from the Modules page or click Visitor Settings on the Control Panel and click Visitor Adults.
|
|
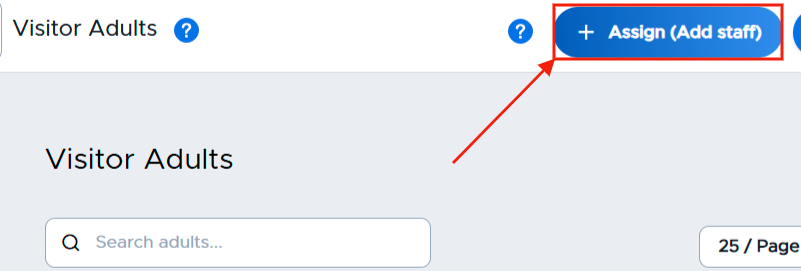
On the Visitor Adults page, click the blue + Assign (Add Staff) button in the top right corner. A white popup window will appear.
|
|
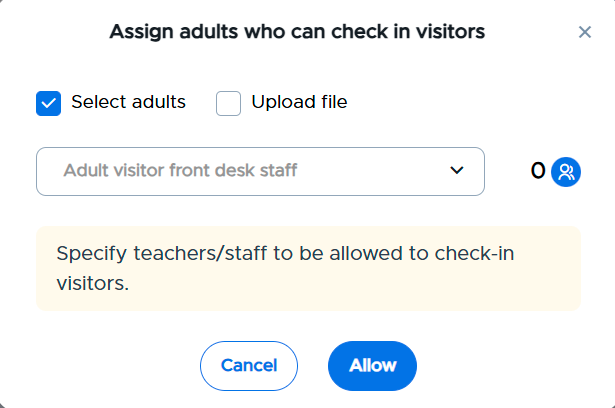
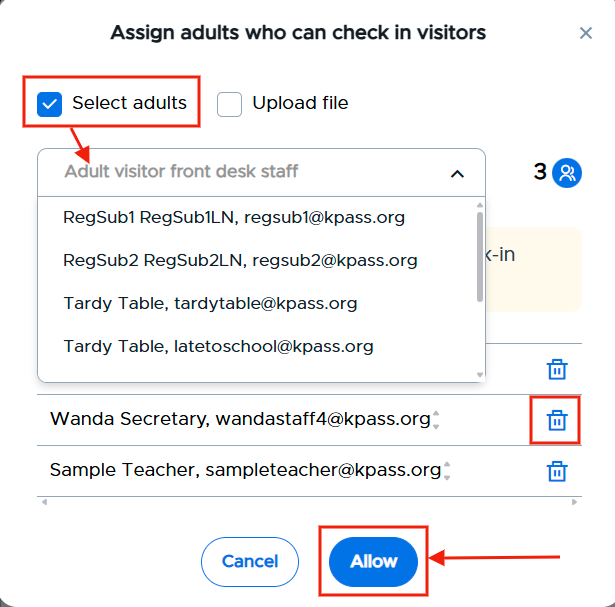
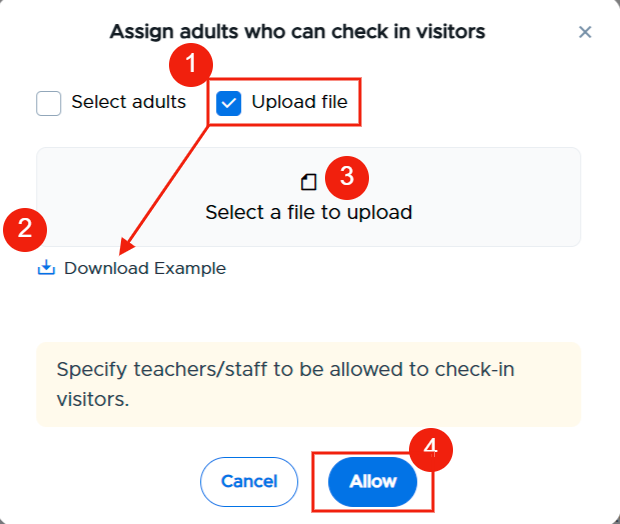
You have two options to assign adults who can check in visitors.
- Check the “Select adults” box and then select adults by typing their name in the “Adult visitor front desk staff” box or clicking in the box and clicking on the names of the individuals who should be allowed to check-in visitors. When finished selecting these adults, click the blue Allow button. (If you added a person by mistake and need to delete that person from the list, click on the blue trash can to the right of their name.)
|
- Check the “Upload file” box, click Download Example file to see how the CSV file should be formatted, create your file, save it, click “Select a file to upload” and choose the correct file, and then Allow.
|

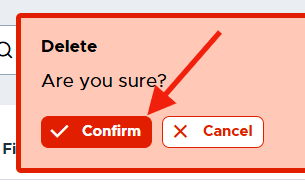
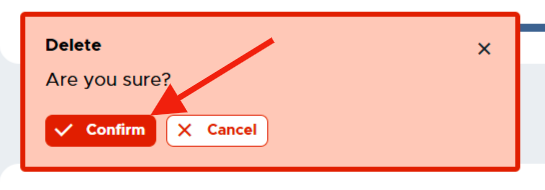
Your Visitor Adults will appear on the table. If you need to remove someone from the list, simply click on the three (3) dots to the right of that person’s name, click Delete, and then click the red Confirm button. That person will be removed from the list of Visitor Adults.
|
|
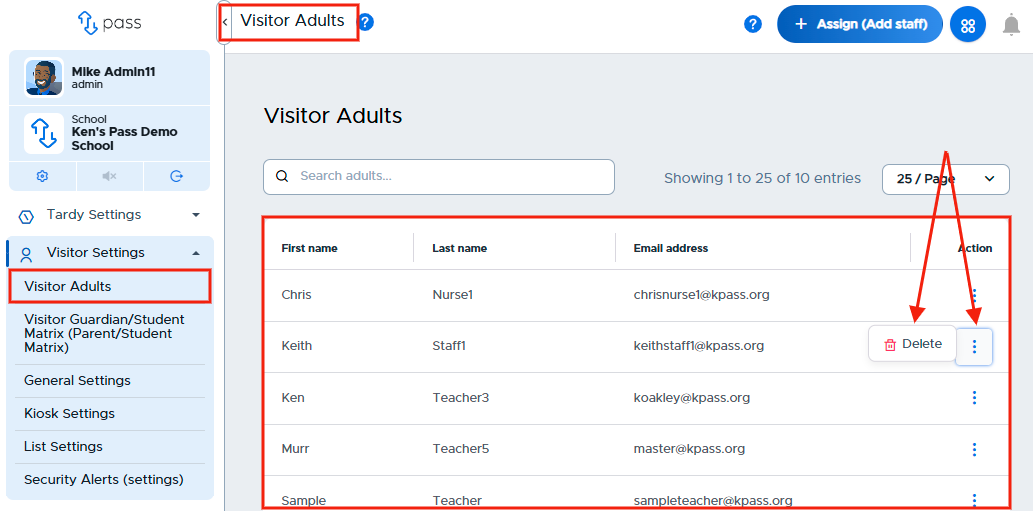
You can amend the list of Visitor Adults at any time.
Once your Visitor system has been created, as an admin you can select the parameters that will be used as visitors enter your building.
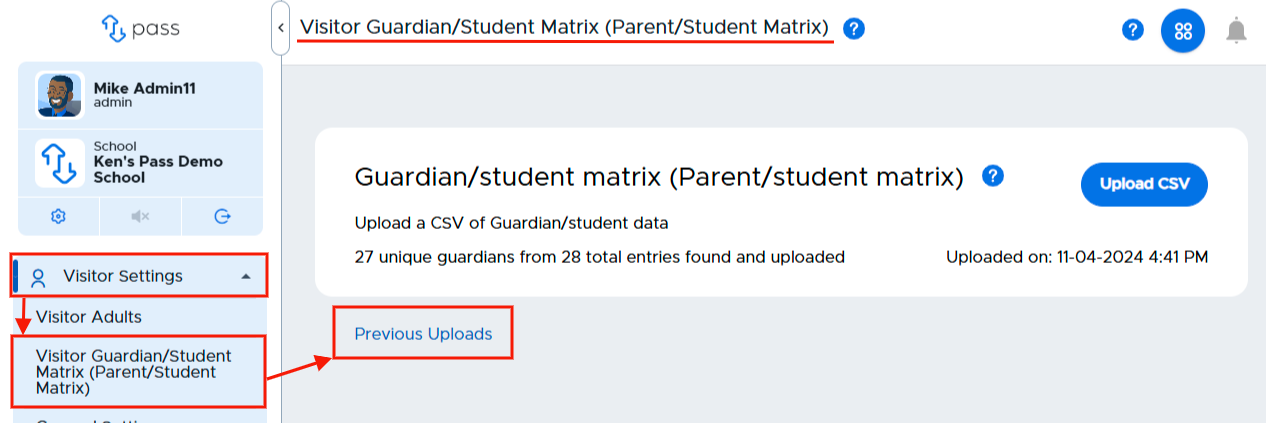
Under the Control Panel, click on Visitor Settings, where you will find six (6) tabs where you will customize your settings.
- Visitor Adults
- Visitor Guardian/Student Matrix
- General Settings
- Kiosk Settings
- List Settings
- Security Alerts
Visitor Guardian/Student Matrix
The Guardian/Student Matrix matches guardians/parents with their students during pick up and drop off. The matches are based on the information shared via matrix.
>>> PLEASE NOTE <<< At Check-in, the name of the visitor MUST MATCH EXACTLY what is listed on the matrix. If a nickname is used at Check in, that visitor will be denied access.
|
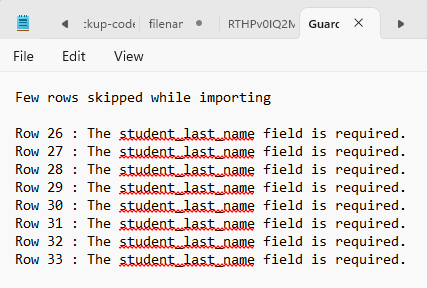
In order to utilize this functionality, you will need to upload a matrix file that matches guardians with their students. Before uploading your Matrix, make sure that you have student users provisioned into your system. You can check this under Users - Main Users.
You have two options for uploading a Guardian/Student matrix:
Option #1 - SFTP
Individual School file (One file uploaded for one school)
District file (One file uploaded for multiple schools in the district)
Option #2 - Manual (CSV via the Pass system)
Option #1 - SFTP
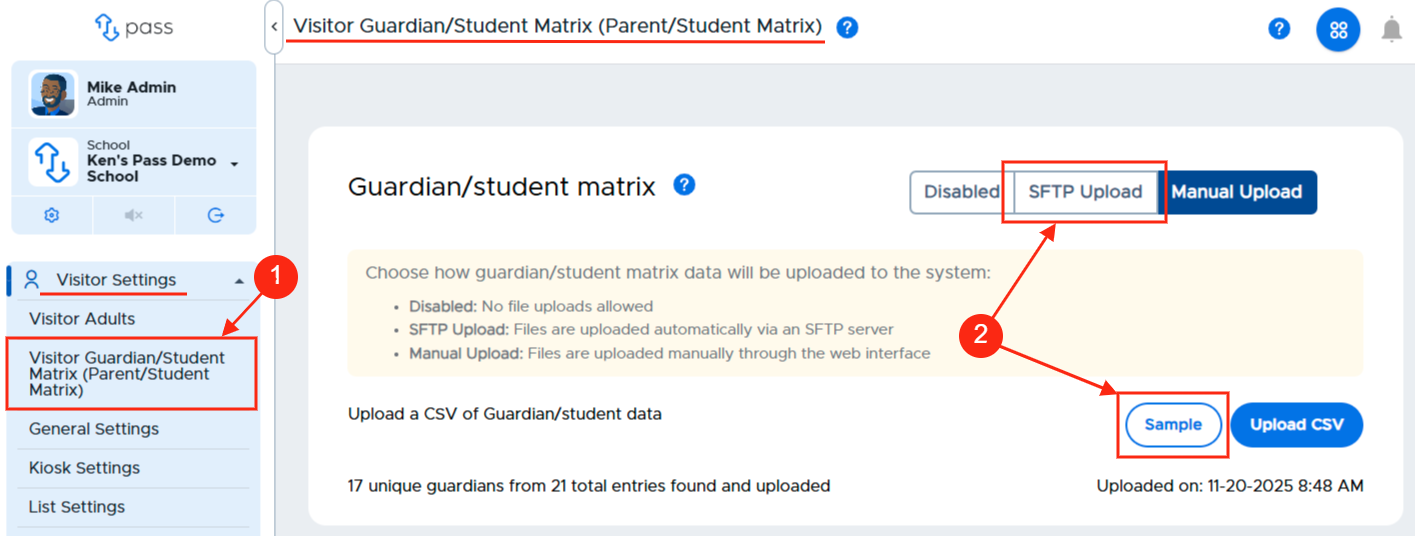
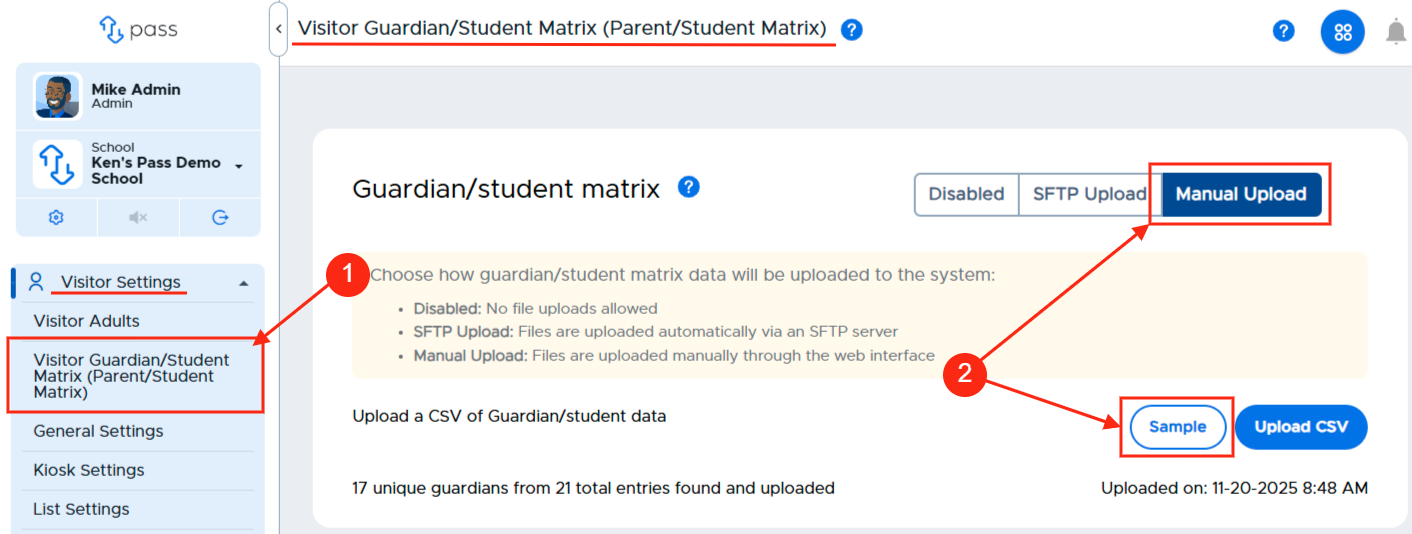
To create a Guardian/Student Matrix file for SFTP, under the Control Panel, click Visitor Settings and then Visitor Guardian/Student Matrix. On this page in the upper right corner, click SFTP. Click Sample to view the sample file.
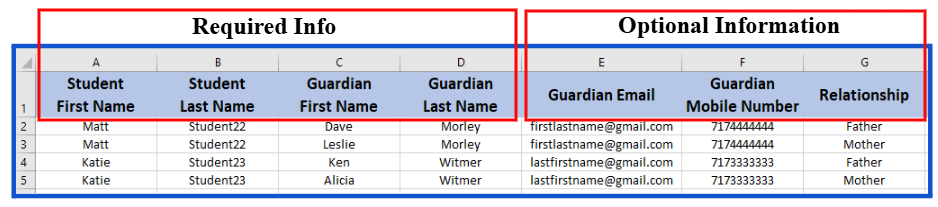
Please keep the following information in mind when adding the information to the spreadsheet:
- The information in the first four columns) is REQUIRED.
- Student First Name
- Student Last Name
- Guardian First Name
- Guardian Last Name
- The information in the last three columns) are optional. (DO NOT deletethese columns from the file. Just leave them blank if not providing this information.)
- Guardian Email
- Guardian Mobile Number
- Relationship
- Note: It is possible for one student to be matched with multiple people (mother, father, aunt, uncle, grandfather, etc.) Each person will need to be added on a separate line on the file, the student’s name will be repeated on as many lines as needed to match the multiple guardians.
Important Matrix File Info
- The hyphen ( - ) and the apostrophe ( ‘ ) are acceptable characters in the file. Other characters may cause an issue when the file is uploaded.
- Remove errant spaces at the beginning of cells.
- The headers in your CSV file need to be exactly the same as the appear on the Download Example file. (The screenshot below has been modified for easier viewing.)
Individual School Guardian/Student Matrix (Sample File Screenshot) when uploading a file for an individual school.
District file - Guardian/Student Matrix (Sample File Screenshot) when uploading a file for a district with multiple schools. If you are creating a district file, please add “School Name” to column H. Use the schools’ full names when adding the schools. (Columns are manipulated for easier viewing.)

Note: If interested in the District file option, please reach out to the Help Desk for your schools to be configured and/or if you need your SFTP school/district credentials.
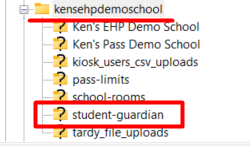
When the file is ready, you will need to access our SFTP server. Locate your Pass folder and upload the file to your school’s or district’s sub-folder labeled “student-guardian”.
Final SFTP Notes:
- It is best practice to have one master file for your matrix. Each new file upload (SFTP or manual) will write-over all existing data and will remove data that is not included in the most recent file. Use your master file to add or remove guardians and re-upload the same CSV file.
- Please consult your district IT personnel if you desire to automate the upload process to our SFTP server.
Option #2 - Manual (via CSV)
To create a Guardian/Student Matrix file via CSV file upload, under the Control Panel, click Visitor Settings and then Visitor Guardian/Student Matrix. On this page in the upper right corner, click Manual. Click Sample to view the sample file.
Please keep the following information in mind when adding the information to the spreadsheet:
- The first four columns are REQUIRED.
- Student First Name
- Student Last Name
- Guardian First Name
- GuardianLast Name
- The last three columns are optional.
- Guardian Email
- Guardian Mobile Number
- Relationship
- Note: It is possible for one student to be matched with multiple people (mother, father, aunt, uncle, grandfather, etc.) Each person will need to be added on a separate line on the file, the student’s name will be repeated on as many lines as needed to match the multiple guardians.
Important Matrix File Info
- The hyphen ( - ) and the apostrophe ( ‘ ) are acceptable characters in the file. Other characters may cause an issue when the file is uploaded.
- Remove errant spaces at the beginning of cells.
- The headers in your CSV file need to be exactly the same as the appear on the Download Example file. (The screenshot below has been modified for easier viewing.)

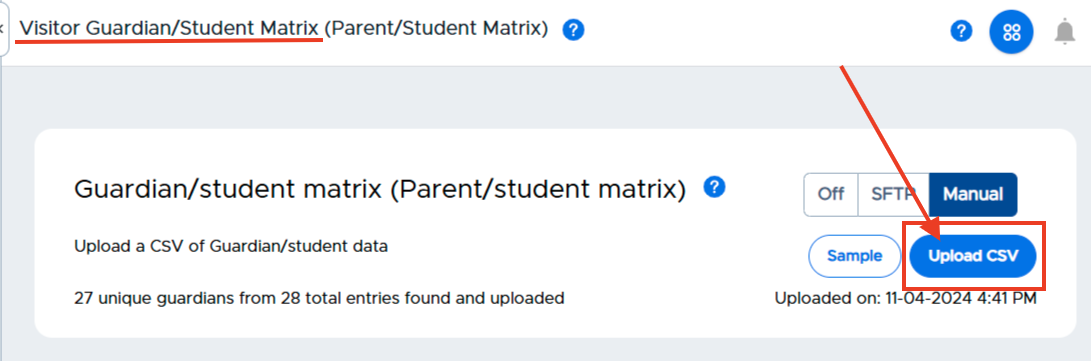
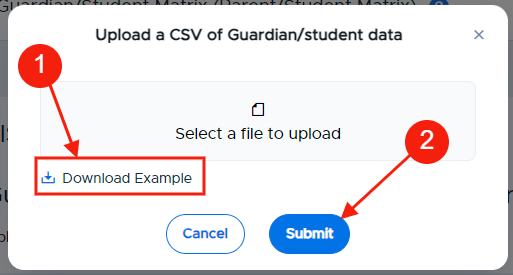
When your file is ready, click the blue Upload CSV button on the Visitor Guardian/Student Matrix page. Click Select a file to upload, select the CSV file, and click Submit.
NOTE: It is best practice to have one master file for your matrix. Each new file upload (SFTP or manual) will write-over all existing data and will remove data that is not included in the most recent file. Use your master file to add or remove guardians and re-upload the same CSV file.
|
|
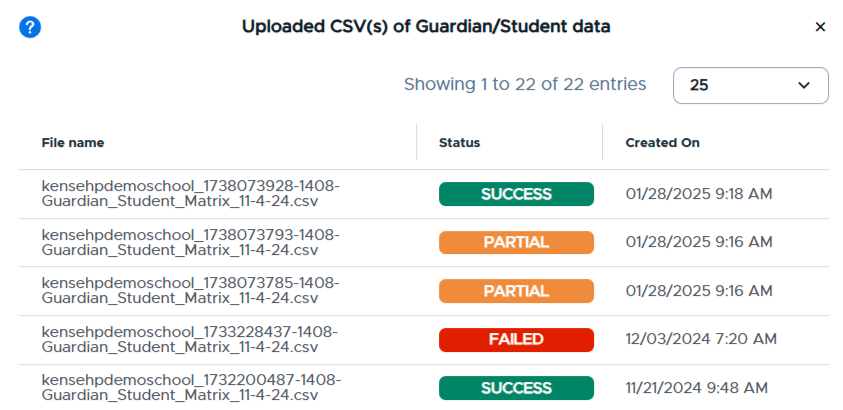
Track File Status
Once you have uploaded your Guardian/Student Matrix, you can easily track the status of the file. On the Visitor Guardian/Student Matrix page, click on Previous Uploads. The name of the file, the status (SUCCESS, PARTIAL, FAILED), and date created will be displayed.
- Status Meaning
- SUCCESS - The file uploaded successfully
- PARTIAL - Portions of the file uploaded successfully (see the information below)
- FAILED - The file did not upload. (Make sure the headers are in the correct format and the required information is included on the file. Re-upload the file.)
|
|
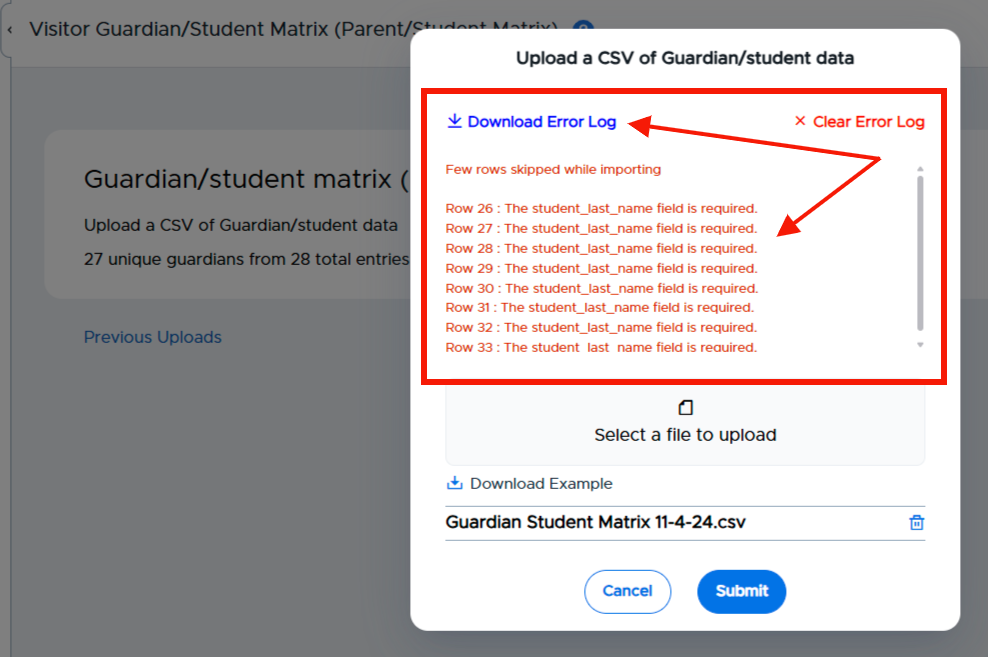
If you receive a PARTIAL status, there are issues with the data on the file, and they will be displayed on the page. If a number of issues exist on the file, you can download the Error Log, make the appropriate corrections on the file, and save and re-upload the file.
Errors Identified on the File | Downloaded Error Log |
|
|
General Settings
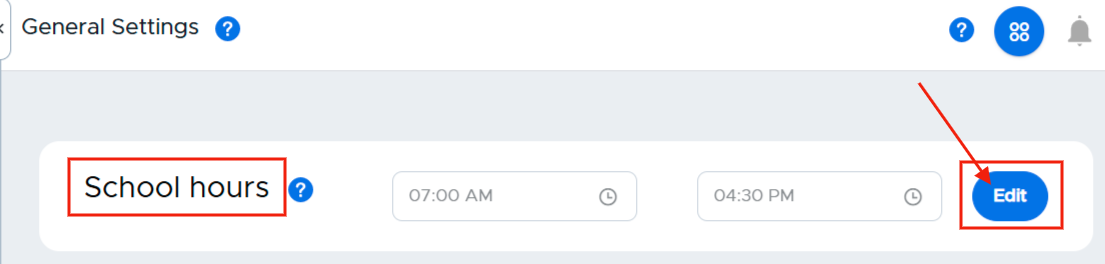
School Hours
This setting allows admins to define the length of the school day.
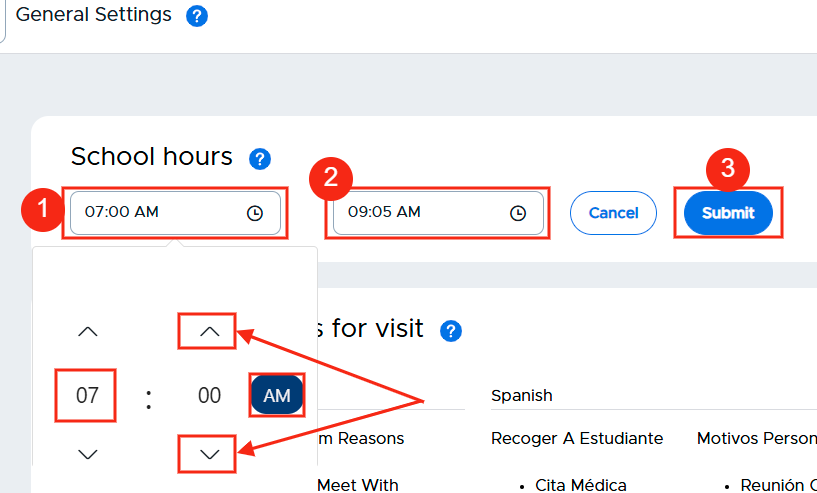
To set the times for your school day, click on the edit button to the right of School hours. Click in the first box and set the start time for your school day (HH:mm and AM or PM). In the second box, set the end time for your school day (HH:mm and AM or PM). When finished, click the blue Submit button.
You can reset or modify the school hour settings at any time.
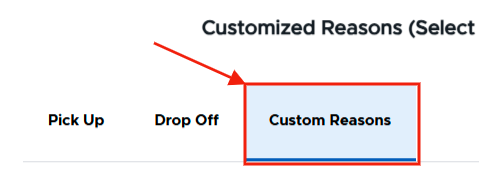
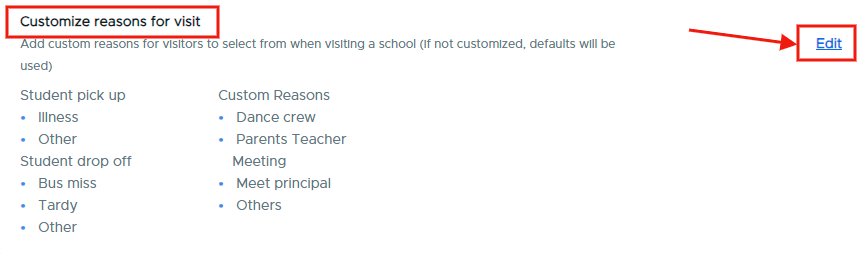
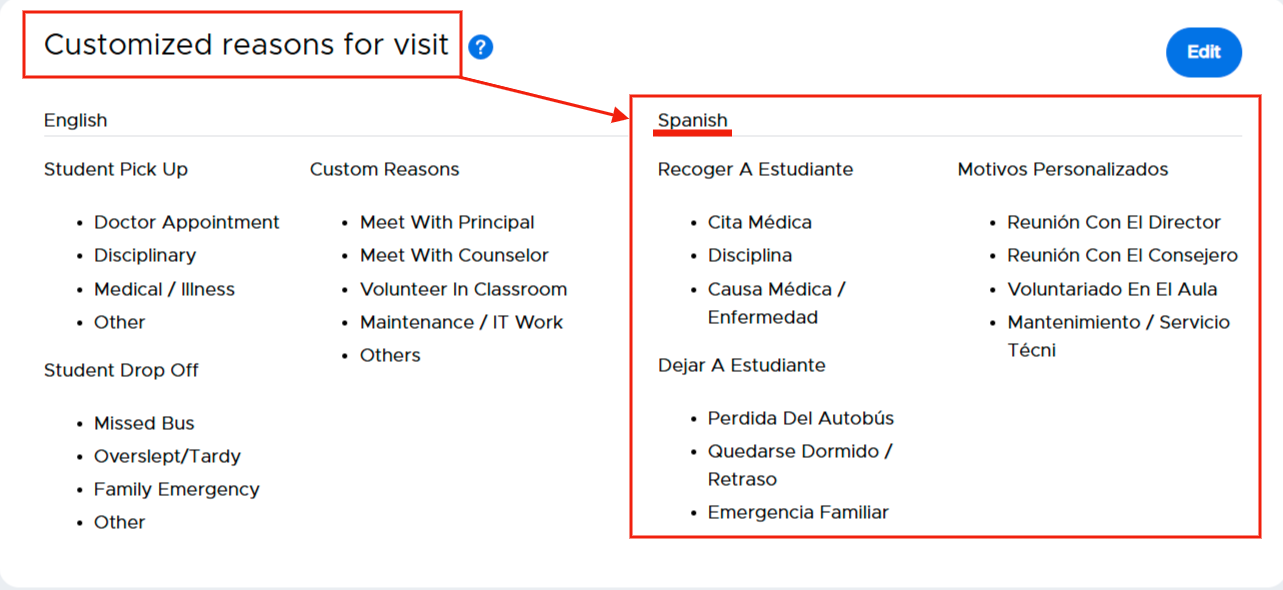
Customized Reasons for Visit
In this section, you can customize the reasons available for visitors to select when checking in.
There are three headings under which you can create up to five (5) reasons:
You can also choose to include this reason on the badge.
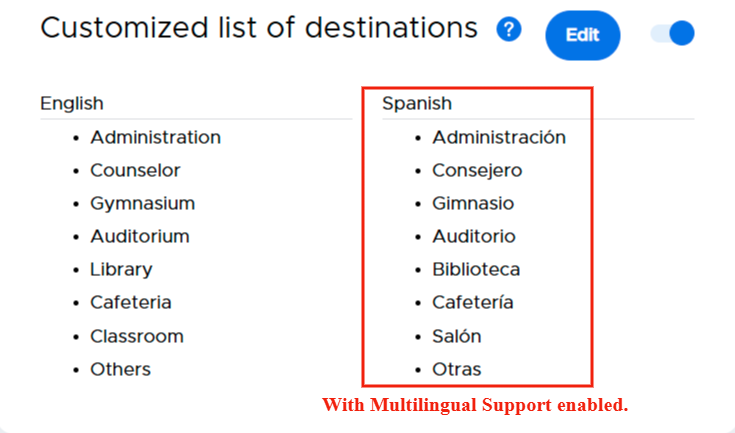
Please note: If you would like these reasons translated in Spanish, you will first need to activate the Spanish Translation (Multilingual Support) setting and then input these reasons in Spanish for them to be displayed in the app in Spanish.
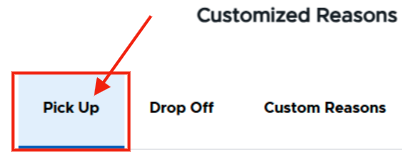
To add or edit a reason, click on the blue Edit button on the far right of the screen.
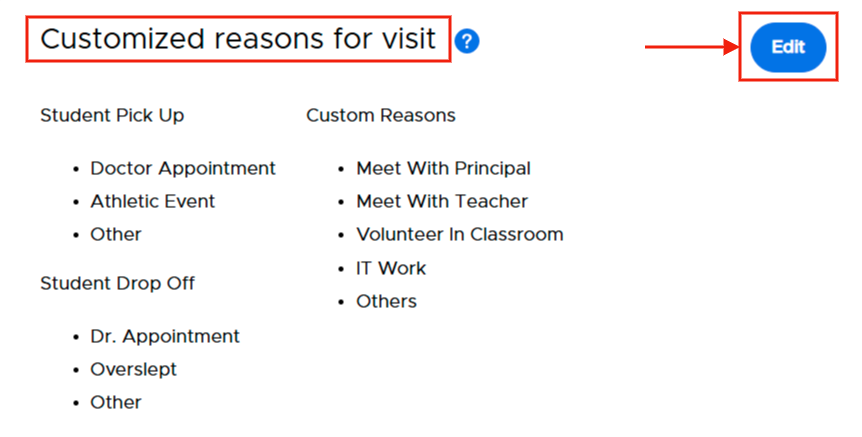
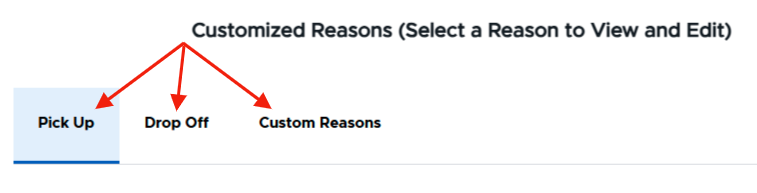
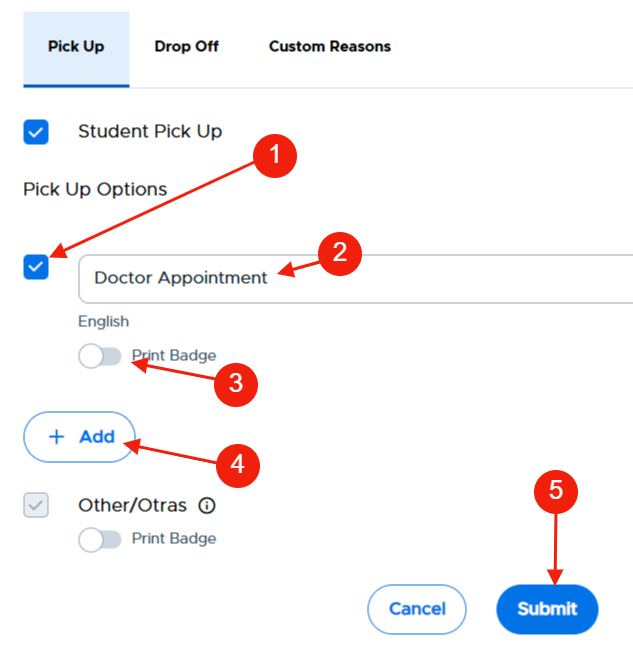
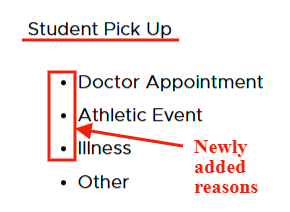
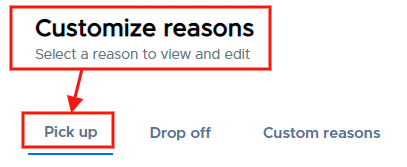
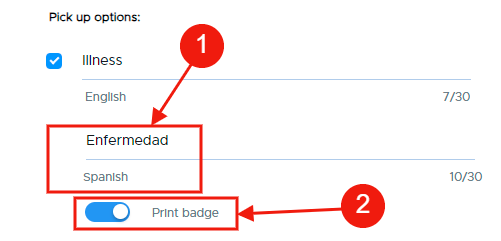
Student Pick Up - To customize the reasons for Student Pick Up:
- Click on Pick up
- Check the box under Pick Up Options (1) and then add the reason (2) (i.e. - Dr. Appt, Family emergency, Personal Appt, etc.)
- Toggle the “Print badge” to the right (3) if you want to automatically print this reason on the visitor’s badge, toggle the “Print badge” to the right (3)
- Add additional reasons (up to five total) as needed (4)
- When finished, click Submit (5).
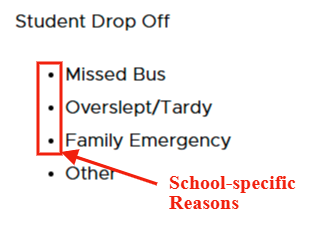
Please Note: “Student Pick Up” (header) and “Other” (reason) are default settings and are always enabled.
| |
|
|
To delete a reason, click the - Remove button or uncheck the box under the reason and click Submit.

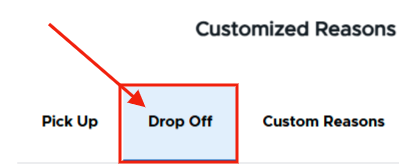
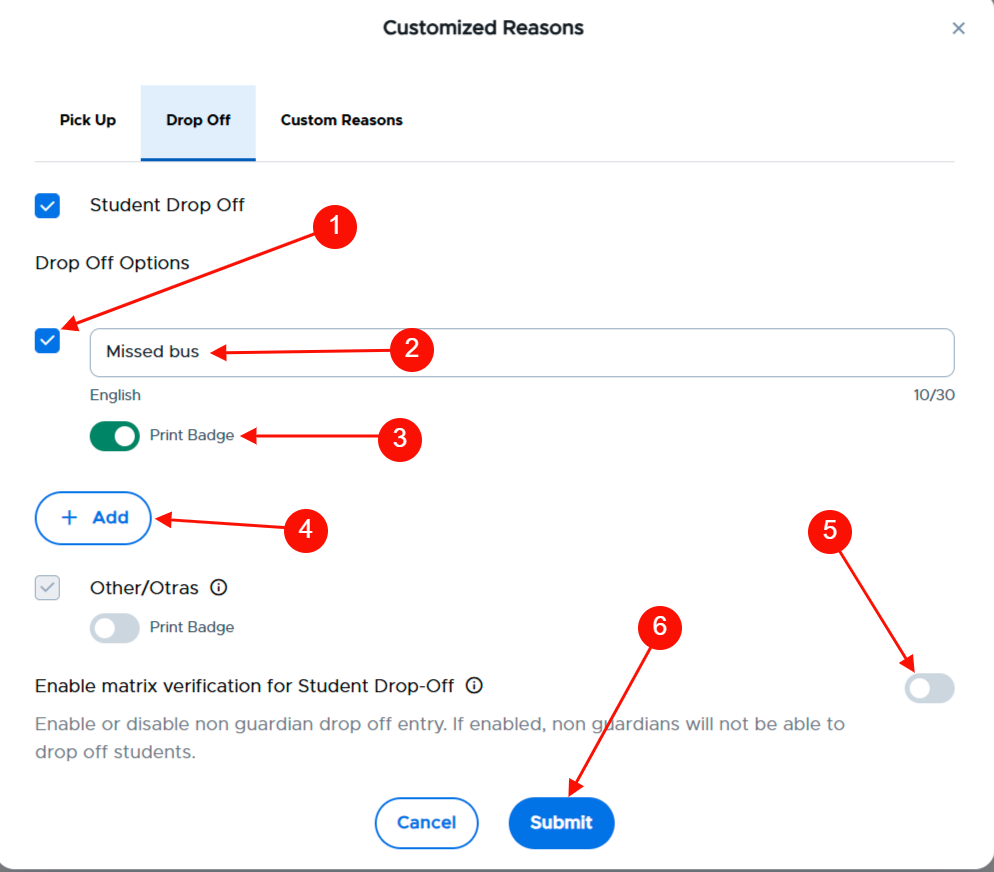
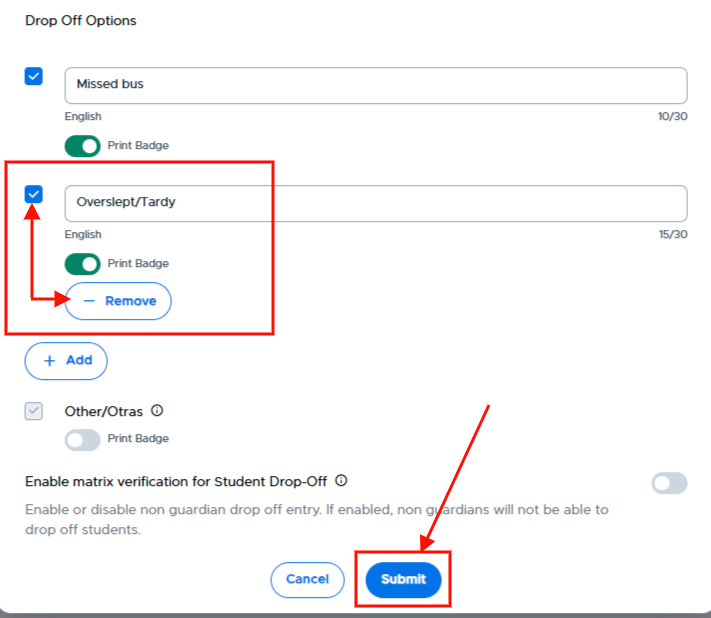
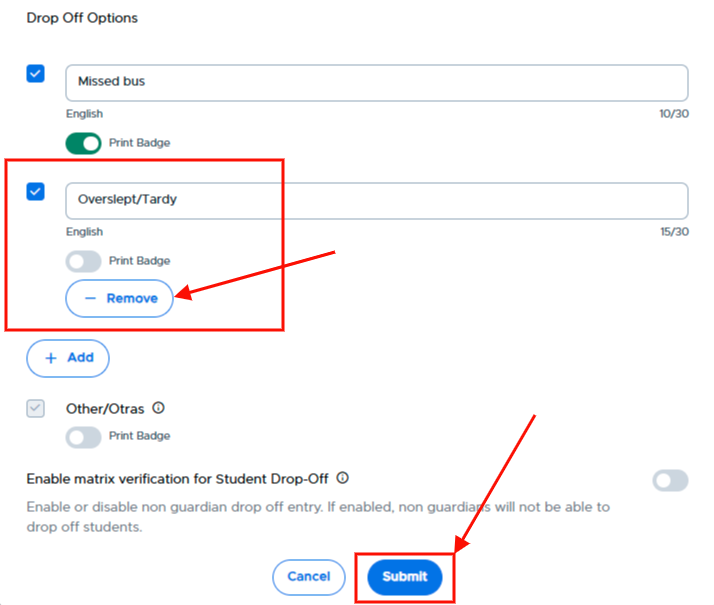
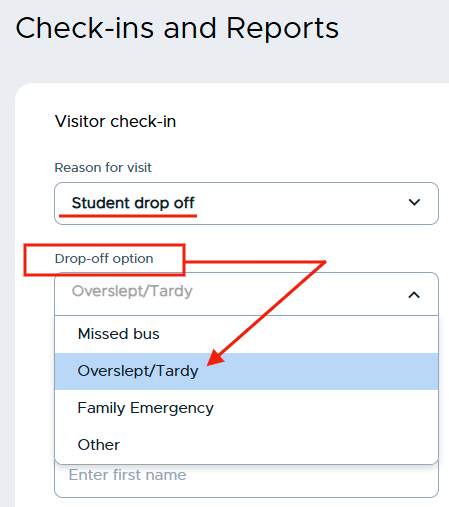
Student Drop Off - To customize the reasons for Student Drop Off:
- Click on Drop off
- Check the box (1) and add the reason (2) (i.e. - Missed bus, Overslept, Medical Appt, Inclement weather condition, etc.)
- Toggle the “Print badge” to the right (3) if you would like to print this badge for this customized reason
- Add additional reasons as needed (4)
- Enablematrix verification for Student Drop Off (5)
- If enabled, non guardians will not be able to drop off students.
- When finished, click Submit (6)
| |
|
|
To remove a reason, click the Remove button under the reason and click Submit to save the change.
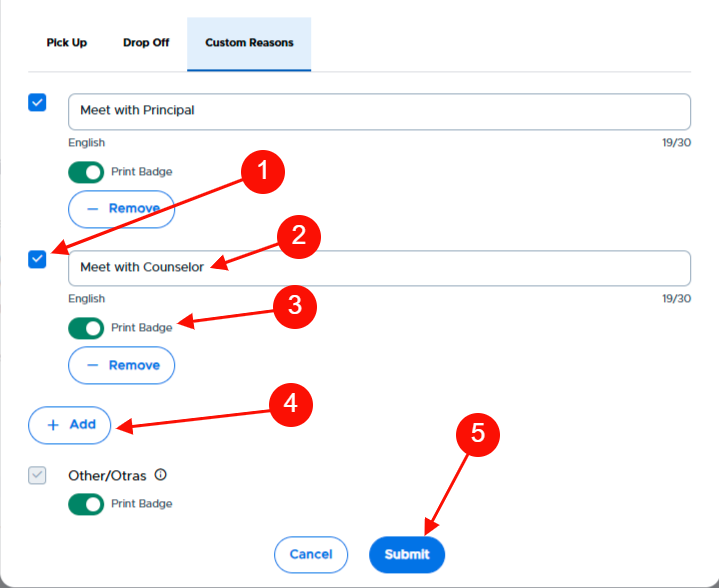
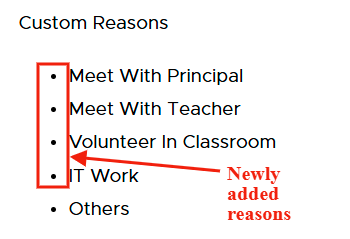
Custom Reasons - To add custom reasons:
- Click on Custom reasons
- Check the box (1), and then add the reason (2) (i.e. - Meet with Principal, Volunteer, etc.)
- Toggle the “Print badge” to the right (3) if you would like to print this badge for this customized reason
- Add additional reasons as needed (5)
- When finished, click Submit (6).
To delete a reason, click the - Remove button or uncheck the box under the reason and click Submit.
Please Note: “Others” (reason) is a default setting and is always enabled.
| |
|
|
To delete a reason, click the - Remove button or uncheck the box under the reason and click Submit.
Please Note: “Student drop off” (header) and “Other” (reason) are default settings and are always enabled.
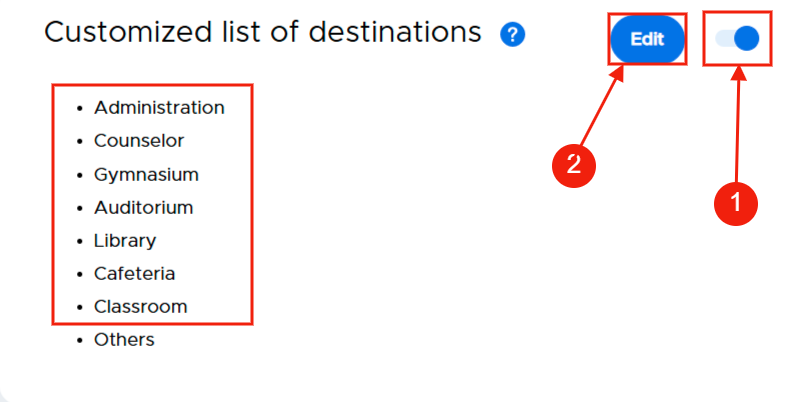
Customized List of Destinations
If enabled (1), visitors can select the location they will be visiting from a list of destinations, which you can easily customize. The system provides for seven (7) locations; you can customize/rename them by clicking on the Edit button (2).
| |
|
|

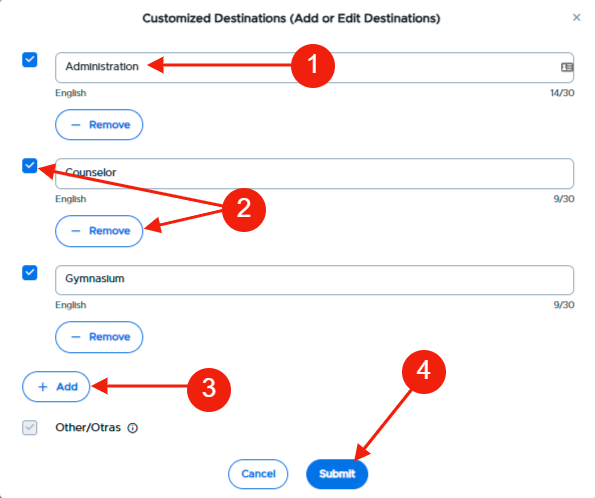
After clicking on Edit, click in the location name field (1) and type the new name of the location OR click - Remove to remove that location from the list or uncheck the box to the left of the destination (2). If you’ve removed several of the locations and desire to add some others, click + Add and add the name of the destination (3). When finished with the list of destinations, click Submit (4).
Customized Questions
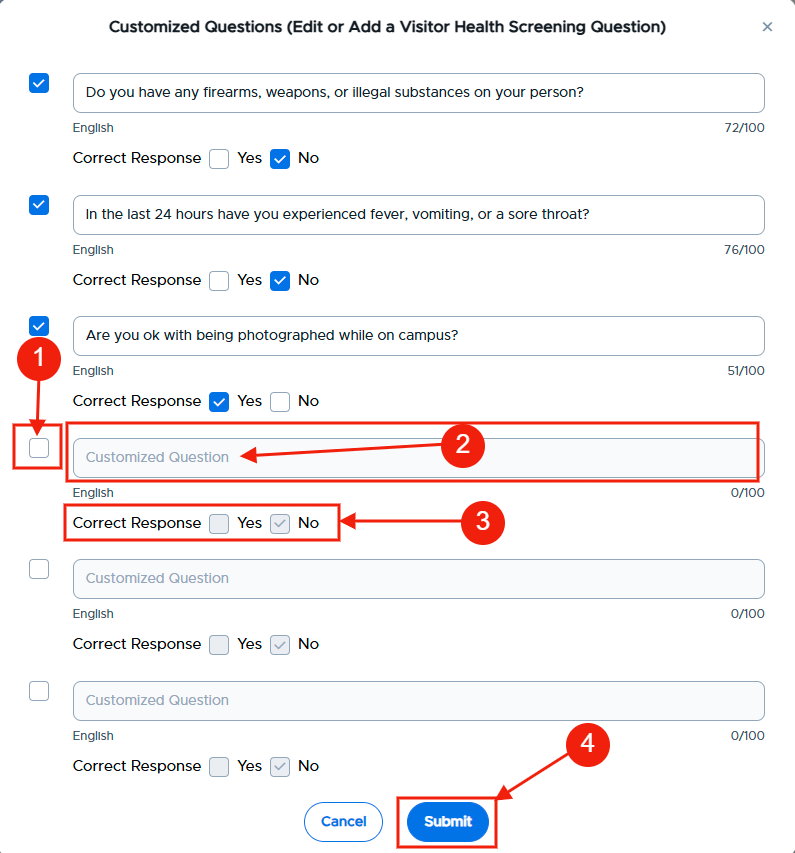
Securly Visitor offers a configurable screening feature that can help schools identify guests who could potentially pose a risk.
To enable the Visitor Customized Screening Questions, slide the toggle to the right. Once enabled, admins can click on the Edit button.
|
|


On the next screen, add questions and the correct answers that visitors need to answer before gaining access to the building. When finished adding questions, click Submit.
Customized Questions with Spanish Translation enabled.
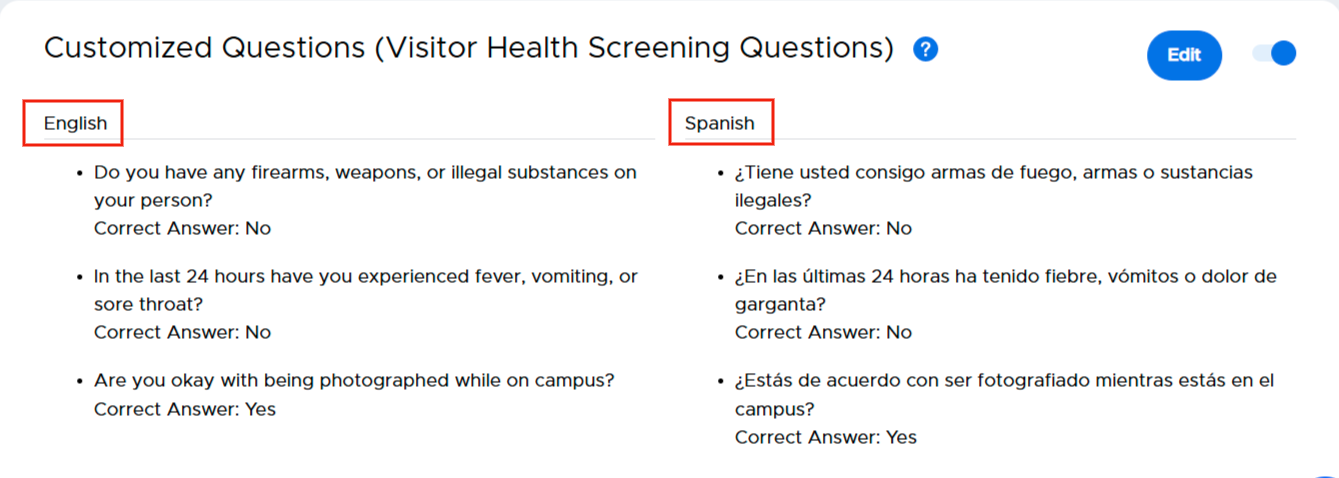
Please note:
- If the guests select your chosen answer for each question, they pass the screening process and go to the next step of guest check-in.
- The questions configured here will be displayed to the guests in the iPad app.
- If a guest fails the screening process, they will be denied entry and asked to talk to the front desk staff. The front desk staff can decide to either deny entry or make an exception for that guest.
The visitor record will indicate if a guest fails the screening check and is allowed or denied entry.

Phone Number Required
Admins can choose to collect phone numbers of visitors entering the campus. Having the phone number for the guest during check-in allows school personnel to contact them in case of an emergency or security situation on campus.
To enable Phone number required, slide the toggle to the right.

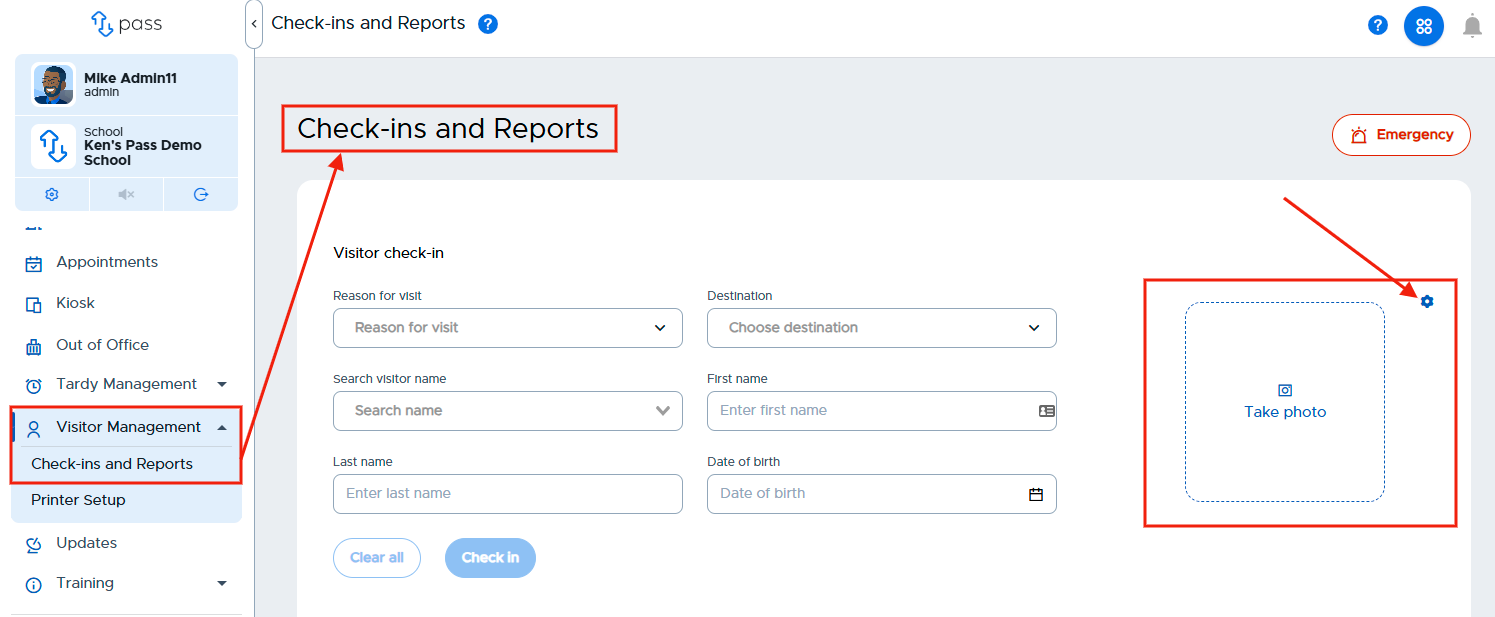
Photo Capture
If enabled, you will be able to utilize the camera on your Kiosk to capture a photo of the visitor that can then be printed on a visitor’s badge.

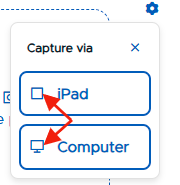
Once enabled, click Visitor Management and then Check-ins and Reports. The Take photo box will appear, along with a gear icon. Click on the gear icon to select the device that will capture the photo - Ipad or Computer. Click here for how to capture a visitor’s photo.
|
|
| |

Pre-set Visitor
The pre-set visitor list is a great way for schools to ensure that only visitors vetted by the school are allowed entry to the campus. If the guests/visitors are present on the list, the Visitor system approves them immediately and provides them the guest pass.
Please note the following:
- The individuals on this list WILL NOT be background checked against the National Sex Offender Registry, the school’s Watch List, nor the school’s Guardian/Student Matrix as they have been checked by the school prior to Check in.
- Visitors NOT on the list will not be able to check themselves in and will need to report to the front desk.
- Office personnel can then “Allow entry” with a note or “Deny entry”.
- Schools could have volunteers/chaperones check in the day(s) before using the kiosk or front desk staff, thereby doing a background check to see if any of those individuals come back as a possible match to the offender list or the school watch list. Then, on the day of the event, the school could use the Pre-set Visitor List, knowing that those on the list have been properly vetted.
To enable the Pre-set Visitor option, slide the toggle to the right.

When enabled, you can easily add visitors to your Visitor Pre-set List. Click on List settings.
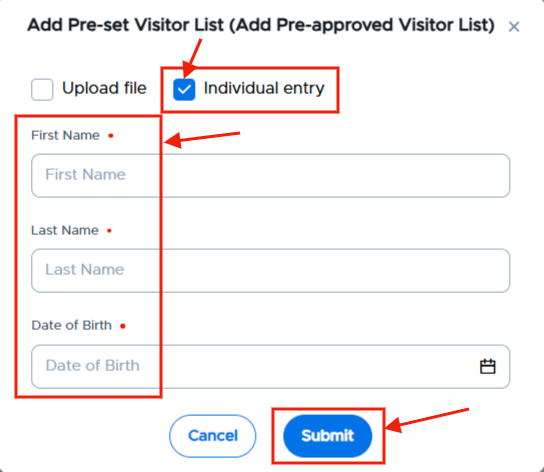
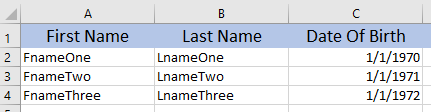
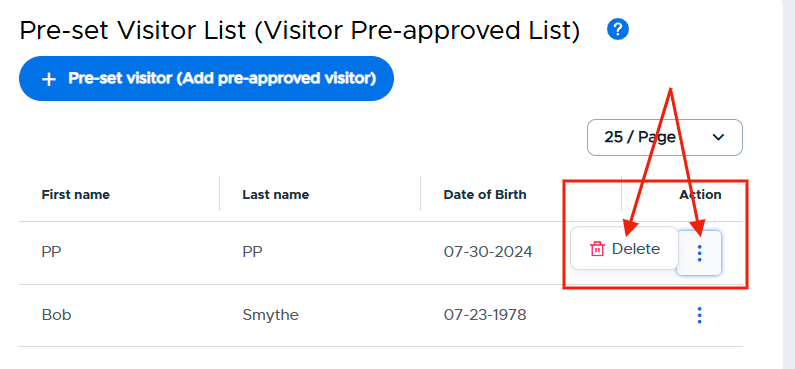
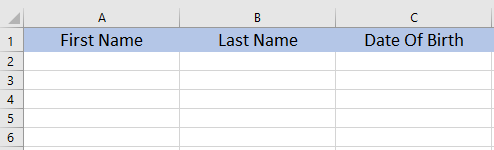
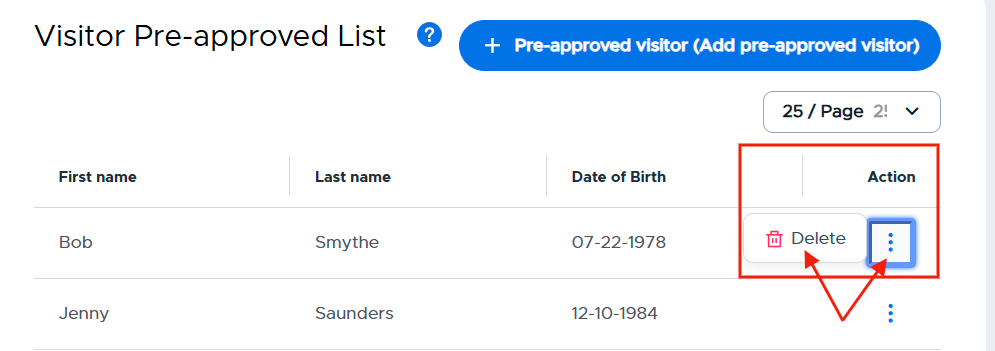
Scroll to the Visitor Pre-set List section and click on the blue + Pre-set visitor (Add pre-approved visitor) button. On the popup, you can add Pre-set visitors by CSV file upload (first name, last name, and Date of Birth) OR by individual entry.
CSV File Upload | Individual Entry |
#1 - Check the Upload file box #2 - Download the Example file, add the appropriate information and save the file as a CSV file. #3 - Select the CSV file #4 - Click Submit. |
|
|

Once added to your list, you can easily remove these visitors by clicking on the three (3) dots under the Action column, clicking Delete, and then clicking on the red Confirm button.
|
|
Automatic checkout
When enabled, this feature will automatically check visitors out of the building at the end of the school day. To enable this functionality, simply slide the toggle to the right.

Kiosk Settings
These Kiosk Settings are related to self-serve check-in kiosks only. On this page, you can require ID scanning at the kiosk, enable visitor self-check out from the kiosk, allow for Visitor self-serve badge printing (DYMO printer); and add Spanish translations to your customized reasons, locations, and customized questions; visitors will then have the option to select English or Spanish when they check in.
Required ID Scanning
By requiring ID scanning, admins can cross-check a visitor's name against all 50 states' sex offender registries/databases, and the Watch List that is maintained by the school. Doing so prevents any misrepresentation of information by the visitor and ensures that the system can accurately verify the guest's driver's license against such lists.
To allow for ID Scanning, slide the toggle to the right.

Enable Visitor Self Check Out
This functionality allows guests or visitors to check themselves out of the building at the Kiosk (iPad). The front desk staff or any school personnel are not required to be present during check-out
To Enable Visitor Self Check-out, slide the toggle to the right.

It is possible to configure check-out on some or all of the iPads the school uses for checking in guests. Once the feature has been enabled from the Kiosk Settings, it will be available by default on all iPads in your school that have the Visitor app. You can choose to configure only the check-out option or remove it completely as well from a specific iPad.
Follow these steps if using an iPad:
- Log in to the Visitor iPad app.
|
|
- Double tap with two fingers to access the admin settings.
|
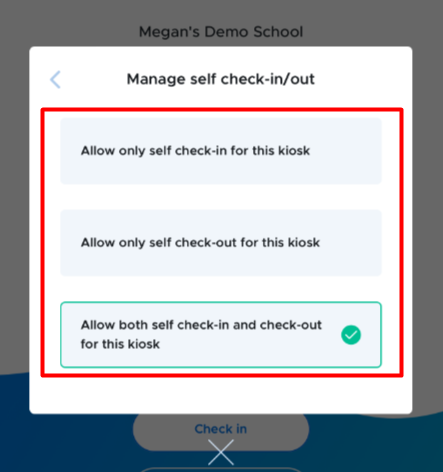
- Click on Manage self check-in/out setting and select the appropriate check-in/out option.
|
- Click on the appropriate Printer options.
|

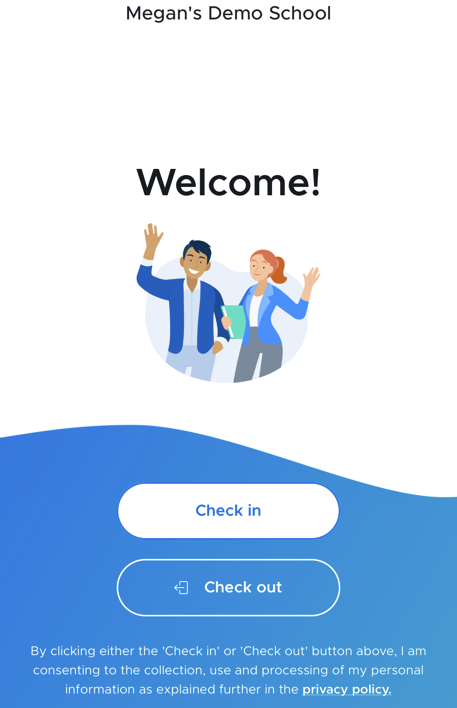
- The check-in/out buttons will appear on the Welcome screen of the Visitor app.
|
|
Dymo Printer: Visitor Self-serve Badge Printing
Enabling this feature will allow visitors to print their own badges, reducing dependence on school personnel or office staff to assist guests.
To enable the Dymo Printer self-serve option, slide the toggle to the right.

Please follow these instructions if using this feature:
- The badge printer must be connected to the front desk machine at all times.
- The Visitor web application should be logged in and running on the front desk staff’s system at all times. (This does not hamper the person’s ability to work on other tasks.)
- The Visitor web application should be opened using either Chrome or Safari browsers.
- The Dymo driver must be installed. (Directions for the installation of the printer and driver can be found on the Dymo website.)
To test if the printer is working at any time, click on the Test printer button at the top of the page. The system will check if your browser is supported, the requisite framework is installed, web service is present, and the printer is connected. If all four conditions are fulfilled, the guest will be able to use the self-serve option.
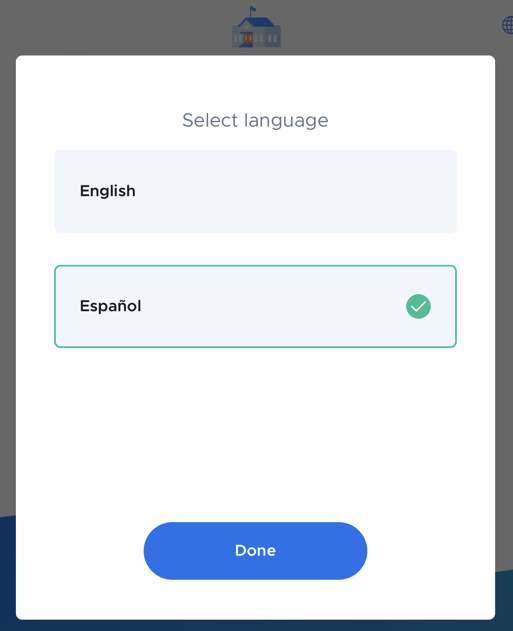
Spanish Translation
With Spanish translation enabled, admins can add Spanish translations to their customized reasons, locations, and customized questions. Visitors will then have the option to select English or Spanish when they check in at the kiosk.
To enable Spanish Translation, slide the toggle to the right.

Once enabled, guests will start to see a language selector on the iPad app and can choose to check-in in Spanish.
|
|
|
While the check-in instructions will be displayed in Spanish, the custom reasons for visits AND the Customized Questions are not translated automatically. Admins must input these reasons and questions in Spanish for those to be displayed in the app in Spanish.
Please note: Spanish support will NOT be enabled until at least one of them is translated.
| |
|
|
| |
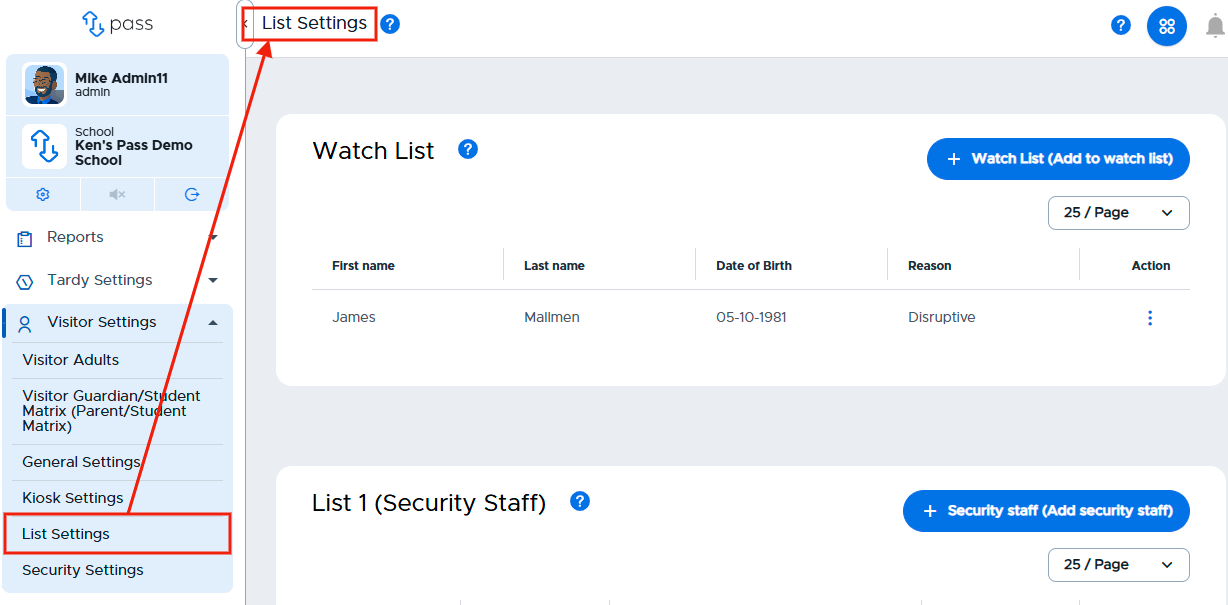
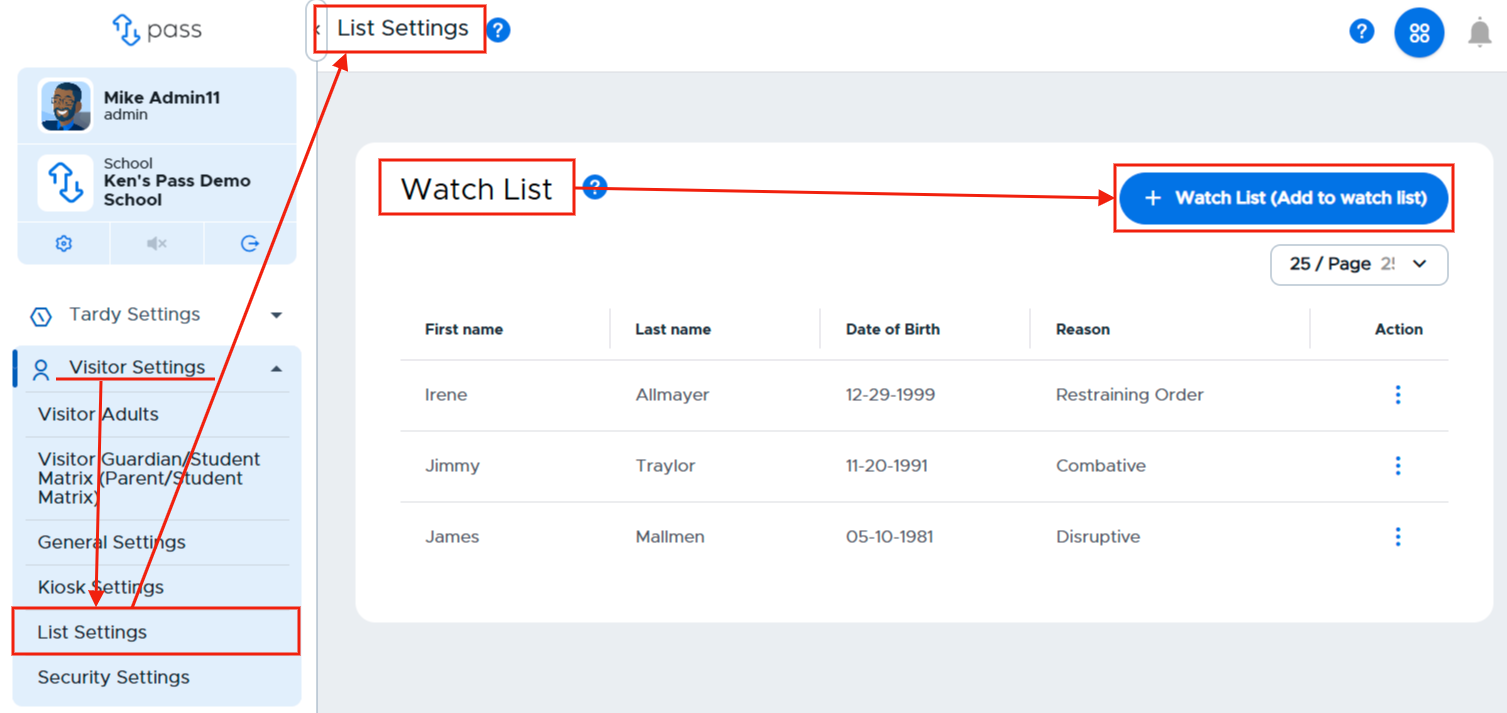
List Settings
From the List Settings, admins can add Watch List information, Security Staff / Emergency Contacts details, and Visitors who are pre-set. This data will be used to match parents with students, create a Watch List for when specified adults are on campus, and add Security Staff to the system who will then be notified when needed.
Watch List
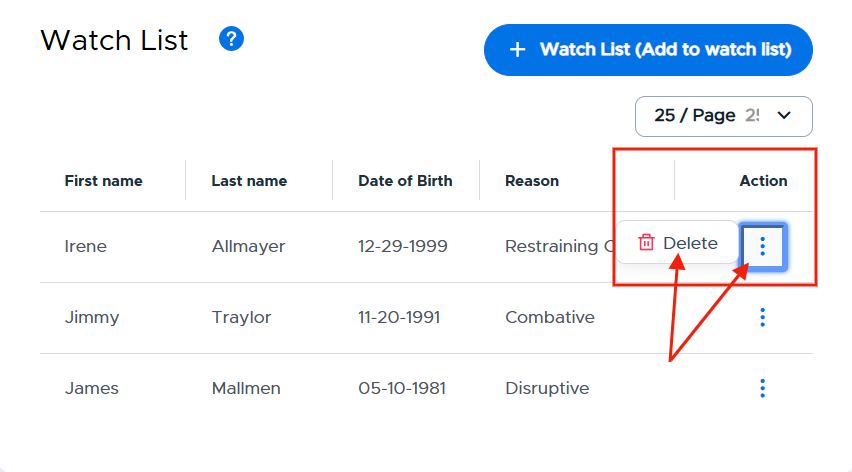
Admins can create a list of potential visitors who require additional screening/supervision while on campus. If a guest is on this list and attempts to check in, they will be “Denied” access and will be referred to the front desk person, who can then uphold the denial, ask additional questions, alert security, or create an exception and allow that guest entry into the building.
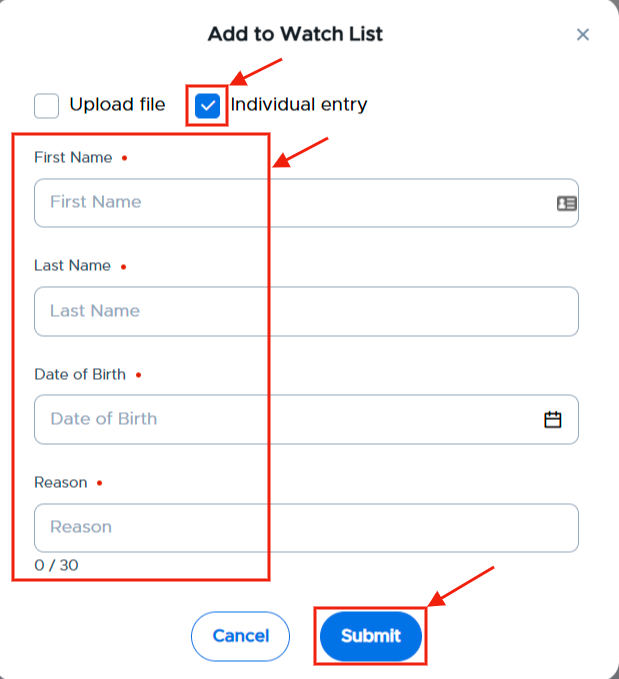
To create a Watch List, under Visitor Settings, click on List Settings. In the white Watch List box, click the blue + Watch List (Add to watch list) button.
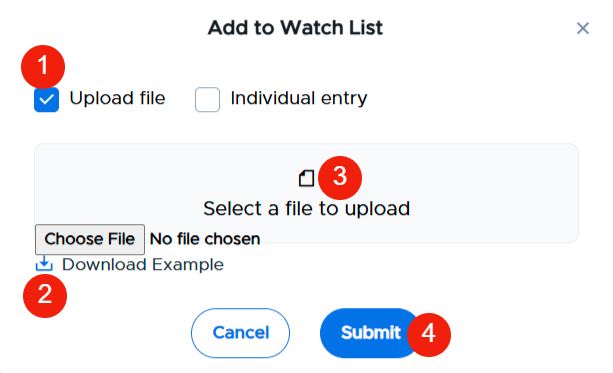
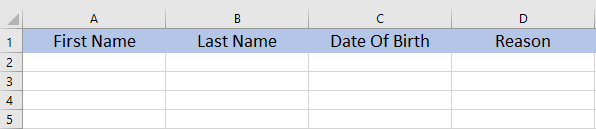
On the white popup screen, you have two options to add names to your Watch List. You can add names by uploading a CSV file OR by adding the individual names.
Upload file | Individual entry |
#1 - Check the Upload file box #2 - Download the Example file, add the appropriate information and save the file as a CSV file. #3 - Select the CSV file #4 - Click Submit. |
|
|
Once these individuals have been added either by a CSV file or manually, the list will be displayed on the screen. If you need to remove an individual from the list, simply click on the three (3) dots to the right of that person’s name, click Delete, and then Confirm.
|
|

List 1
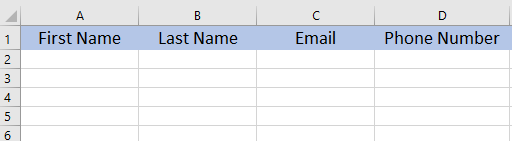
List 1 can include those individuals who work in the school and are on the Security Team when needed. This list could include staff members, teachers, admins, and/or the SRO. Admins can manage their security staff by adding these individuals via CSV file upload or individual entry.
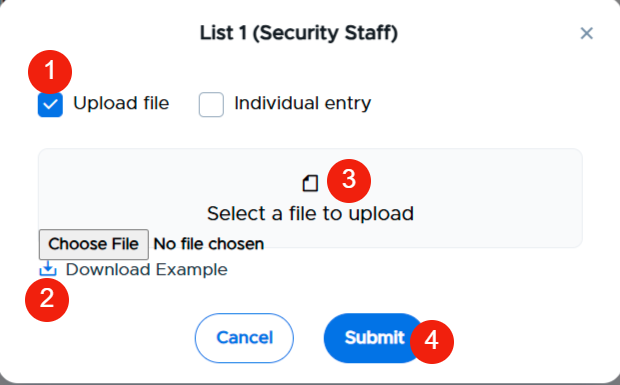
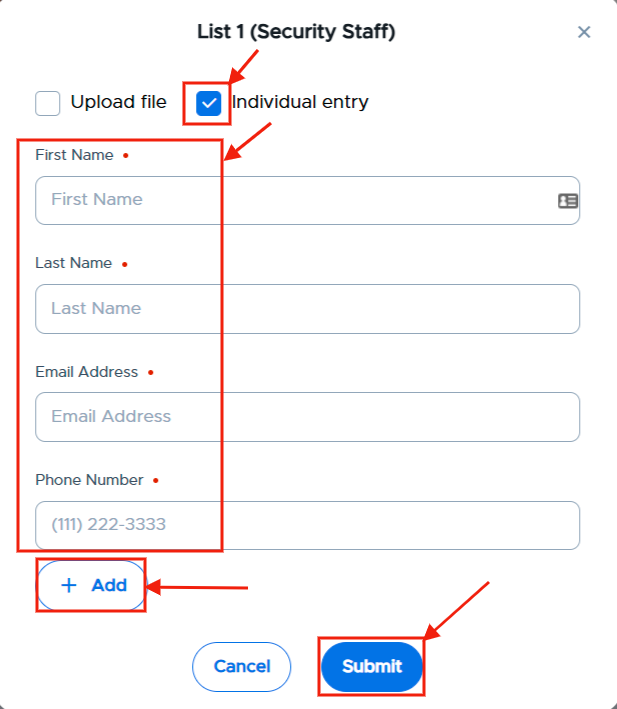
To create a List 1, under Visitor Settings, click on List Settings. In the white List 1 box, click the blue + Security staff (Add security staff) button.
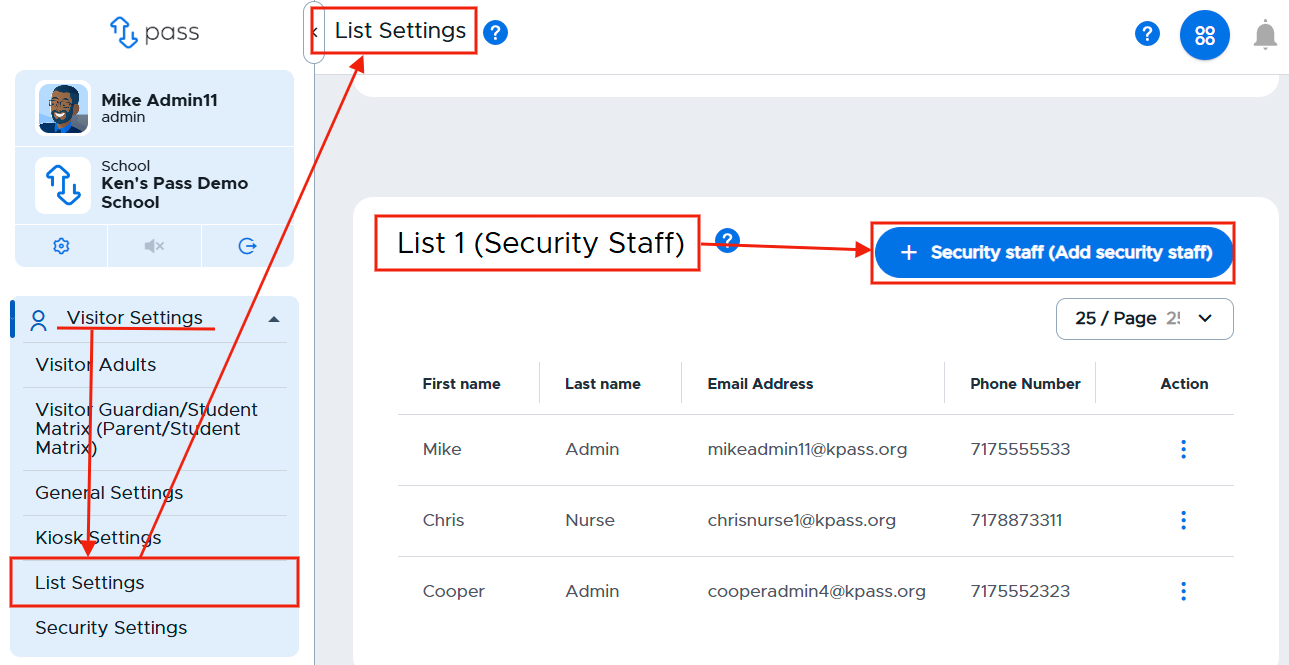
On the white popup screen, you have two options to add names to your List 1. You can add names by uploading a CSV file OR by adding the individual names.
Upload file | Individual entry |
#1 - Check the Upload file box #2 - Download the Example file, add the appropriate information and save the file as a CSV file. #3 - Select the CSV file #4 - Click Submit. |
|
| (With Individual entry, click + Add to add others to the list. Then click Submit.) |
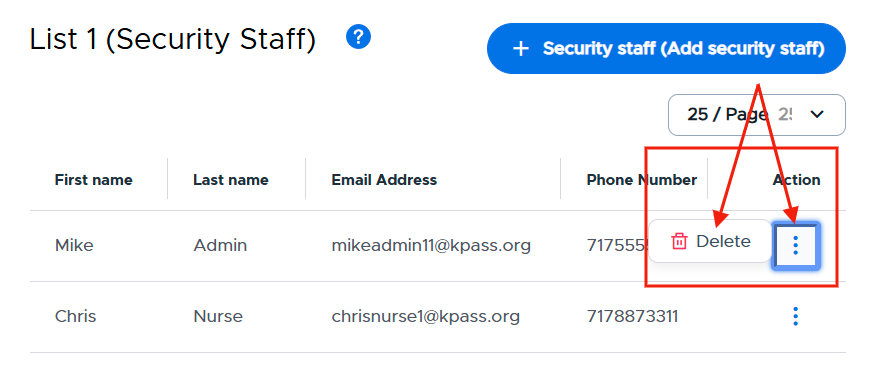
Once these individuals have been added either by a CSV file or manually, the list will be displayed on the screen. If you need to remove an individual from the list, simply click on the three (3) dots to the right of that person’s name, click Delete, and then Confirm.
|
|

List 2
List 2 (Emergency contacts) could include those individuals who should be contacted in the event of an emergency. This could include school/district personnel and/or law enforcement officers. Admins can manage their security staff by adding these individuals via CSV file upload or individual entry.
To create a List 2, under Visitor Settings, click on List Settings. In the white List 2 box, click the blue + Emergency contact (Add emergency contact) button.
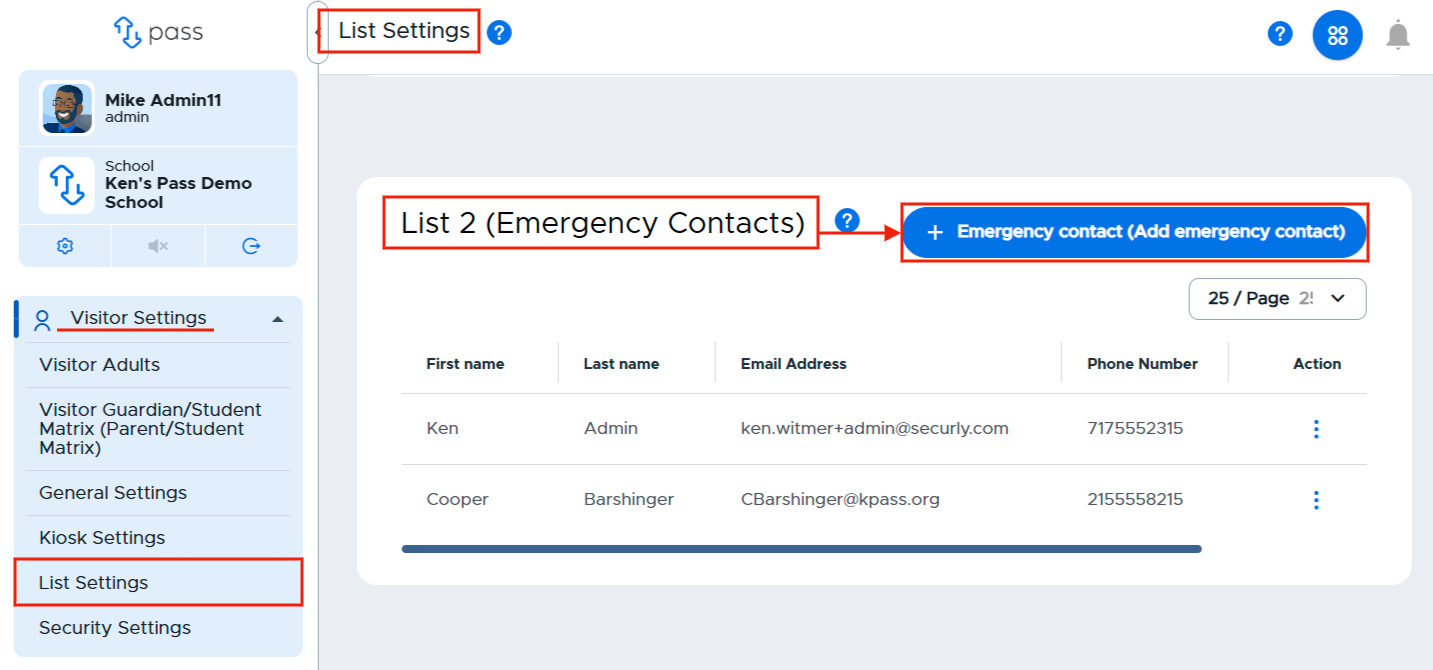
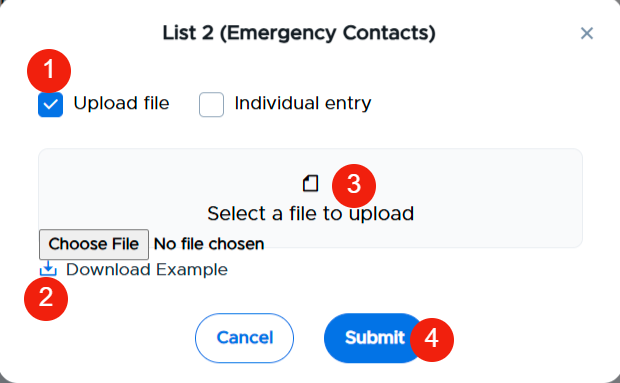
On the white popup screen, you have two options to add names to your List 2. You can add names by uploading a CSV file OR by adding the individual names.
Upload file | Individual entry |
#1 - Check the Upload file box #2 - Download the Example file, add the appropriate information and save the file as a CSV file. #3 - Select the CSV file #4 - Click Submit. |
|
| (With Individual entry, click + Add to add others to the list. Then click Submit.) |


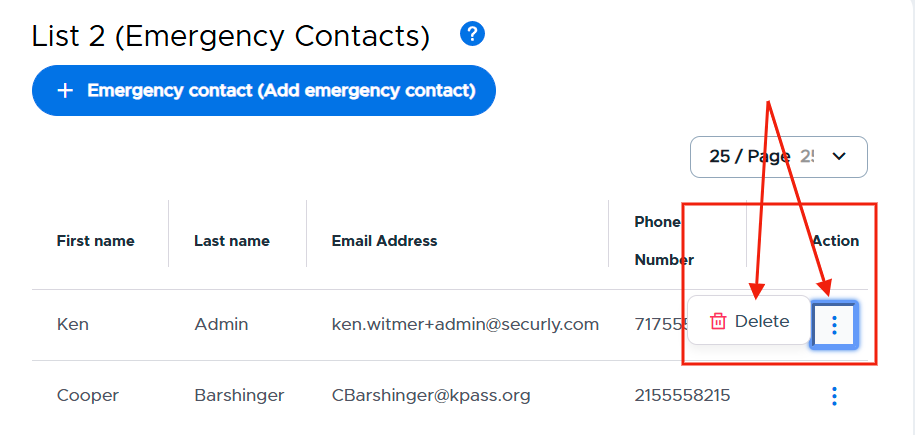
Once these individuals have been added either by a CSV file or manually, the list will be displayed on the screen. If you need to remove an individual from the list, simply click on the three (3) dots to the right of that person’s name, click Delete, and then Confirm.
|
|

Visitor Pre-set List
The Pre-set Visitor List is a great way for a school to ensure that only visitors vetted by the school are allowed entry to the campus. These individuals could include contracted counselors, district maintenance staff, etc. If they are present on the list, Visitor approves them immediately and provides them a guest pass.
Before enabling a Pre-set Visitor List, please consider these points:
- Guests who are not present on the pre-set list will not be able to check themselves in.
- People listed on the pre-set list are not checked against the National Sex Offender Registry or internal Watch List.
To create a Visitor Pre-set List, under Visitor Settings, click on List Settings. In the white Visitor Pre-set List box, click the blue + pre-set visitor (Add pre-approved visitor) button.
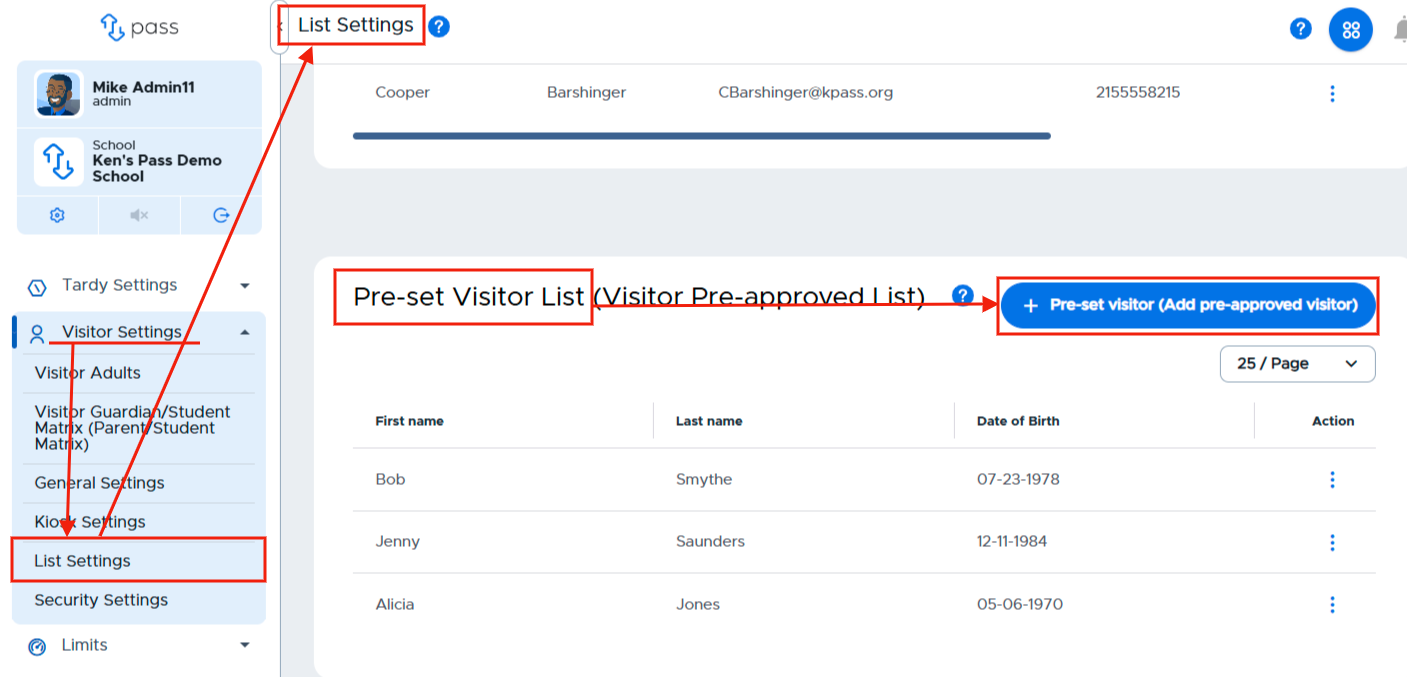
On the white popup screen, you have two options to add names to your Visitor Pre-set List. You can add names by uploading a CSV file OR by adding the individual names.
Upload file | Individual entry |
#1 - Check the Upload file box #2 - Download the Example file, add the appropriate information and save the file as a CSV file. #3 - Select the CSV file #4 - Click Submit. |
|
|


Once these individuals have been added either by a CSV file or manually, the list will be displayed on the screen. If you need to remove an individual from the list, simply click on the three (3) dots to the right of that person’s name, click Delete, and then Confirm.
|
|

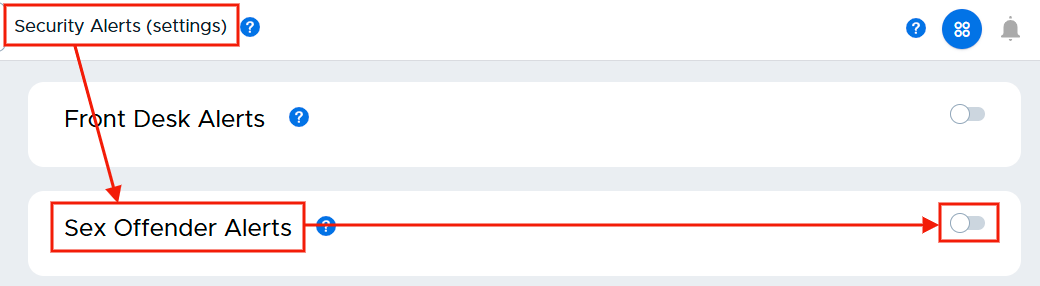
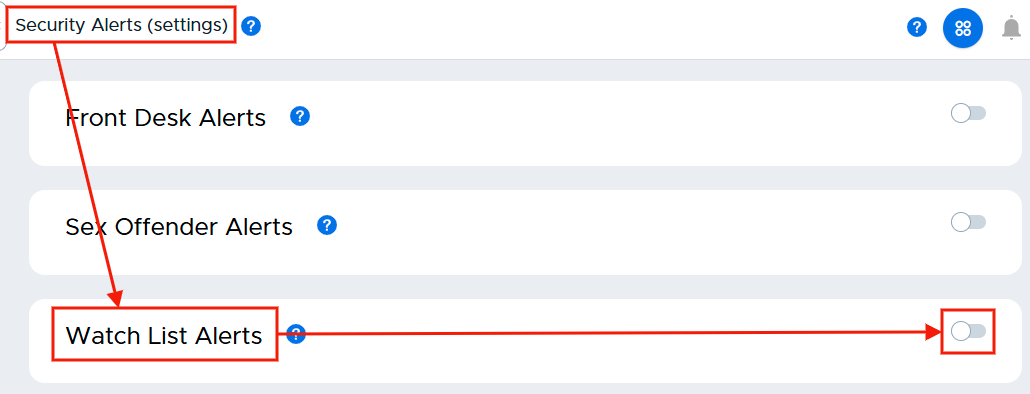
Security Alerts
The Security Alerts tab allows you to set up and manage your Front Desk Alerts, your Sex Offender Alerts, and Watch List Alerts.
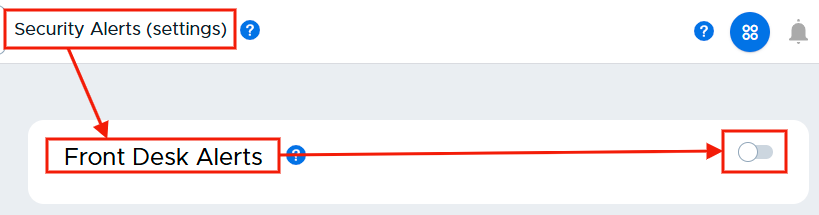
Front Desk Alerts
Admins can send alerts to security staff and/or other emergency contacts.
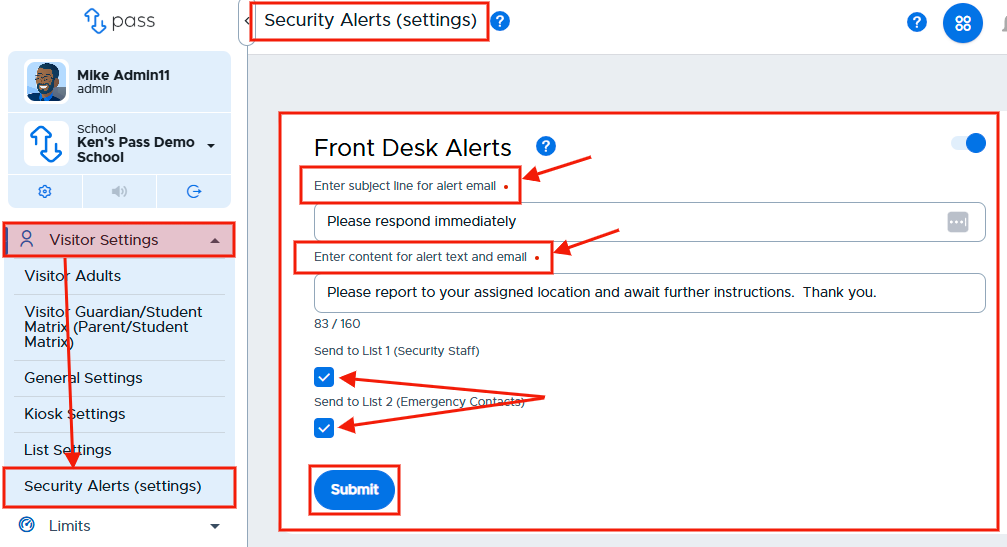
To enable the Front Desk Alerts message, click Security Alerts (Settings). To the right of Front Desk Alerts, slide the toggle to the right. (It will turn blue when activated.)
Once the Front Desk Alerts has been activated, enter the text for the Subject line for the Front Desk Alert email and the content for the Front Desk Alert text and email. Then, check the appropriate box(es) as to who will receive the emergency alert - List 1 (Security Staff),
List 2 (Emergency contacts), or both. Click Submit when finished with this section. (The subject line and corresponding message are for illustration purposes only.)
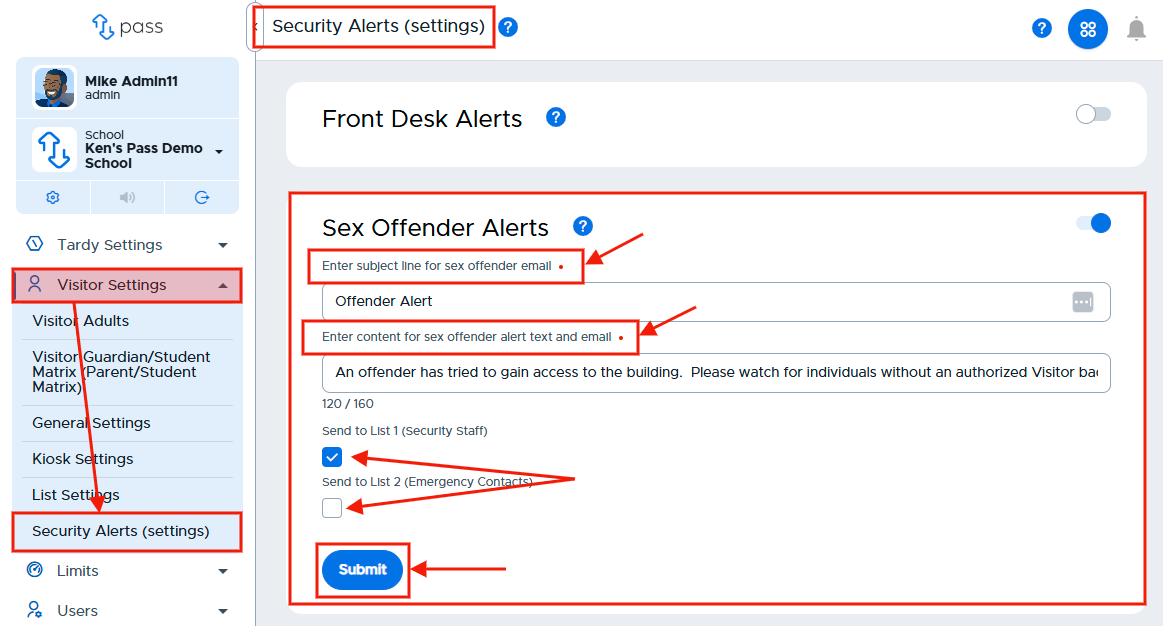
Sex Offender Alerts
Admins can send Sex Offender Alerts to specific staff and/or emergency contacts when a sex offender is present on campus.
To enable the Sex Offender Alerts, slide the toggle to the right. (It will turn blue when activated.)
Once the Sex Offender Alerts has been enabled, enter the Subject line text for the Sex Offender Alert email and the content for the Sex Offender Alert text and email. Then check the appropriate boxes as to who will receive these emergency alerts - List 1 (Security Staff), List 2 (Emergency Contacts), or both. Click Submit when finished with this section. (The subject line and corresponding message are for illustration purposes only.)
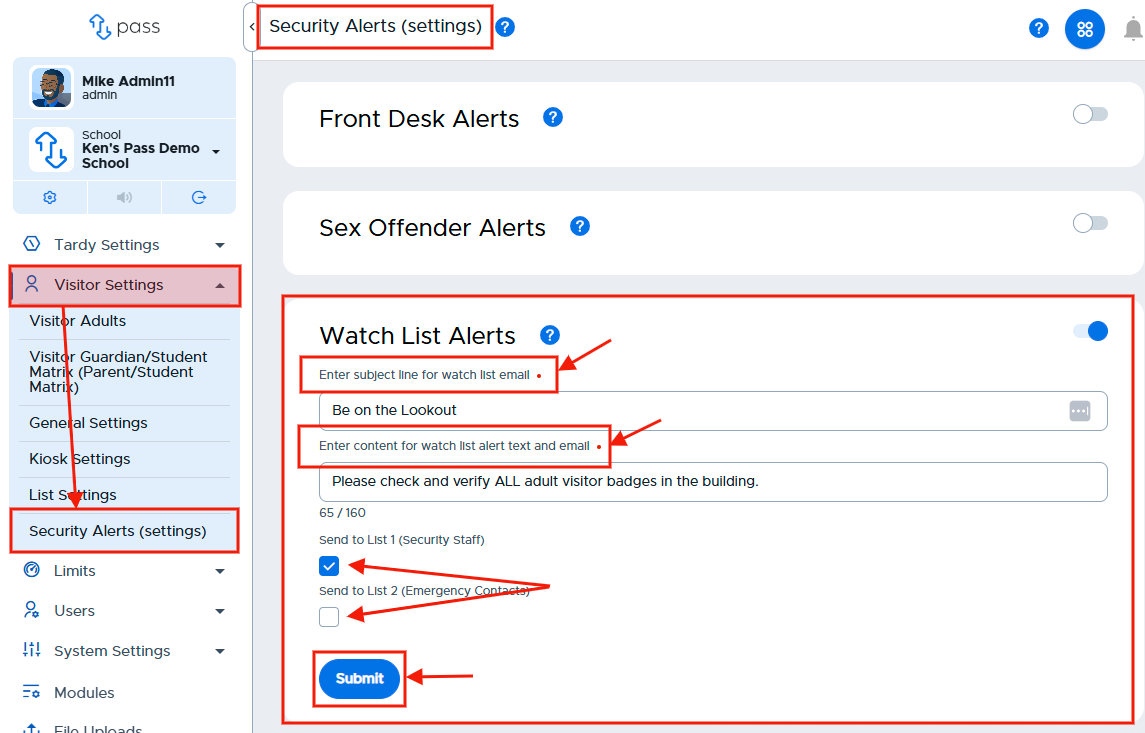
Watch List Alerts
Admins can send alerts to specific staff and/or emergency contacts when individuals who should not be permitted as visitors to the school are present on campus.
To enable the Watch List Alerts, slide the toggle to the right. (It will turn blue when activated.)
Enter the Subject line text for the Watch List Alert email and the content for the Watch List Alert text and email. Then check the appropriate boxes as to who will receive these emergency alerts - Security Staff, Emergency Contacts, or both. Click Save when finished with this section. (The subject line and corresponding message are for illustration purposes only.)
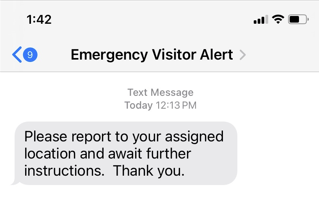
Contacts - Lists 1 and 2
If you create alerts, the emails will be sent to the email addresses that correspond to the individuals noted on your lists. The text messages will be sent to the phone numbers associated with the people on your list and will be from 844-431-1100. (Suggestion: Make a contact on your phone - “Emergency Visitor Alert” for 844-431-1100.)
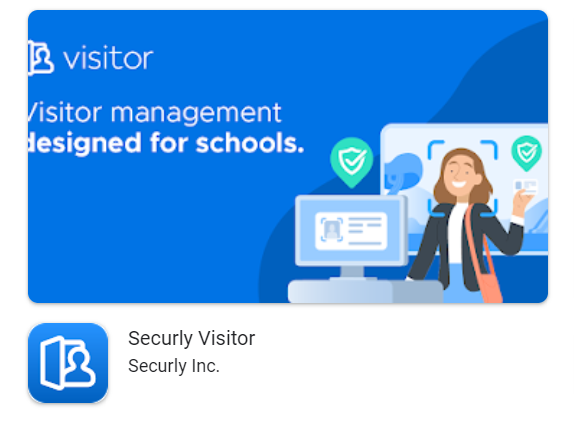
Setup and Management of Kiosks
Securly Visitor allows you to set up self check-in and check-out kiosks using any iPad running the current iOS plus the two most recent versions OR using an android tablet. If you have the appropriate iPad or android device, follow the instructions outlined below:
- Download the Securly Visitor app for iPad from the App Store or a tablet from Google Play. (Please note: This is a mobile App for tablets, not for cell phones.)
App Store | Google Play |
|
|
|
|

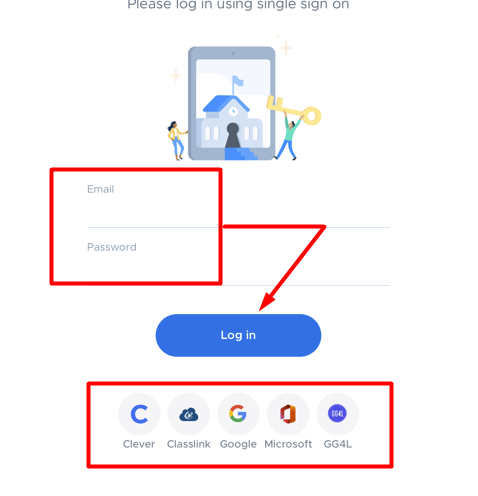
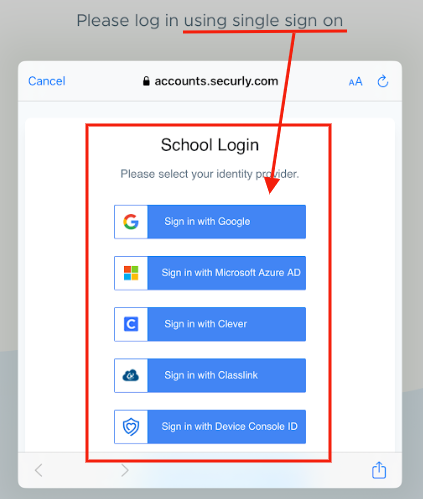
- Open the app on the device in the portrait or landscape orientation, sign in as any school admin or visitor adult, and set up the iPad/tablet for your school.
|
|

Portrait Orientation | Landscape Orientation |
|
|
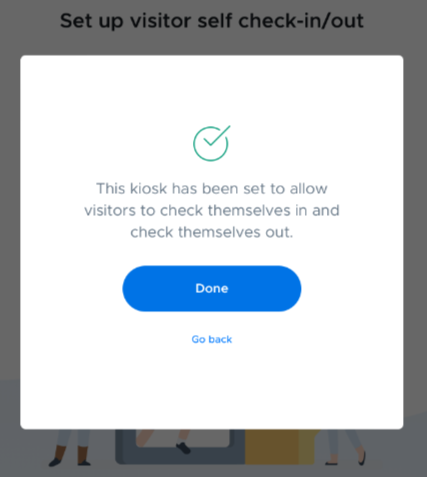
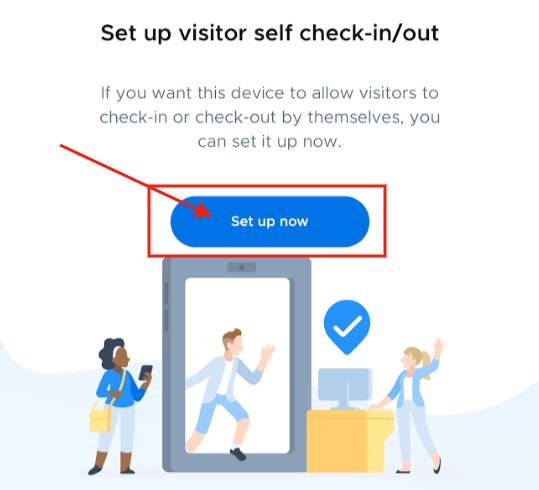
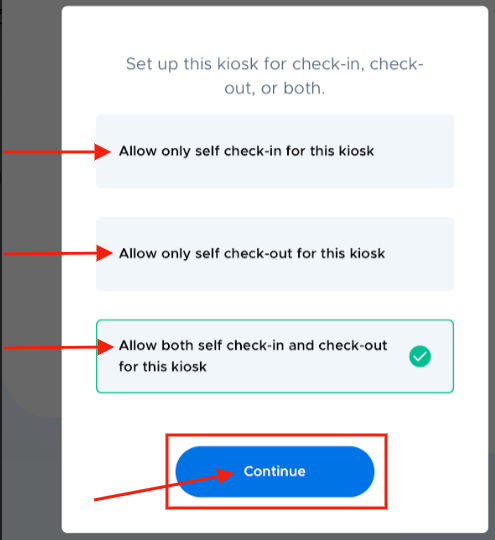
- In the Setup Wizard, you can set up visitor self check-in/out. Click Set up now, select the appropriate option, and then click Continue. Your kiosk is ready to allow visitors to check themselves in and/or out. Click Done.
|
| |
Allow self check-in ONLY | ||
Allow self check-out ONLY | ||
Allow BOTH check in and check-out |
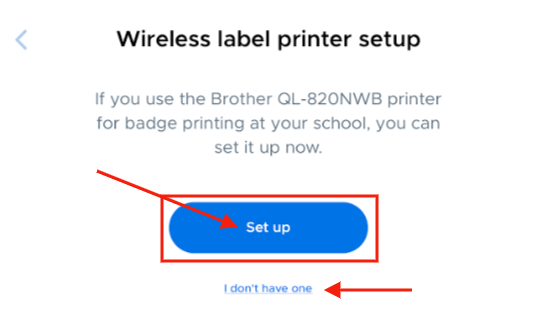
- Connect to a wireless label printer to enable badge printing. In order to complete this step, you will need a Brother QL-820NWB printer. Make sure the printer is turned on. On the “Wireless label printer setup” page, click Set up. If using a printer is not desired, click I don’t have one.
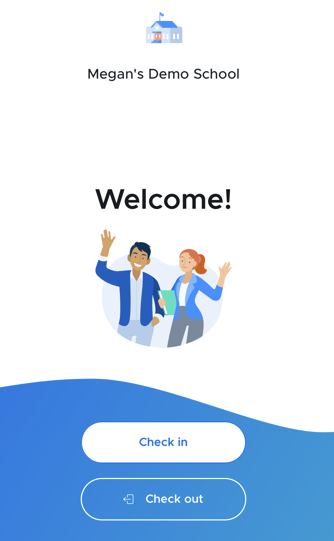
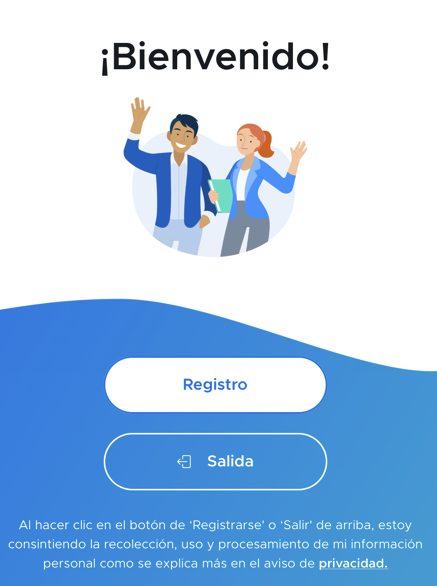
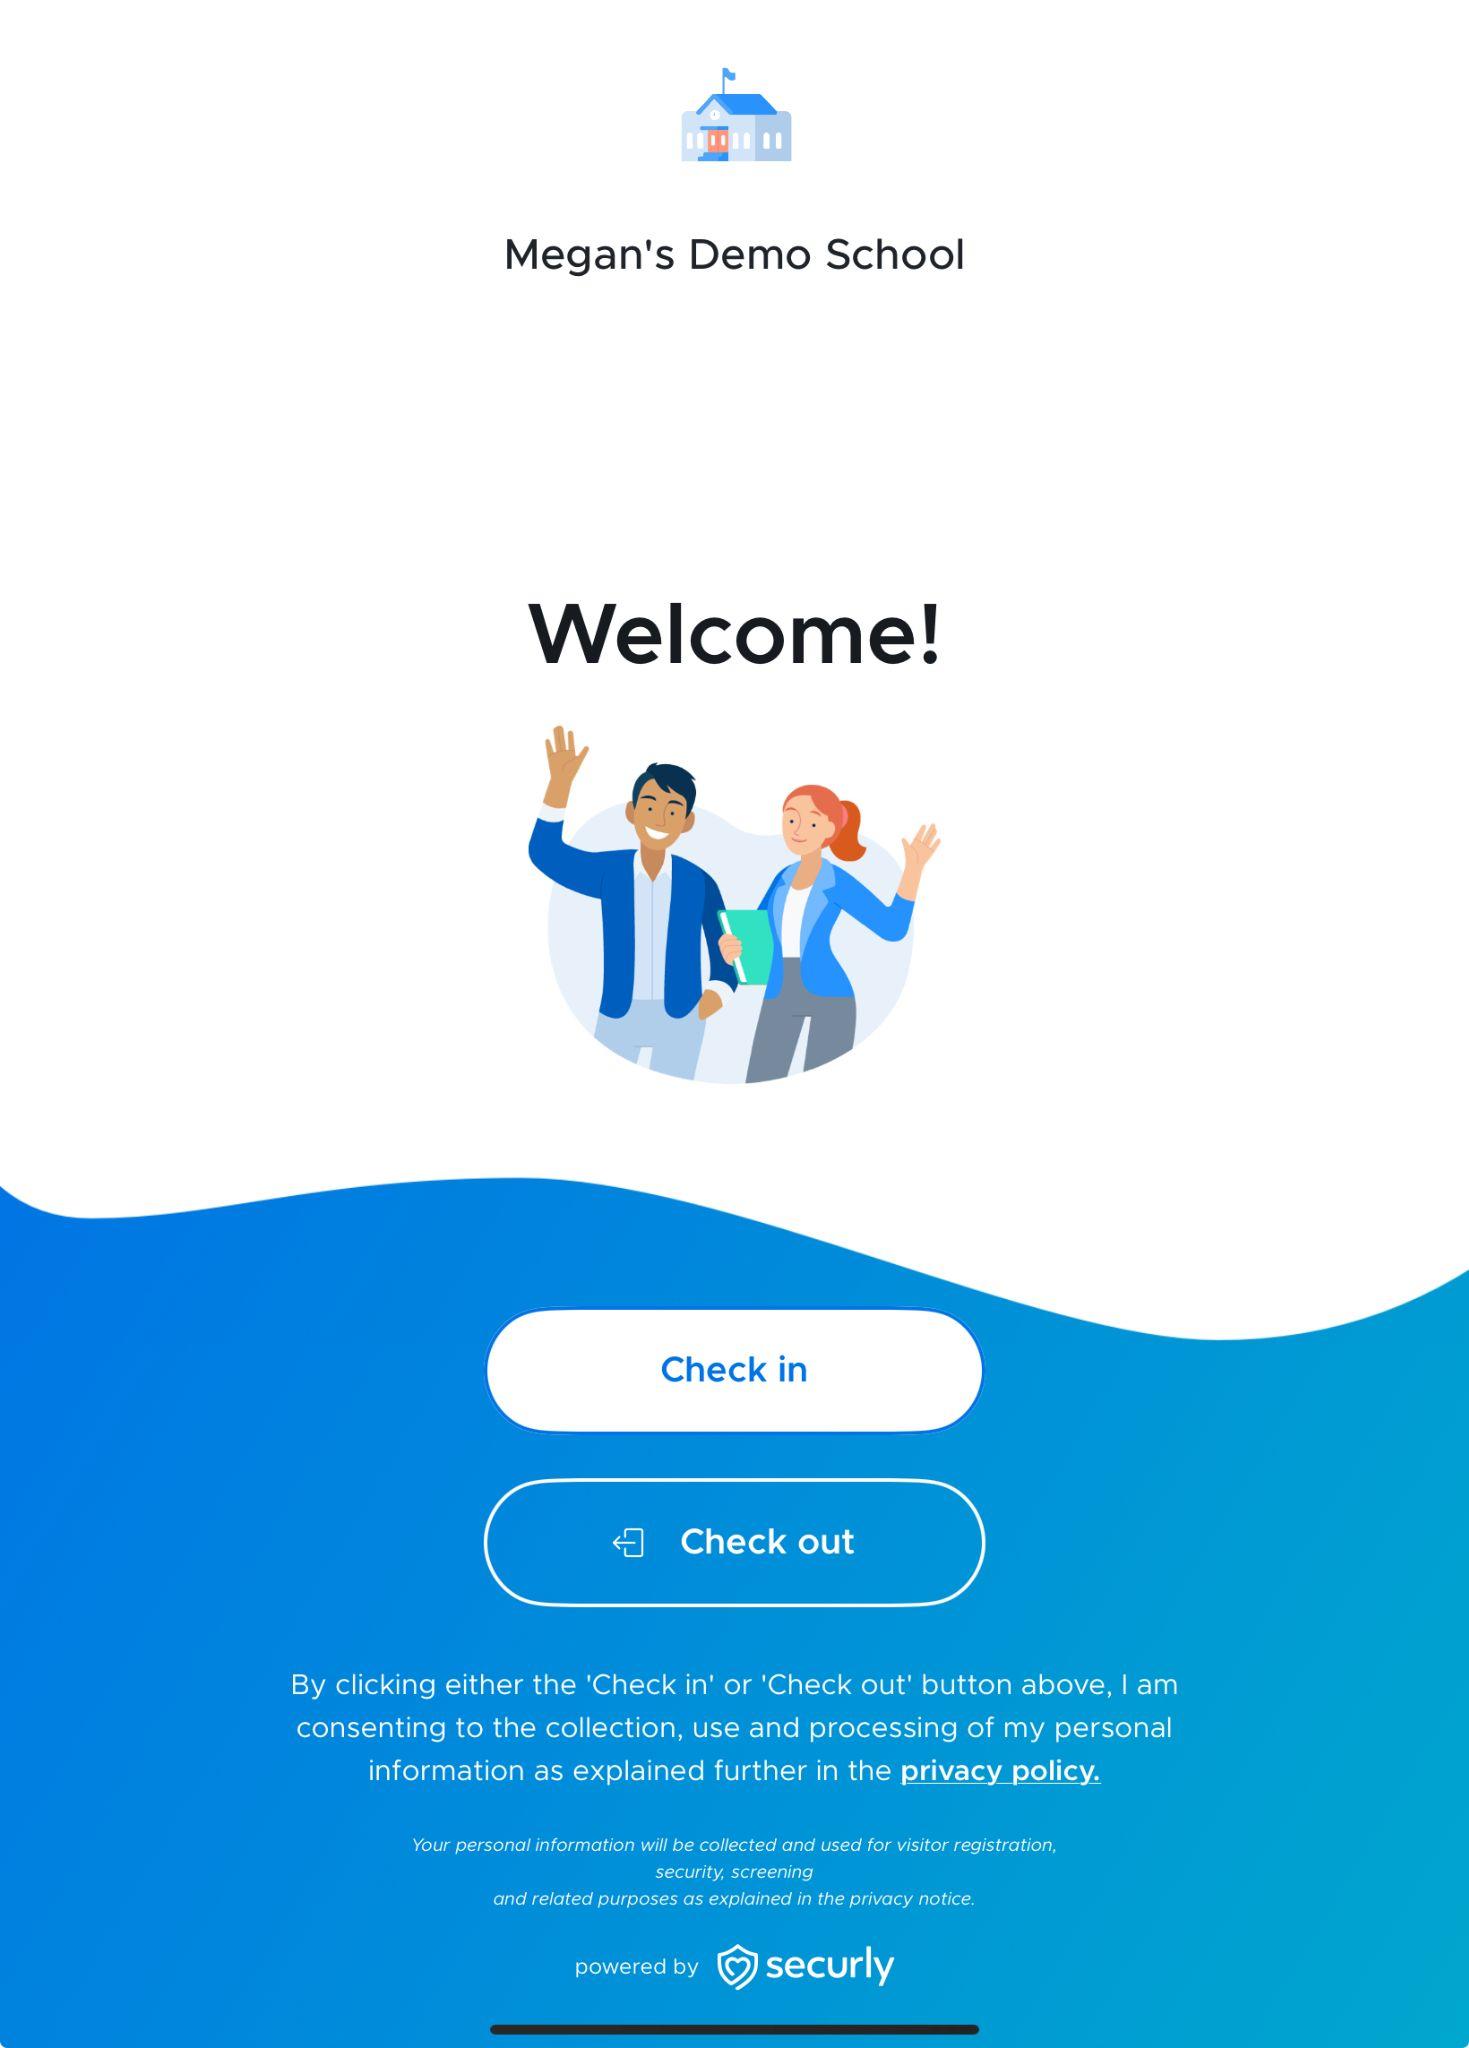
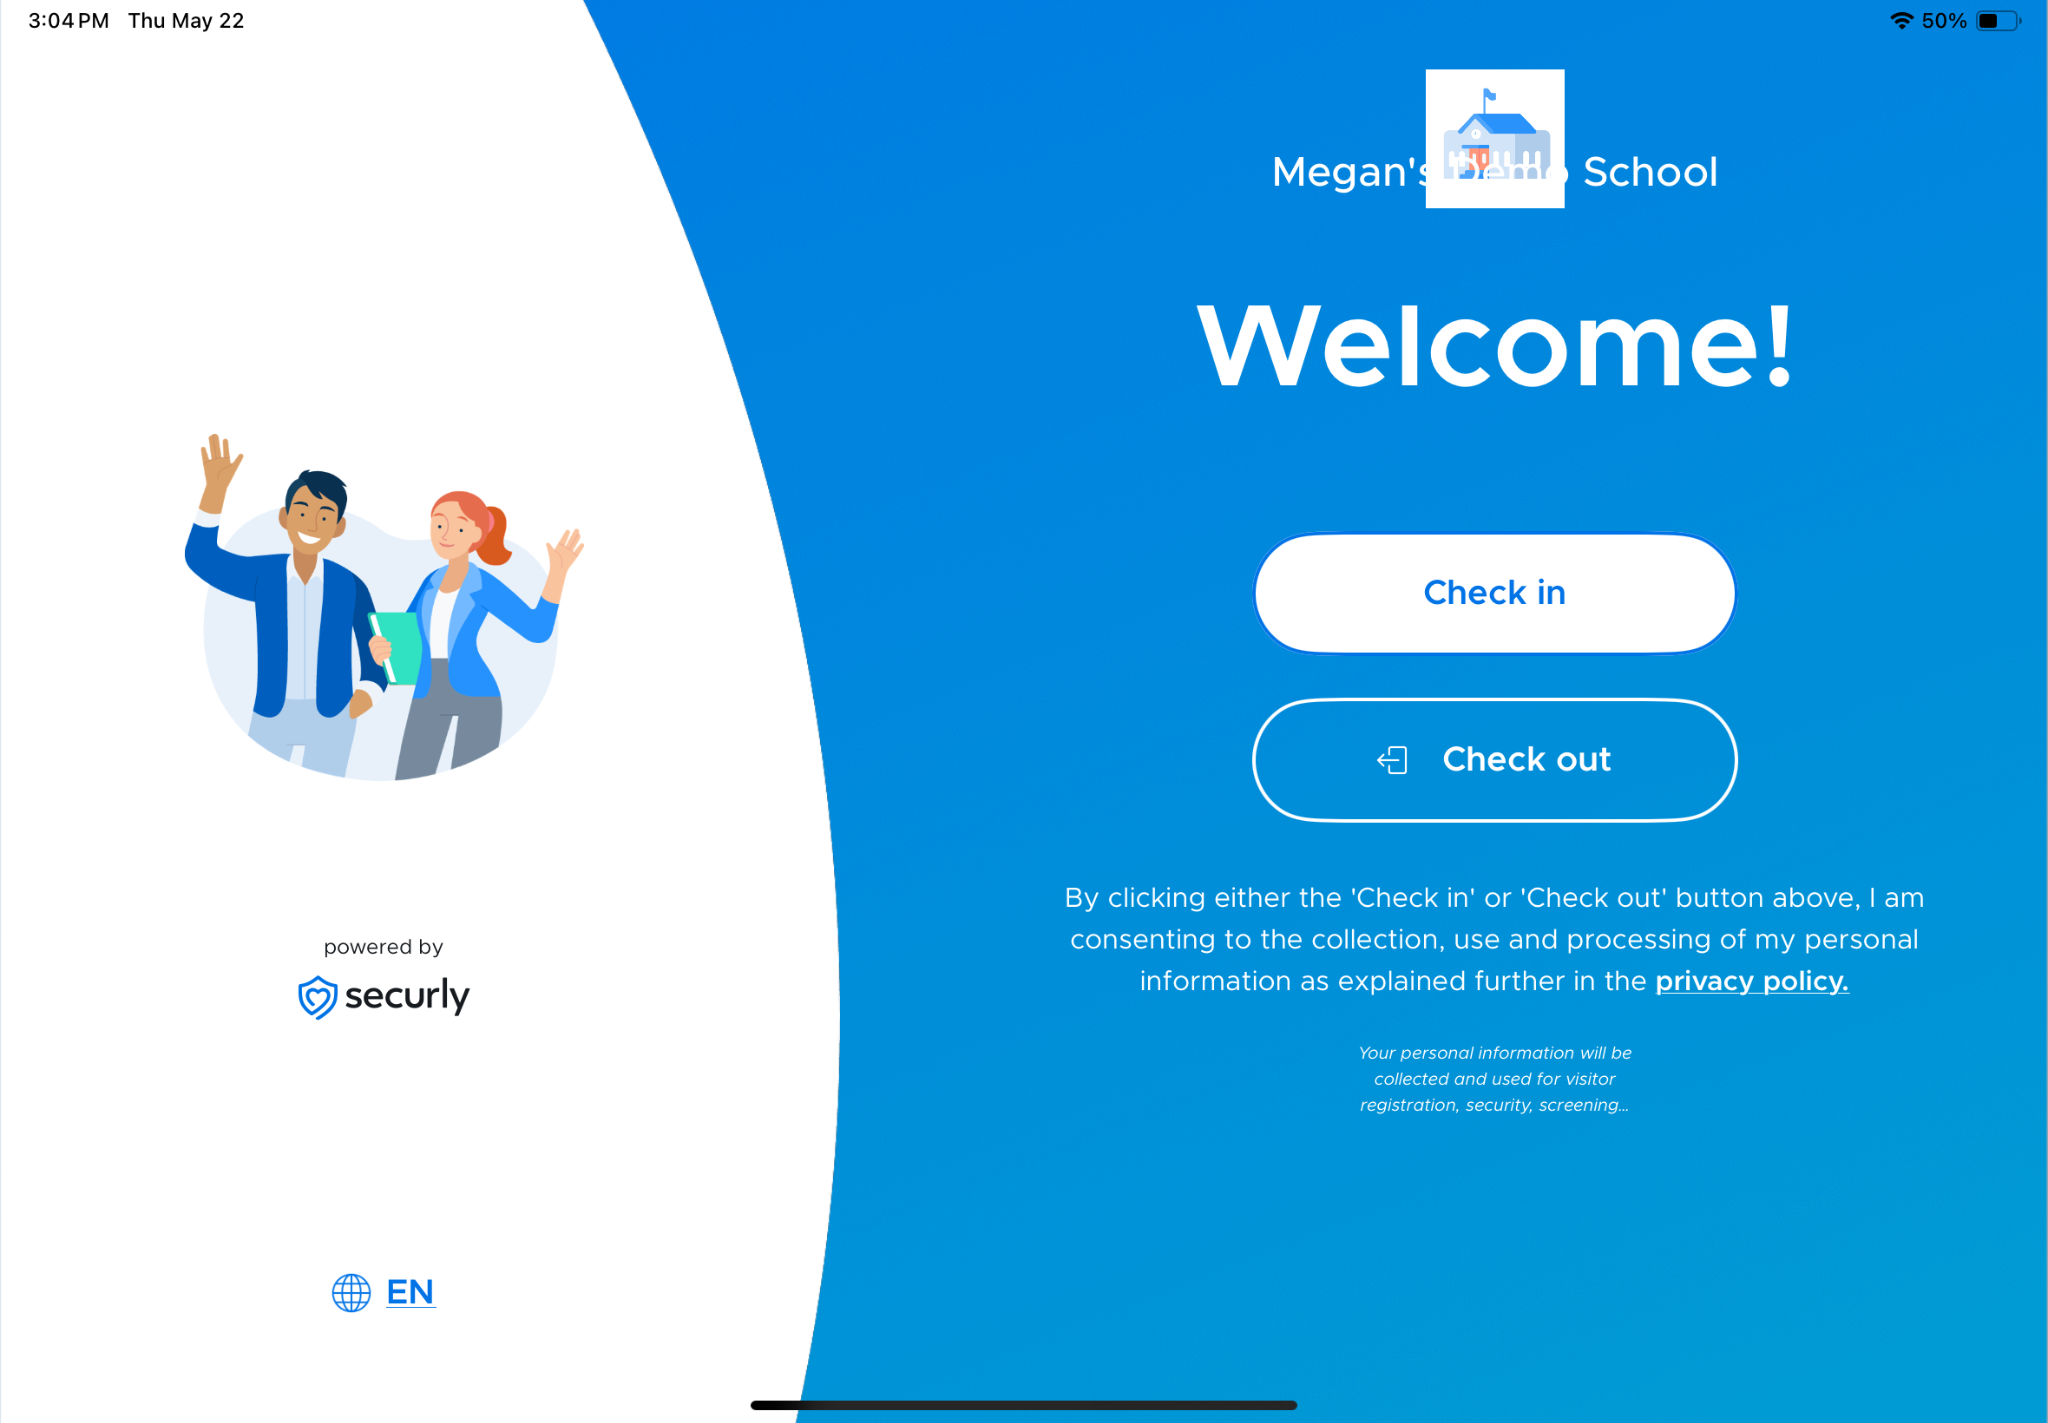
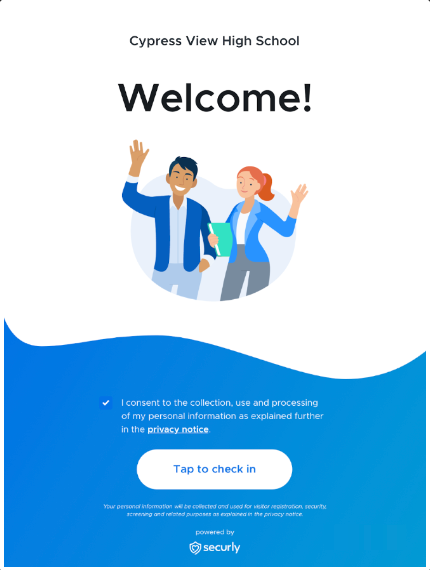
When finished, you will see the Welcome screen. Click the Tap to check in button.
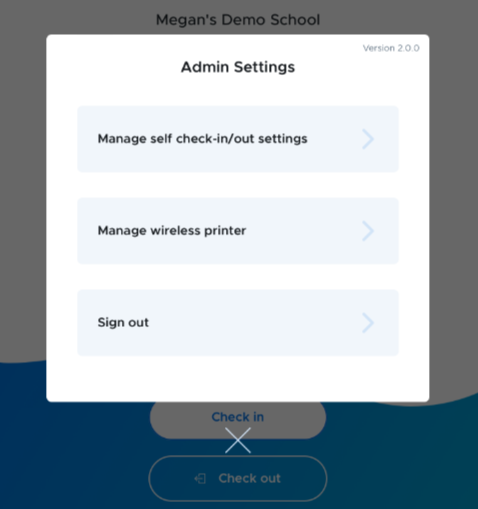
To access the Admin Settings, double tap the Welcome screen with two fingers. This will allow you to adjust any of the settings using the iPad.
Please note: Please allow notifications on your iPad/tablet for the Securly Visitor app.
Technical Compatibility Guidelines
Selecting Kiosk Mounts / Stands
When setting up the Check-in/Check-out Kiosk, select an appropriate stand for the iPad/tablet. The Securly Visitor app can display in either portrait or landscape orientation.
- Ensure that your stand does not obstruct the front or rear-facing cameras.
- The front-facing camera is used to capture visitor photos, and the rear-facing camera is used to scan licenses and IDs.
Note: If you do not intend to use these features, please disregard this information.
Compatible Devices
iPads/Tablets
iPad - Current iOS plus the two most recent versions
Android Tablet - 8.0 or higher
Compatible Badge Printers
We support the following printers:
- Brother
- Brother QL-820NWB Desktop Label Printer
- Requires DK 1202 printer labels
- Only supports connecting to the 2.4 GHz wireless band. It will not “see” or connect to the 5 GHz band of your router
- Works directly with the iPad
- Allows you to print badges from the iPad or the Front Desk location
- Facilitates multiple iPads printing to a single printer
- Brother QL-820NWB Desktop Label Printer
- DYMO
- DYMO labelWriter 450 turbo
- DYMO LabelWriter 450
- DYMO LabelWriter 550 turbo
Compatible Labels
- Brother - DK1202 (Brother printer - 62mm x 100mm)
- DYMO - DYMO Labels for LabelWriter Printers (57mm x 102mm)
Setting up Printers in Visitor
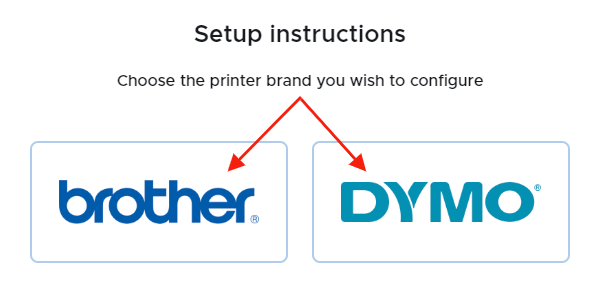
To set up a printer, from the left menu, click Visitor Management, Printer Setup, and then Setup Instructions.

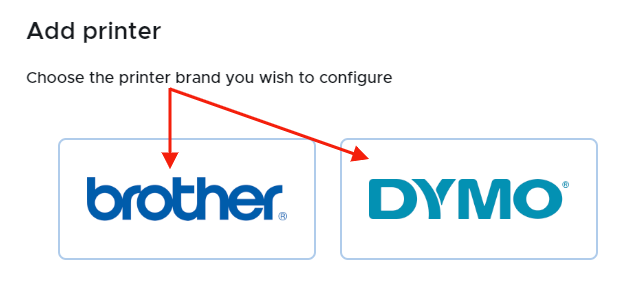
On the popup, select the brand of printer you have and follow the instructions that are listed for the printer that you selected (brother or DYMO).
| |
Brother printer - Setup Instructions | |
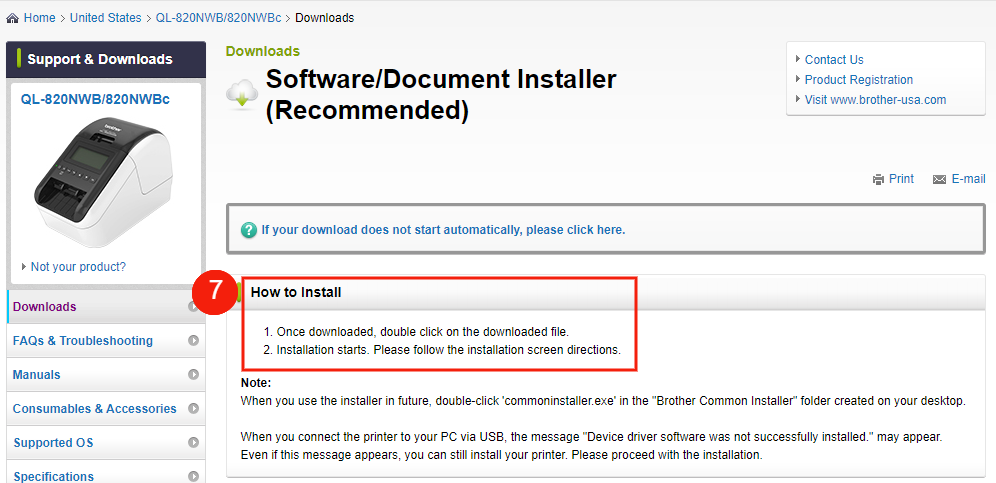
Brother Printer - Setup Instructions | |
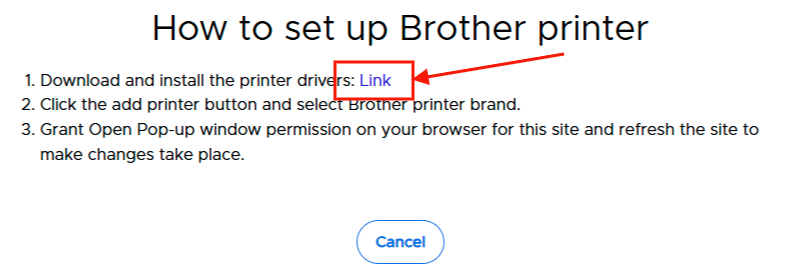
Download and install the printer drivers: Link | |
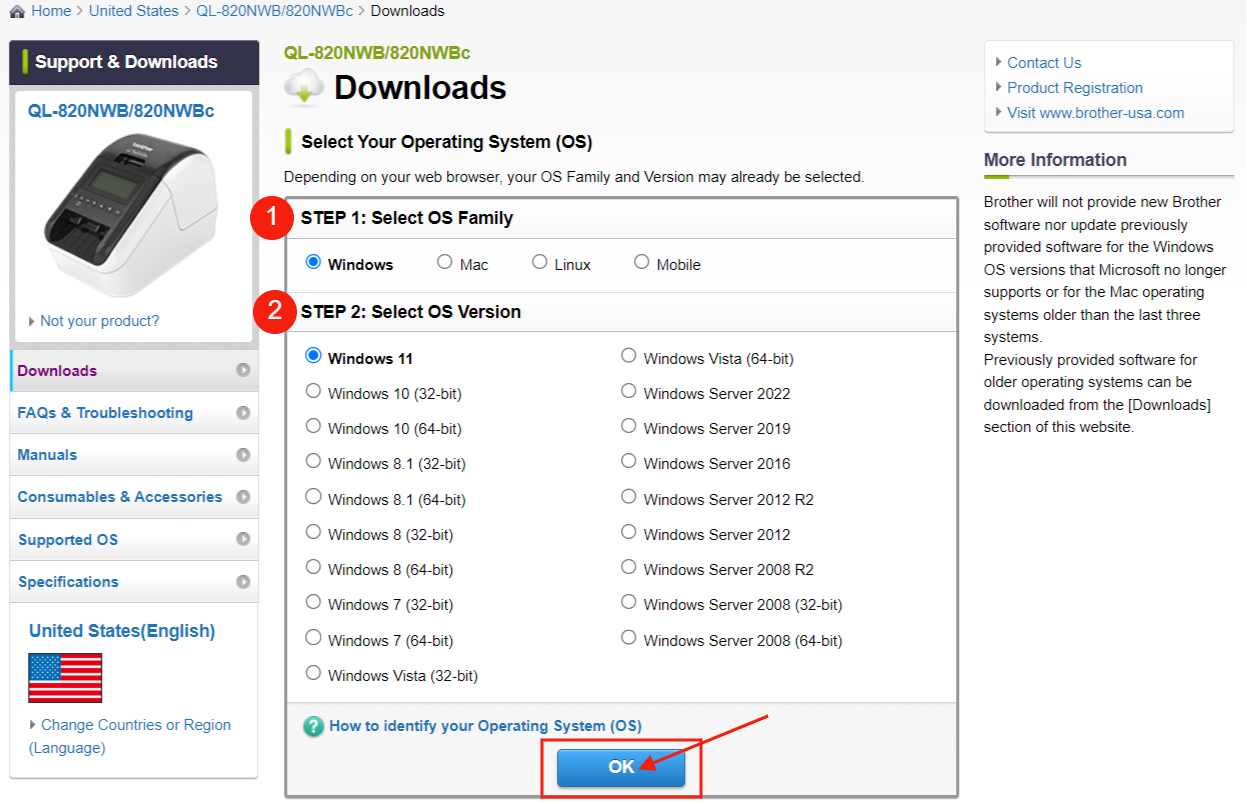
Steps 1 & 2 | |
| |
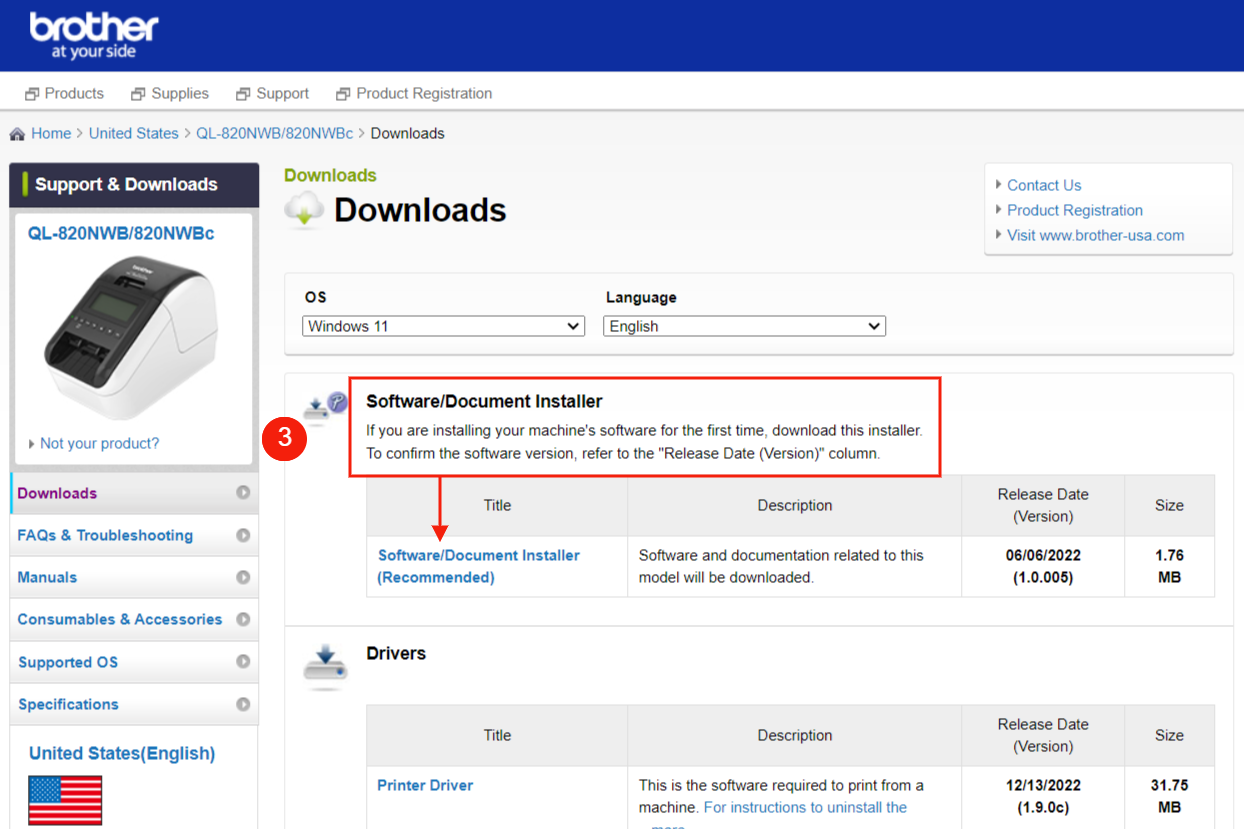
Step 3 | |
| |
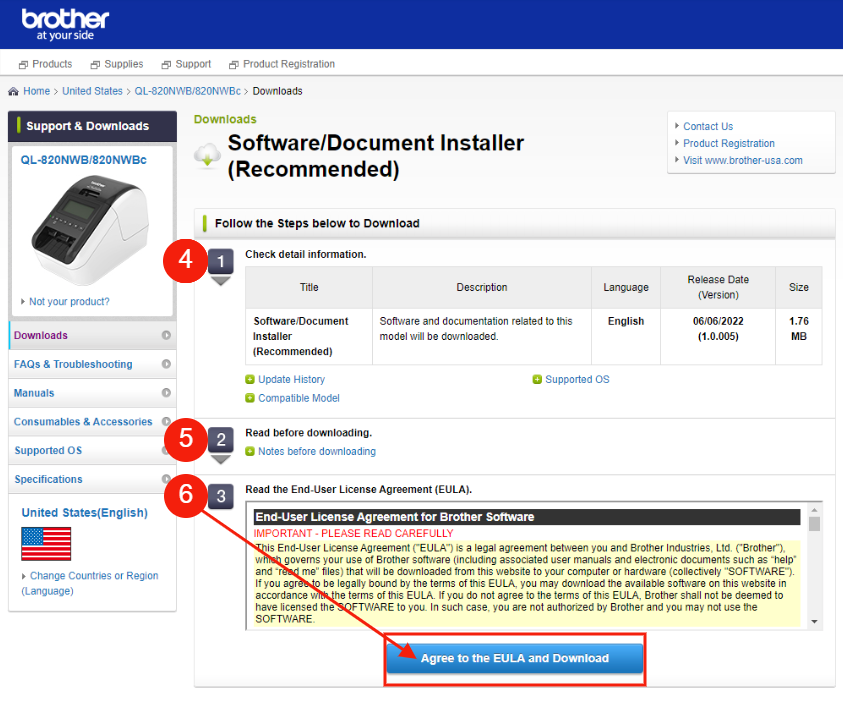
Step 4, 5, & 6 | |
| |
Step 7 | |
Please note: If you have issues with your Brother printer, please reach out to Brother FAQs and Troubleshooting. | |
| |
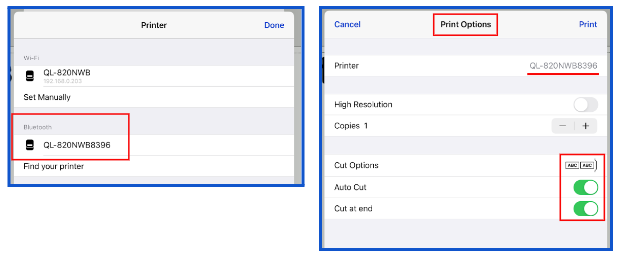
Connect Brother QL-820NWB to Bluetooth | |
Enable Bluetooth printing on your Brother Printer
| |
Please Note: If you try these steps and are still not successful in connecting with Bluetooth, contact Brother Support and ask for assistance. The 2.4 GHz limitation is specific to the printer, not to our product, so the Brother team can add additional insight into the WPA3 setup and other network components. | |
Please note: If you have issues with your Dymo Printer, please consult these resources.
|

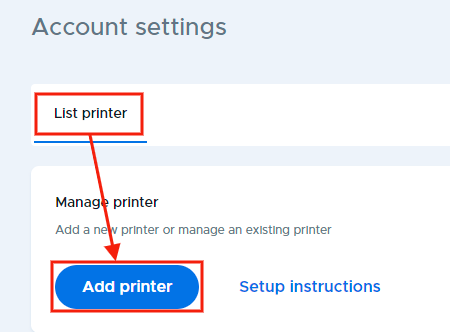
Next, go back to Printer Setup and click Add Printer. Select the brand of printer - brother or DYMO.
|
|
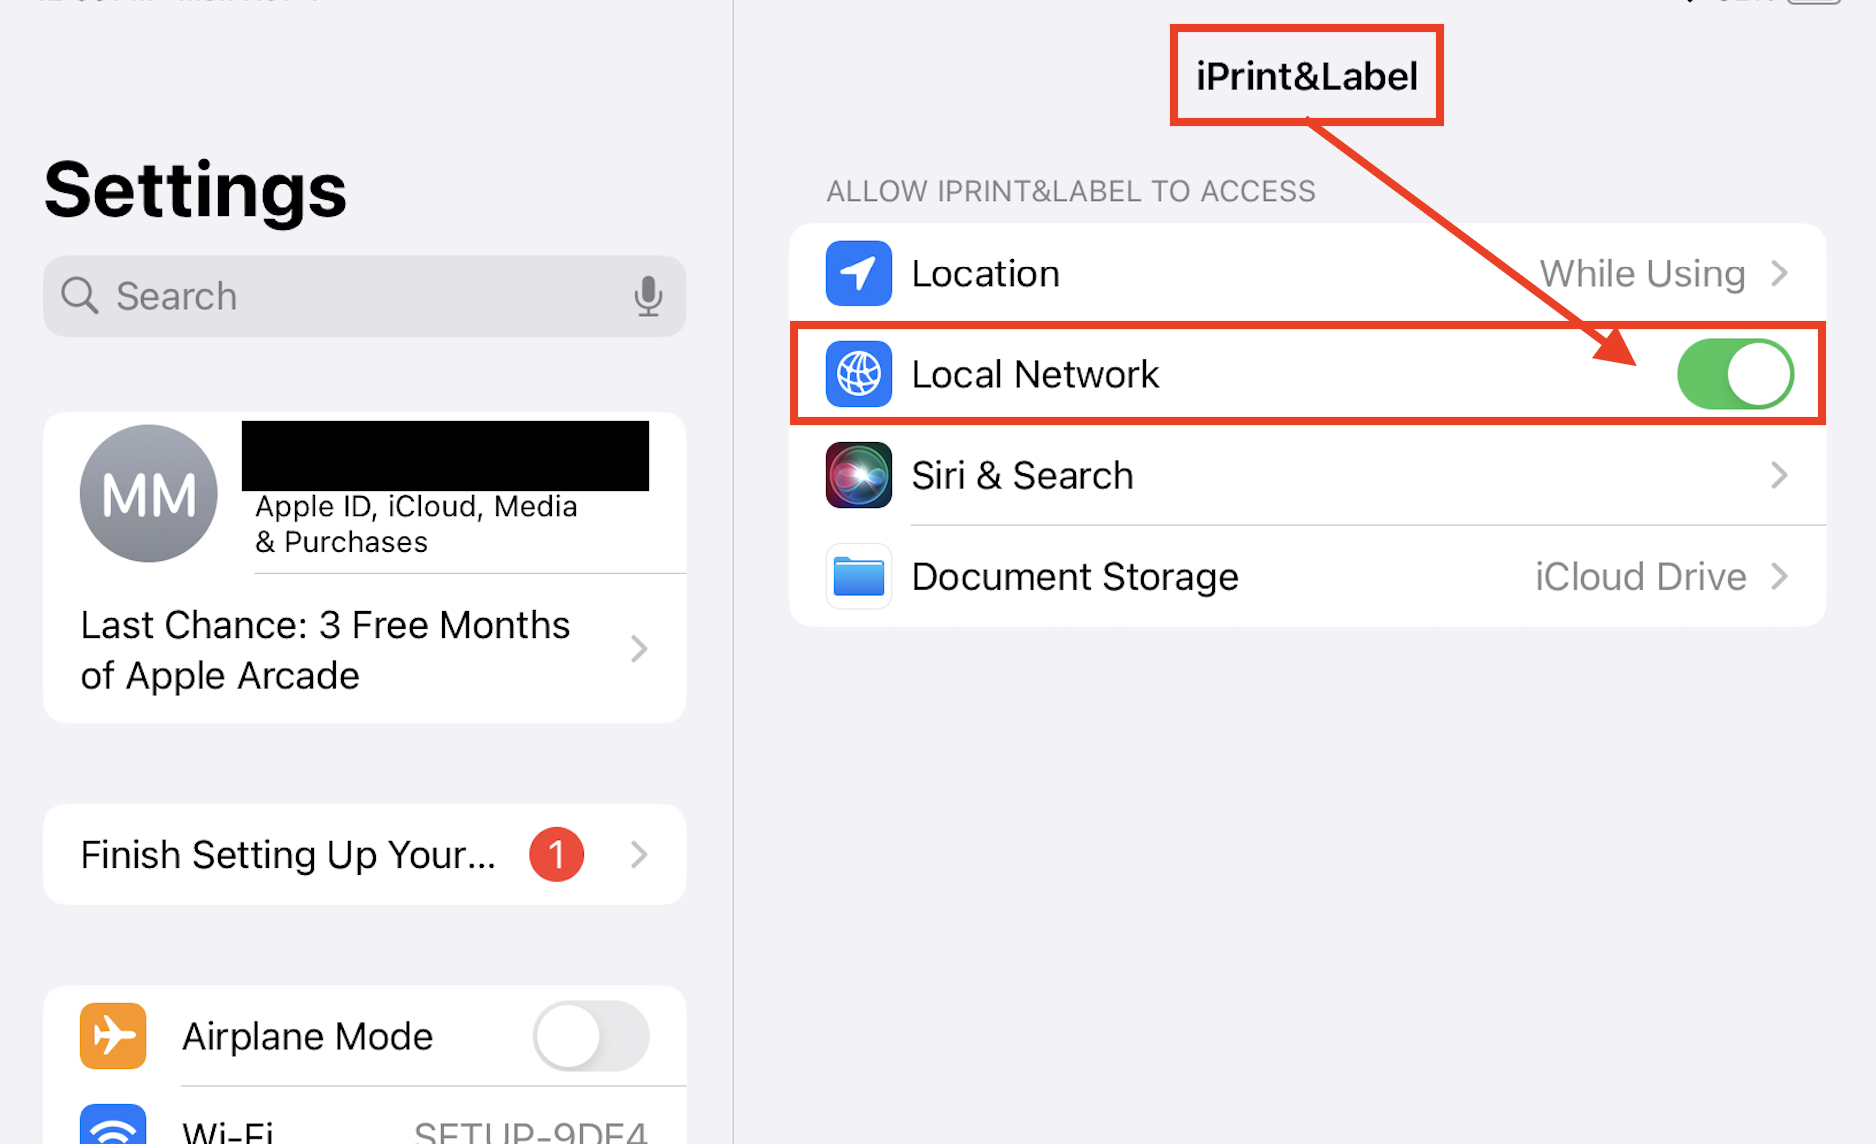
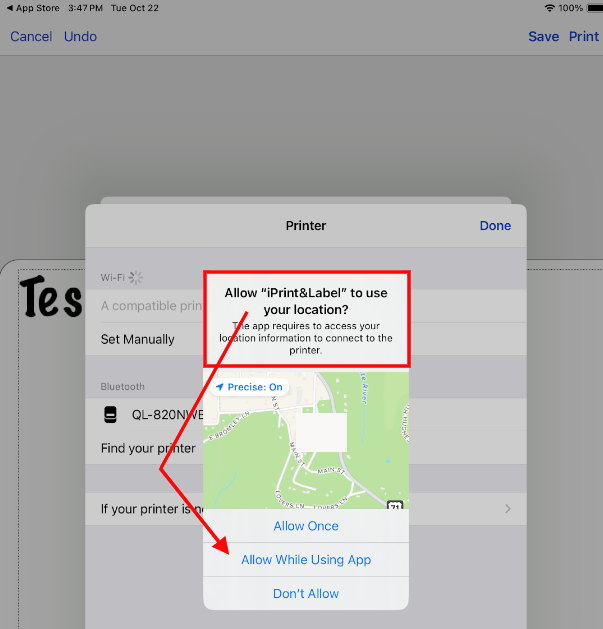
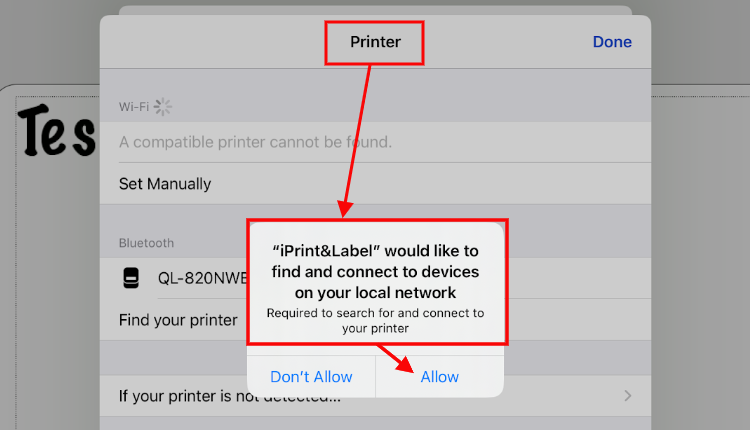
Setting up Printers in the Visitor iPad app
When installing and setting up the Securly Visitor app for the first time, you will be prompted to set up a printer. To access admin settings after you've already set up an iPad kiosk, tap and hold on the Welcome screen with two fingers. This will allow you to adjust any of the settings you set up initially, including adding a new printer. You can also test the selected printer, remove a printer, or change the selected printer.
Note: When adding a new printer, only AirPrint-enabled printers will be shown in the list.
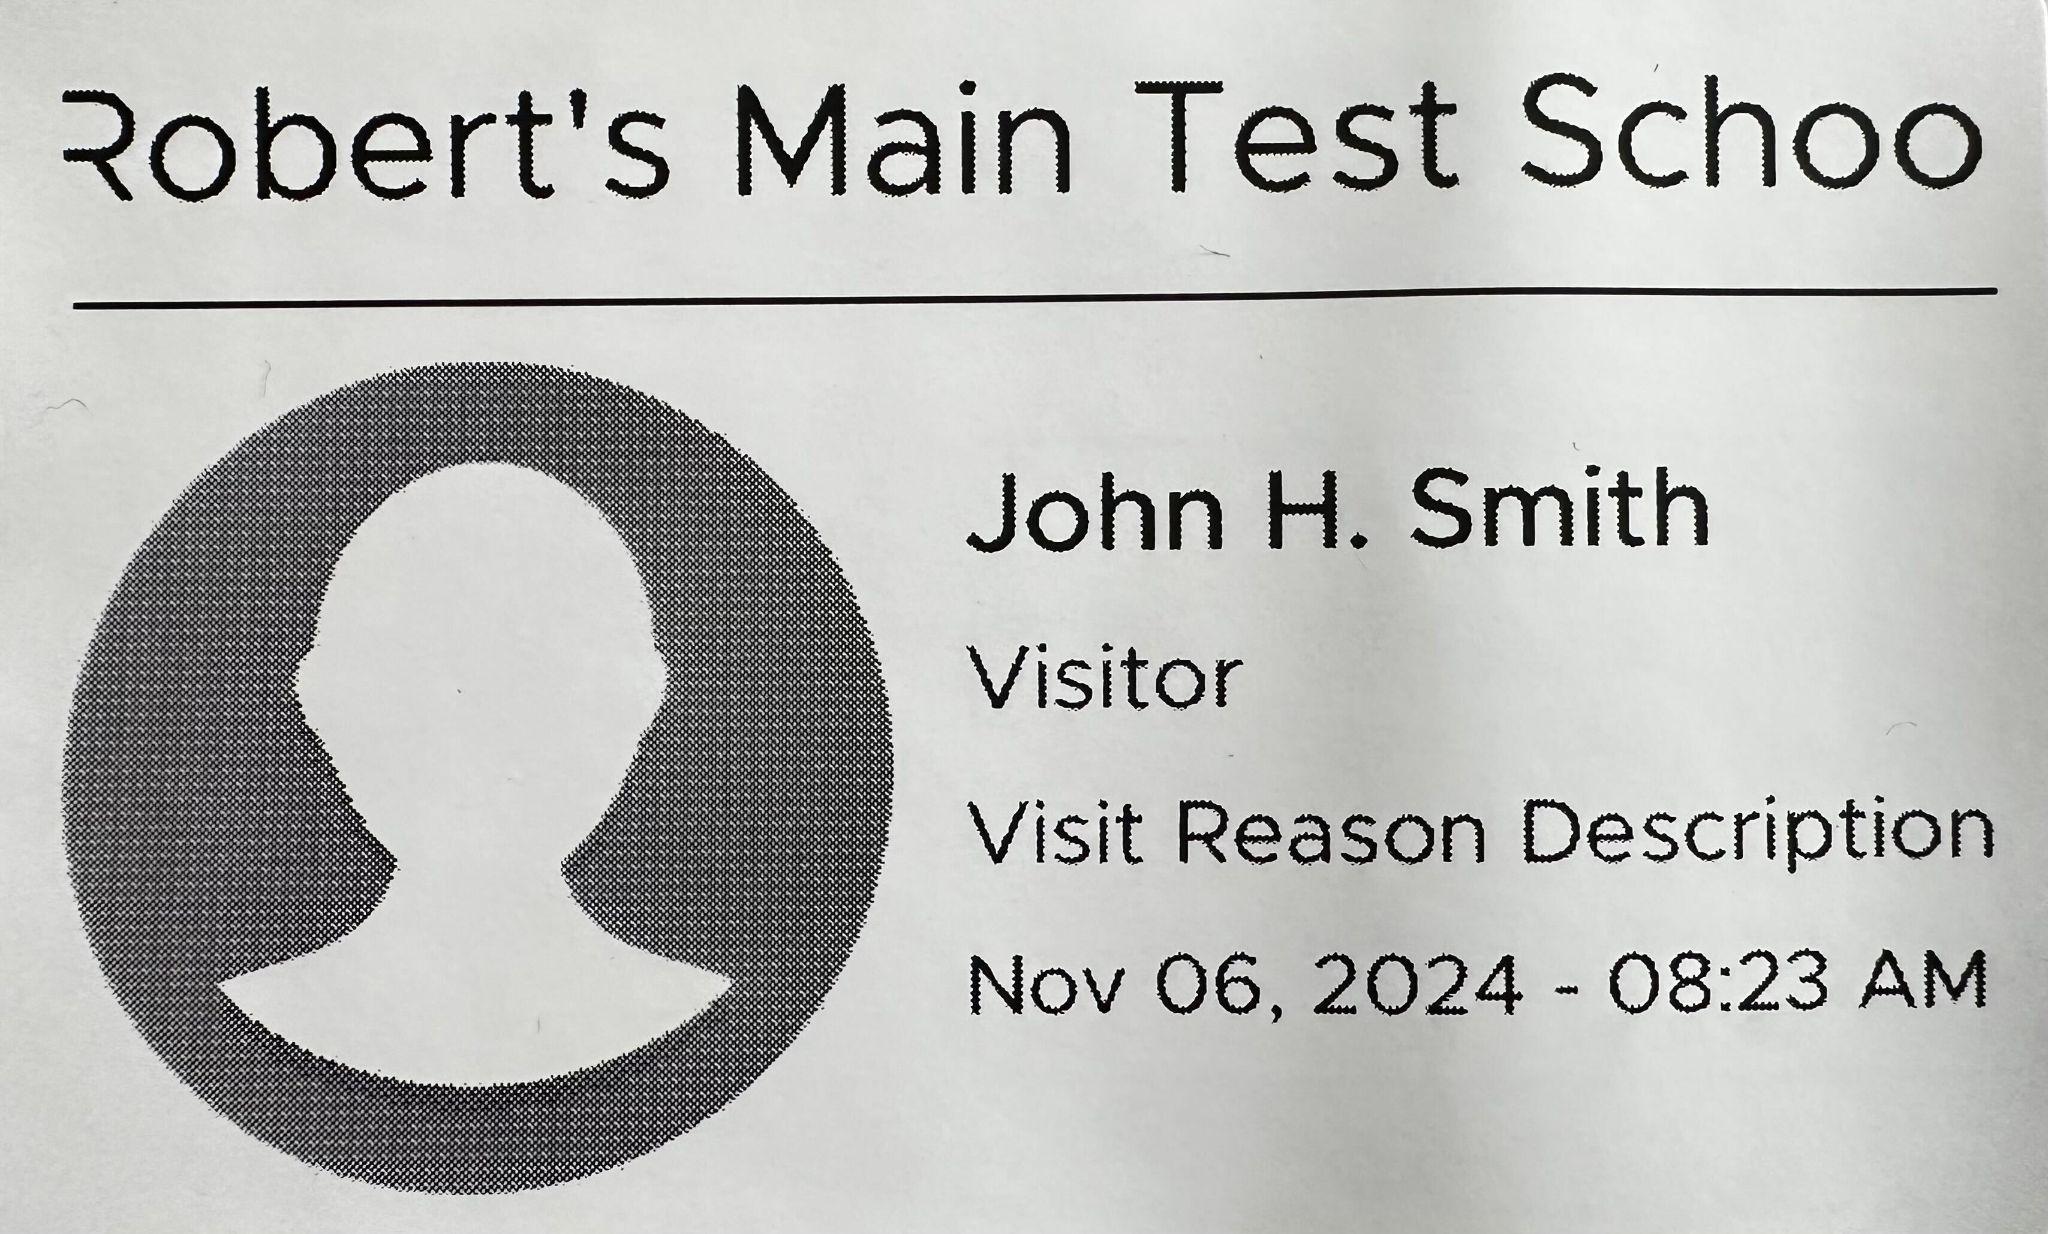
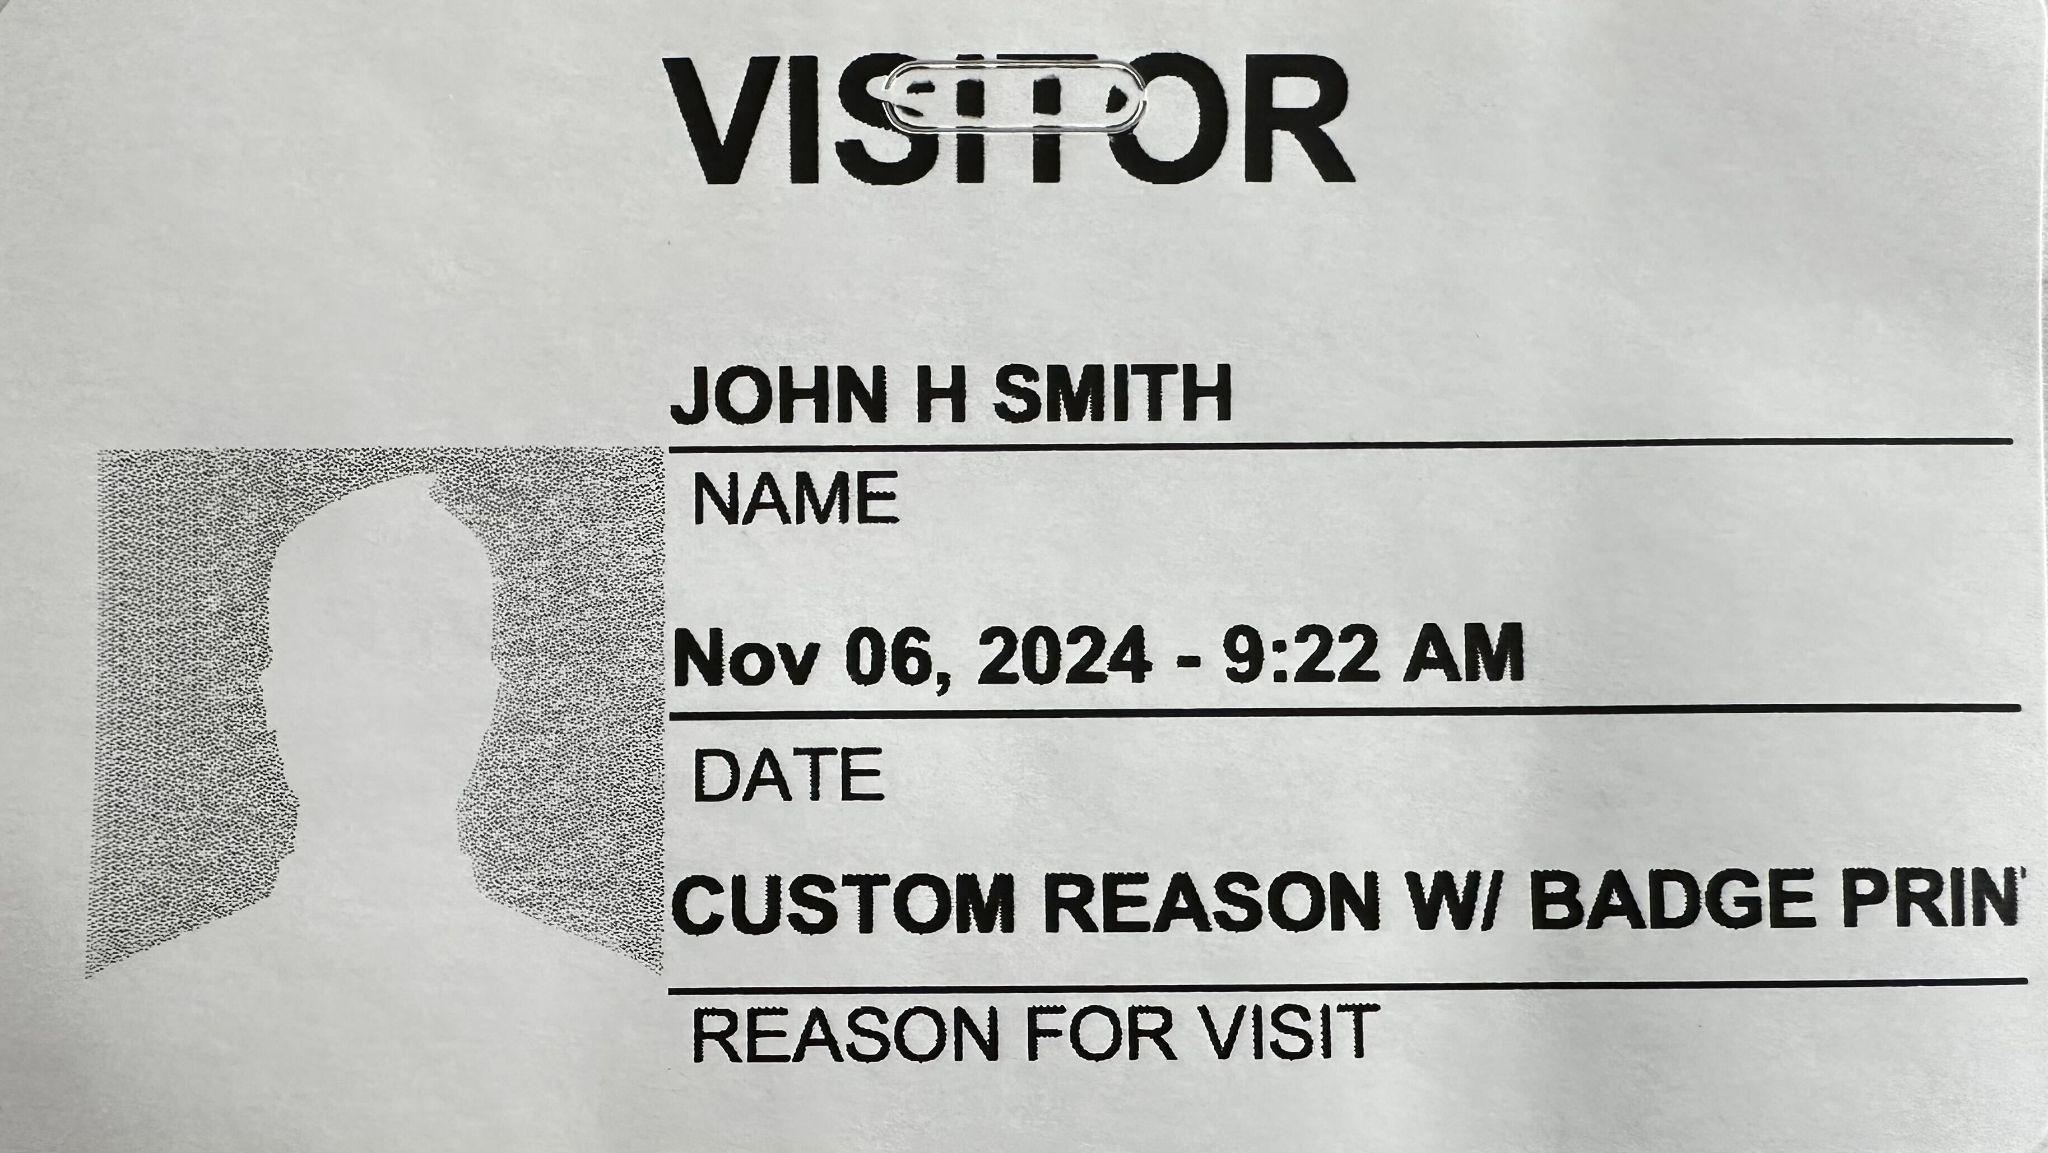
When your printer is set up, you are ready to print badges. The following information will be displayed and cannot be modified:
- Visitor’s name
- Visitor’s Picture (if Photo Capture is enabled)
- Reason for the Visit
- Date and Time
(The Destination is NOT printed on the badge.)
Below are screenshots of what the badge should look like based on your printer.
Brother - Web application | Brother - iPad | DYMO - Web and iPad |
|
|
|

External Camera Setup
You can use an external webcam or the desktop/laptop’s built-in camera to capture images of your visitors. To do so, under the Control Panel, click Visitor Settings, then Kiosk Settings, and then scroll down to Photo capture and toggle this feature on (to the right).
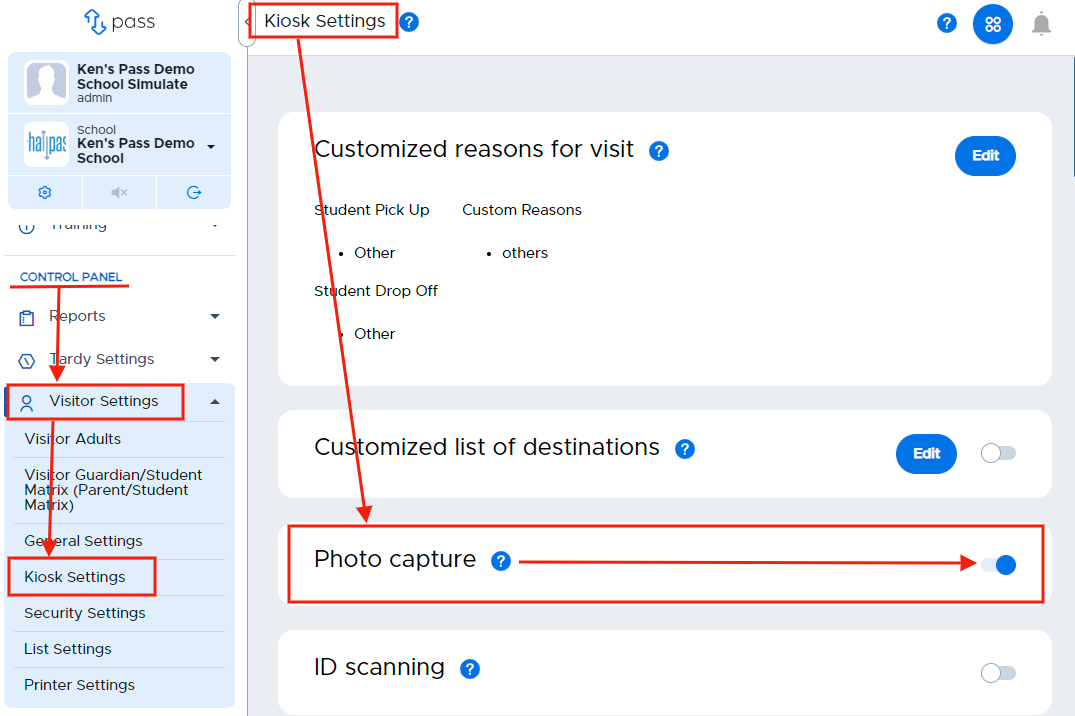
Once Photo capture is toggle on, click Visitor Management (above the Control Panel) and then Check-ins and Reports. Click the gear icon beside the Take photo box and select either iPad or Computer.
You are now ready to take a photo of a visitor. Click here for details on how to take a visitor’s photo.
Using Visitor for Check-ins / Check-outs
Schools have options when checking in guests.
Option 1 - They can have guests check in at the front desk or the kiosk, which will include running a background check, Watch List, etc. on each guest. (Most schools utilize this option.)
Option 2 - They can create a Pre-set Visitor List, which will only check if the visitor is on the list but will not run a background check, Watch List, etc. on the visitors on that list.
Checking in a Visitor
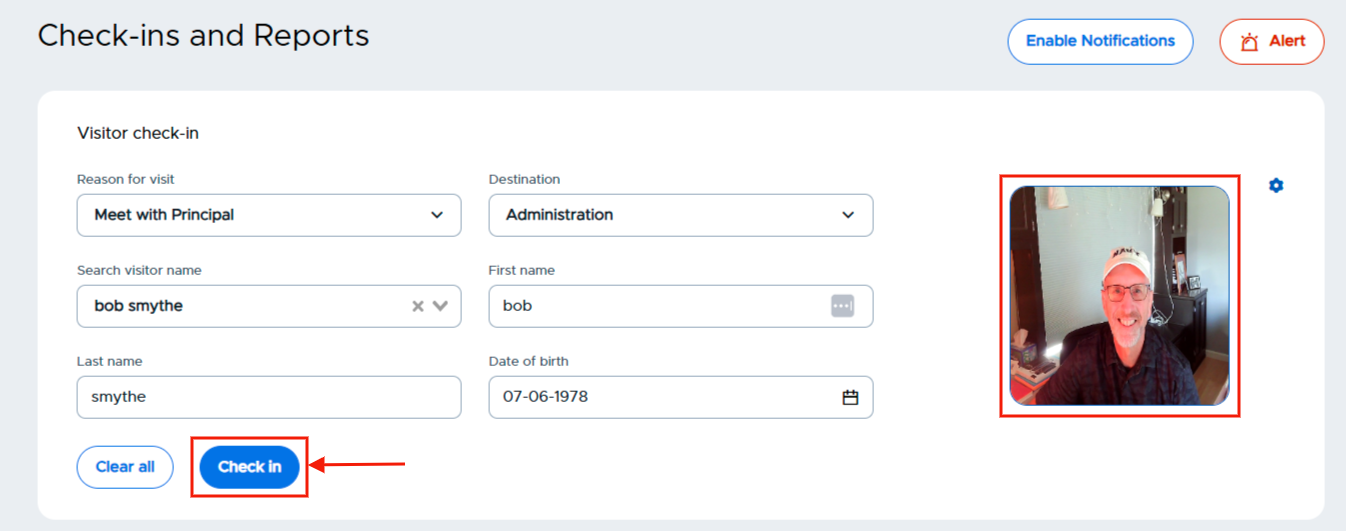
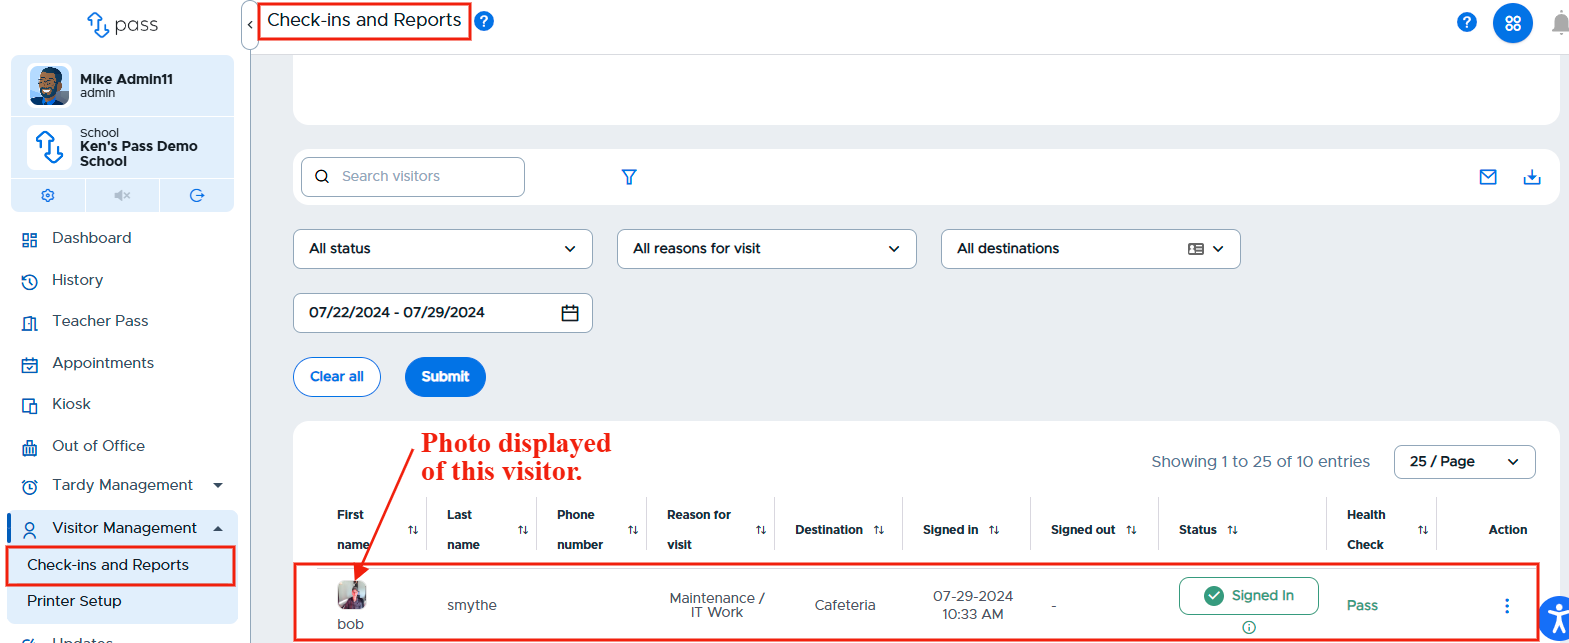
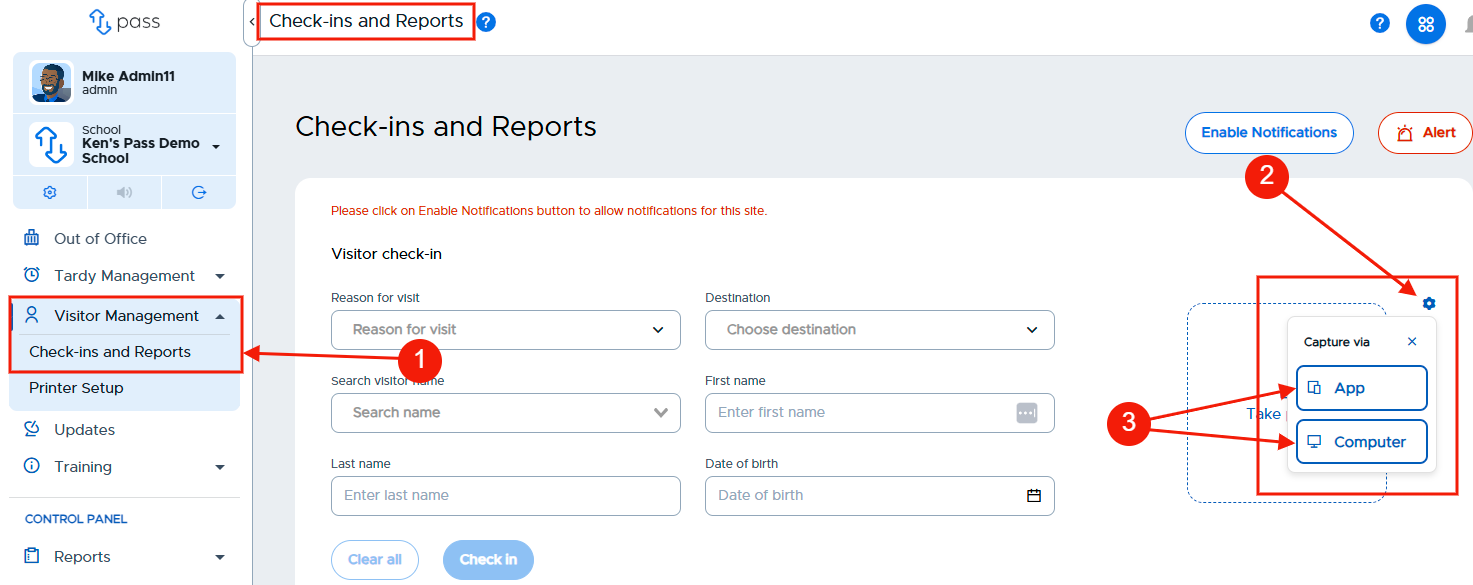
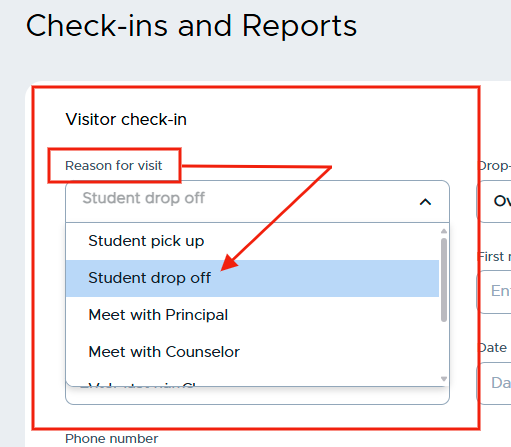
To check a new Visitor into the building, click Visitor Management and then Check-ins and Reports. The Visitor Check-in area will appear.
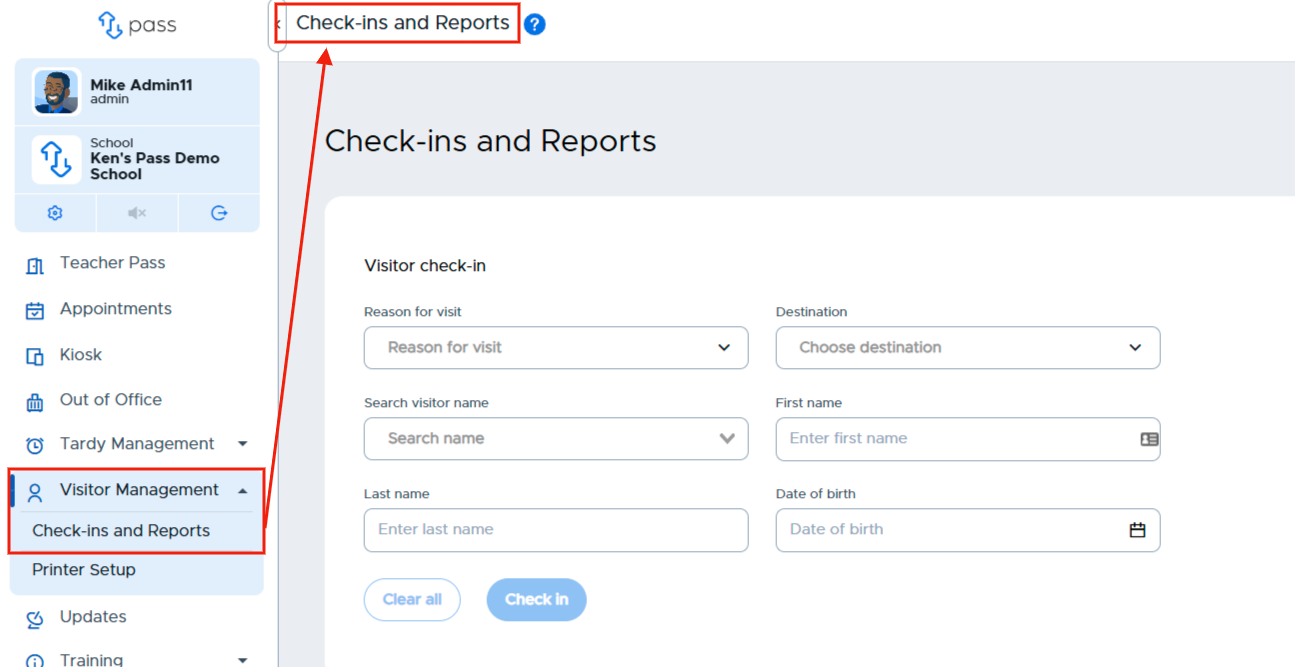
Click Choose a reason for visit, select a reason from the dropdown menu and an option, if available.
|
|
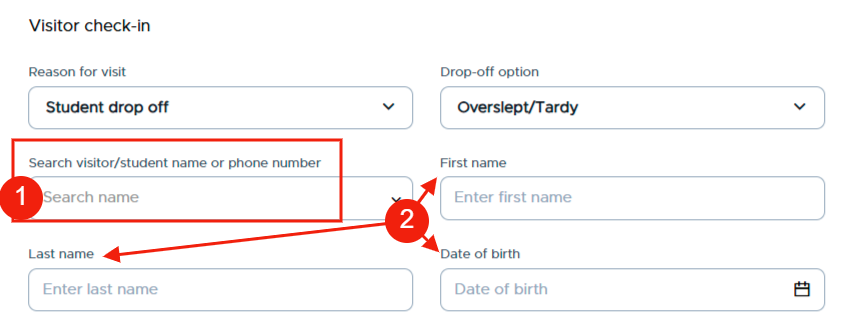
If the person has visited the school before, you can search for that person by name by entering the name in the Search visitor name (1) field. If the visitor is new (2), enter their first name and last name, as well as their date of birth.
|
You can click Take Photo to capture a photo of the visitor. This can be taken through a webcam connected to the front desk computer or through a connected iPad kiosk. You can click the gear icon next to the photo section to change which device captures photos.
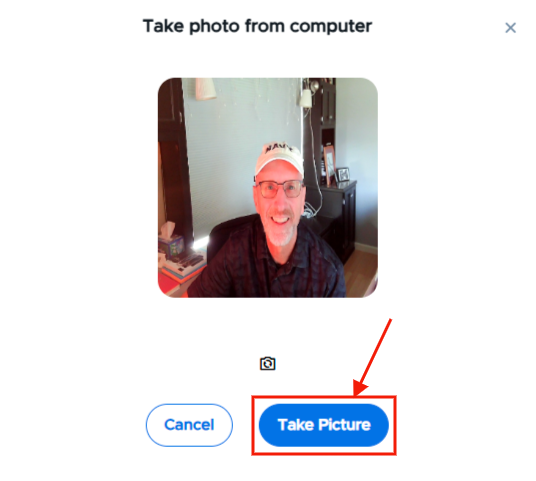
Once you’ve included all of the identifying information for the visitor, click Take photo.

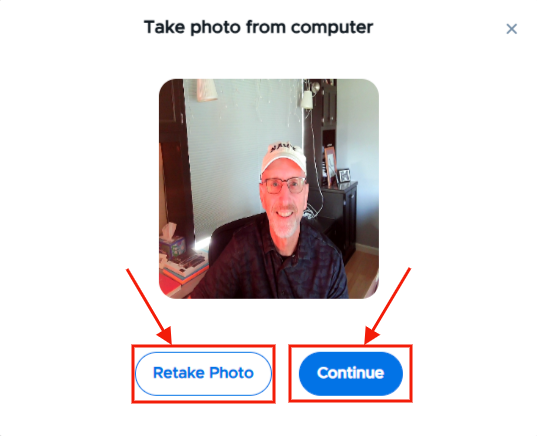
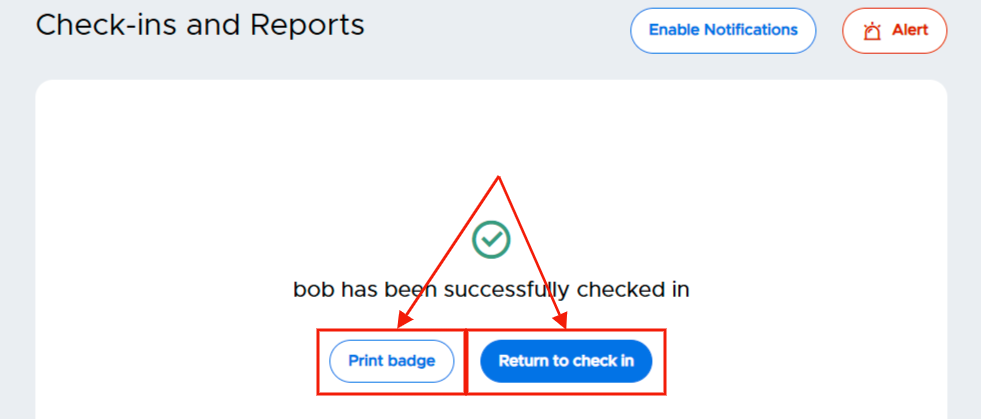
On the popup screen, click Take Picture. On the next popup screen, click Continue or Retake Photo. Back on the Check-ins and Reports page, click Check in. You can print that individual a badge (if enabled) or return to check in. Once checked in, that person’s name and thumbnail photo will appear on the Reports table.
|
|
| |
| |